Retiming Cameras In Nuke
How to apply a retime curve to a camera in Nuke…

If you have a camera that has been matchmoved to a scan and you later end up having to retime that scan, you can easily retime the camera in Nuke and avoid having to redo the camera tracking work.
In order to do this you can use a retime curve, expressed in frames, from the Kronos, OFlow, or TimeWarp node. For the other retiming nodes such as Retime and TimeOffset, the approach is a little bit different.
Kronos/OFlow
If you are retiming the scan using a Kronos/OFlow node, you can make a retime curve by changing the Timing dropdown menu (knob name: timing2) to Frame, and then setting keyframes just below, in the knob called timingFrame2.
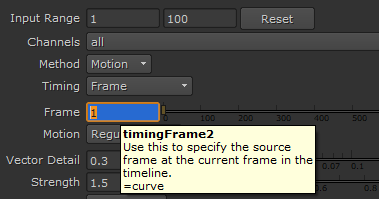
By retiming the scan this way instead of just setting the output speed, you will make a curve in the timingFrame2 knob which maps the retimed frame onto the current frame, for every frame. And we can use this curve to retime the camera.
To do that, open up the camera's properties. For each of the animated knobs in the camera (in all the tabs!), right click on the Animation menu button (the one with the squiggly curve all the way to the right of the animated values), and go to Edit expression.
The Animation menu button next to the translate animation.
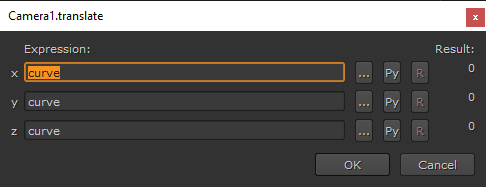
In the window that pops up, the expression will say curve which just means there are animated values stored in that knob, represented as a curve over time, and that the expression will output the value of that curve on the current frame. (The expression updates on every single frame, outputting the value of the curve for that frame).
The expanded expression curve(frame) would do exactly the same thing, just written more explicitly. Again, it just means: “Hey Nuke, look at this curve – what is the value on the current frame? Output that, please.”
Now, since we have retimed the scan we don’t want the expression to output the value of the curve as it is on the current frame. What we want is to change the expression so that it outputs the value of the curve as it is on the retimed frame instead. And with the retime curve that we created earlier, we can do just that.
So, instead of putting (frame) after curve in the expression, we replace that with the timingFrame2 from the Kronos node, like so:
curve(Kronos1.timingFrame2)
(In this example the Kronos node is named Kronos1).
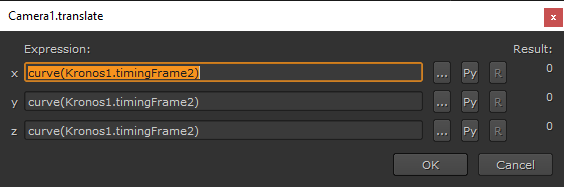
Remember to do this for all the animated knobs in the camera, and that’s it – you now have a retimed camera.
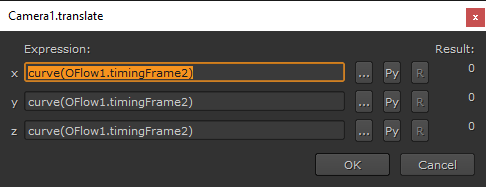
If you are using an OFlow node instead of a Kronos node, the method is exactly the same. Just swap out Kronos for OFlow in the expression, like so:
curve(OFlow1.timingFrame2)
(In this example the OFlow node is named OFlow1).
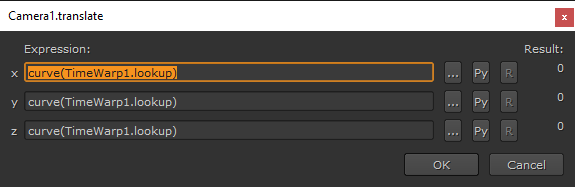
TimeWarp
If you are retiming the scan using a TimeWarp node, you can make a retime curve by setting keyframes straight in the knob named lookup.
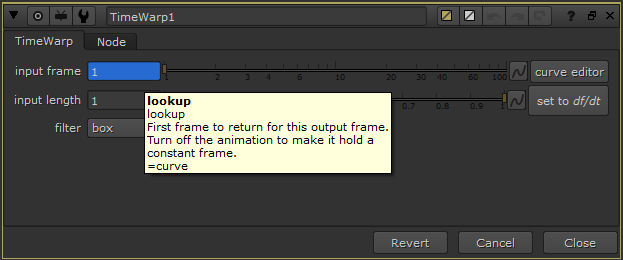
And in the camera you would change the expressions like so:
curve(TimeWarp1.lookup)
(In this example the TimeWarp node is named TimeWarp1).
Retime
As mentioned at the beginning, if you are retiming the scan using a Retime node, the approach is a little bit different. You start by setting your speed and then compare the input range and the output range.
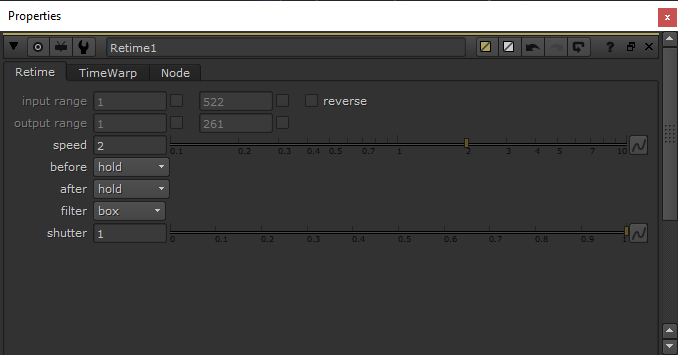
Then, transfer those values into for example a TimeWarp node: Go to the first frame of the output range and set a keyframe in the TimeWarp node with the corresponding value from the first frame of the input range. In the example above, both are 1. So on frame 1 set a keyframe with value 1 in the TimeWarp’s lookup knob.
Next, go to the last frame of the output range and set a keyframe in the TimeWarp node with the corresponding value from the last frame of the input range. In the example above, you would go to frame 261 and set a keyframe with value 522 in the TimeWarp’s lookup knob.
Now you have a retime curve which you can use in the expressions in your camera like described in the TimeWarp section.
Note: If you in addition to the speed are also changing the input range and output range in the Retime node, you will have to manually calculate how many frames that offset equates to and add that into the expression like so:
curve(TimeWarp1.lookup + 10)
(In this example the TimeWarp node is named TimeWarp1, and the additional offset is +10 frames).
TimeOffset
If you are retiming the scan using a TimeOffset node, you can just select all the keyframes in your camera in the Dope Sheet and move them over the same amount of frames as the TimeOffset.
If you wanted to add an expression, however, you would use the time_offset knob from the TimeOffset node, like so:
curve(frame + TimeOffset1.time_offset)
(In this example the TimeOffset node is named TimeOffset1).
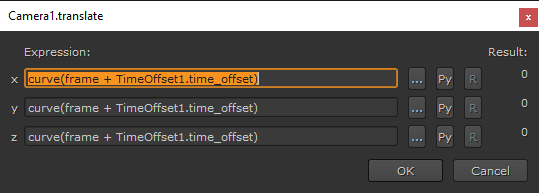
This expression simply takes the current frame and applies the time offset value to it in order to get the retimed frame. Then outputs the value of the curve on that frame.
Baking The Expressions
If you for instance want to export your camera as an Alembic file from Nuke, you will need to bake the expressions you have made into raw keyframes. To do this, right click on the Animation menu button for each animated value in the camera which has an expression in it, then go to Edit → Generate. In the window that pops up, select the frame range you want and hit OK to bake the expression into keyframes.
Versatile Technique
This technique of retiming animations using expressions works not only for cameras but also for any other node in Nuke with animation on it. If you for instance have 2D tracked your scan, and later retime the scan, you can apply the same expressions in the exported Transform_MatchMove node, for example. Or if you have animated a Grade node to match flickering in the scan, you can retime that animation as well.
I hope you found this tutorial useful. For more Nuke tips & tricks, see Nuke.


