The Hidden Number In Nuke
When you create Groups or Gizmos in Nuke, there is a hidden number that you should keep in mind…

When you create Groups or Gizmos in Nuke, there is a hidden number that you should keep in mind.
How To Find The Hidden Number
Each Input node in a Group or Gizmo has a hidden number ID assigned to it. You can find it by typing/pasting the following TCL snippet into the label of the Input node:
[value number]
The hidden knob is simply called “number”.
Using The Hidden Number In Practice
Each hidden number is assigned chronologically. The first Input node that you create gets the hidden number 0. The second gets the hidden number 1, and so on.
The first Input node (with the hidden number 0) is the primary input, and the Input nodes with hidden numbers higher than 0 are all secondary inputs.
That means, the Input node with the hidden number 0 should be your main input in the Group/Gizmo node. When you disable the Group/Gizmo node, that’s the input that will get piped through. (On your Group/Gizmo node, it’s the rightmost input pipe).
The second, third, and so forth input pipes get added to the left of the main one, in order, from right to left.
0 = 1
Just to confuse things, when you create an Input node, the default name is Input1. Anything after “Input” in the node name is what gets shown as the pipe label, so the first pipe is by default named 1. That means, by default, the hidden number 0 corresponds to pipe number 1. And, as you may have guessed, the hidden number 1 corresponds to pipe number 2. And so on.
💡 If you want the pipe label to say for example “img”, you can either change the corresponding Input node’s name to “Inputimg”, or just “img”.
A Bug In Nuke
Below, I have created four Input nodes inside a Group. By default, the pipes on the Group node are labelled 1, 2, 3, and 4. (Hidden numbers 0, 1, 2, and 3, respectively).
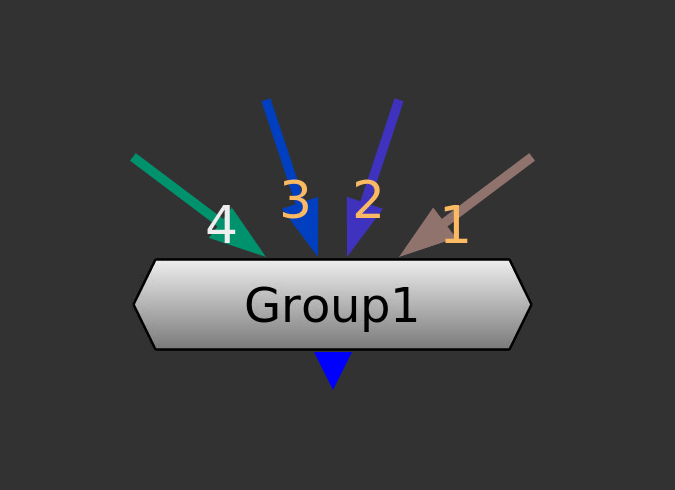
A Group node with 4 inputs.
One thing to watch out for is when you delete an Input node with a hidden number that’s in between a lower and a higher hidden number. Nuke doesn’t reorder the remaining Inputs. The deleted in-between inputs become dead inputs with no function, like this:
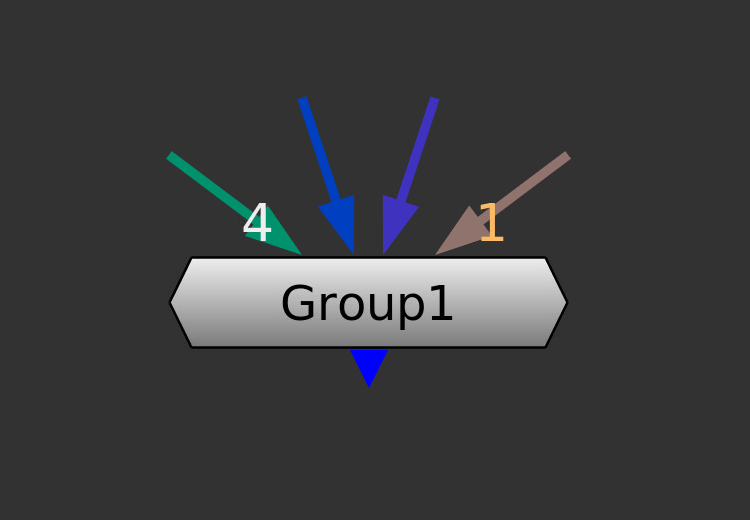
After deleting the Input2 and Input3 nodes, they become dead inputs on the Group node.
That’s because the last input still exists, with a hidden number that is still a value of 3.
To fix this, delete the last input(s), and recreate it (them). Nuke will release the dead inputs and pick up counting from the last correct hidden number.
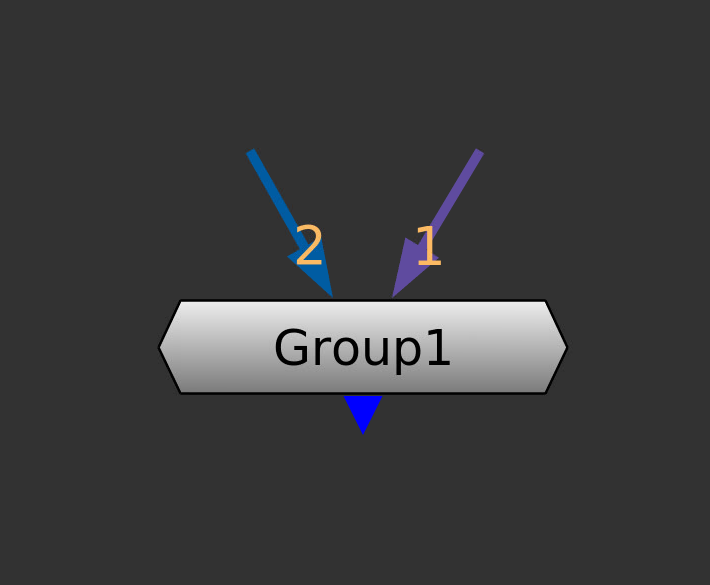
Corrected inputs (4 is now 2).
You can also change the hidden numbers by copy/pasting the Group to a text editor and changing the value next to where it says number.
💡 The main input (0) won’t have the number line, but the secondary inputs will.
In the example Group below, you can see that Input2 has been assigned the number 1 (on line 12):
Group {
 name Group1
 selected true
 xpos -1508
 ypos 2503
}
 Input {
  inputs 0
  name Input2
  xpos -167
  ypos 152
  number 1
 }
 Input {
  inputs 0
  name Input1
  xpos 0
 }
 Copy {
  inputs 2
  from0 rgba.alpha
  to0 rgba.alpha
  name Copy1
  xpos 0
  ypos 146
 }
 Output {
  name Output1
  xpos 0
  ypos 300
 }
end_group
💡 If you change the hidden numbers manually like this, make sure that every Input node has a unique hidden number. If not, the setup will break in Nuke.
After you finish editing the hidden numbers, copy/paste the text back into Nuke. The dead inputs should be gone.
Other Uses For The Hidden Number
Once you know the hidden numbers of your Input nodes, you can make some useful expressions.
A classic one is to check whether or not a certain input is connected to anything, and disable a node inside your Group if it’s not. It’s typically used to avoid getting error messages when an input isn’t connected, for example the alpha channel for a mask input.
To do that, you can add the following expression to the disable knob of a node inside your Group:
![exists parent.input1]
(Change the number marked in red to the relevant hidden number for the input you’re interested in).
Let’s break down the above expression in plain English:
The whole expression is a True or False question – what’s called boolean logic.
The exclamation mark means Not, i.e. whatever comes next, do the opposite. If what comes next is True, output False. And, if what comes next is False, output True.
True and False in this case equal a value of 1 and 0, respectively. So, the exclamation mark effectively means: If what comes next equals 1, output 0. And, if what comes next equals 0, output 1.
The square brackets mean that there is a command inside that needs to be evaluated, and the result of that calculation will replace the square brackets and everything within.
The command starts with exists, which simply checks if something exists. And what it checks, in this case, is whether or not the input with the hidden number 1 has a parent, i.e. is connected to something.
Once that command has been evaluated, the result will either be True/1 (there is an input connected) or False/0 (there is no input connected).
So, the whole expression outputs a value of 0 if there is something connected to the input, and a value of 1 if nothing is connected to the input.
By adding the expression to the disable knob, the node will be enabled if something is connected to the input, and disabled if nothing is connected to the input.
I hope you found this tutorial useful. For more Nuke tips & tricks, see Nuke.


