Painting Distortion In Nuke
⭐ How to accurately paint distortion to specific areas of your image…
⭐ How to accurately paint distortion to specific areas of your image…
This article contains a Companions Exclusive Tutorial at the end
Similar to Painting Motion Blur In Nuke, you can also paint distortion in your image. You just need to change the setup a little bit.
It looks like this:
Painting distortion.
This is very useful when you need to nudge just a part of your render or scan into place, for example if there is a slight mismatch in the line up between the CG and the scan.
Here is the setup:
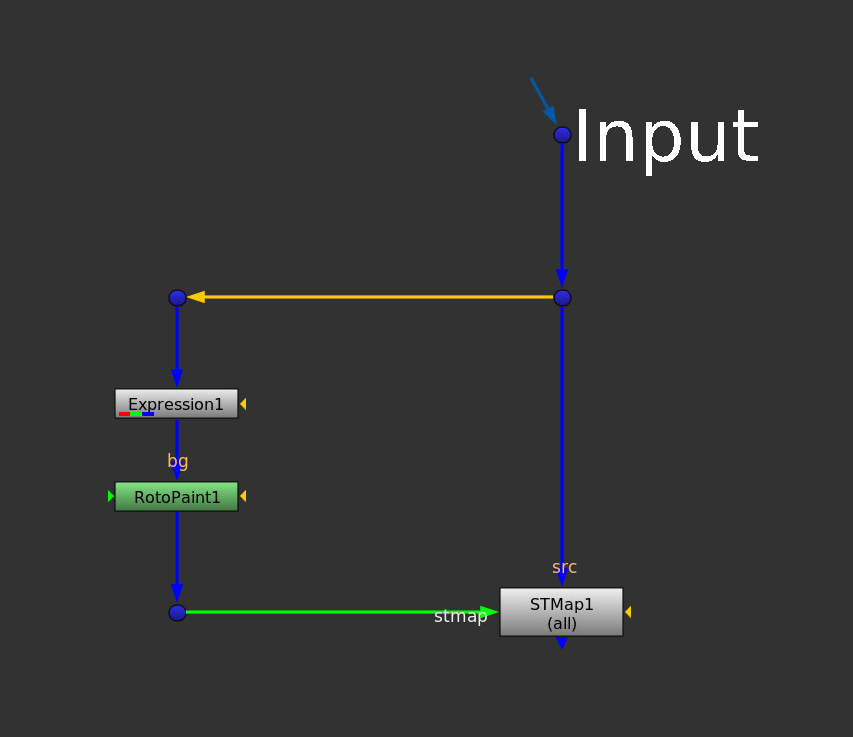
The setup for painting distortion.
Start by creating an ST map, using an Expression node with these expressions:
(x+.5)/width
(y+.5)/height
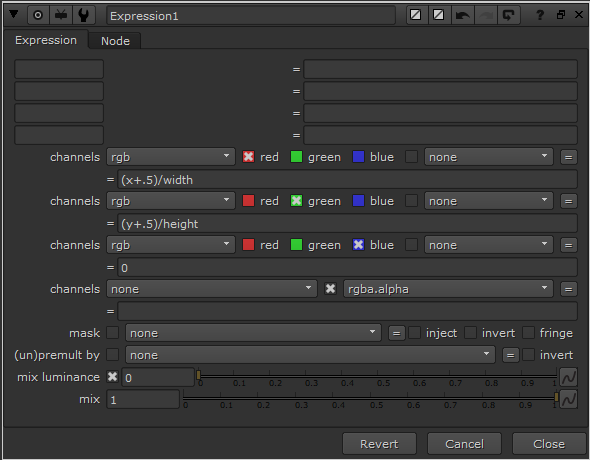
Expressions for making an ST map.
Connect the Expression node to your input so that it picks up the correct format.
Then, connect a RotoPaint node below the Expression node.
💡 When you use the Smear tool in the RotoPaint node, you shift the coordinates in the ST map around. This tells the STMap node how to distort your image.
Next, connect an STMap node to your input and connect the RotoPaint node into its stmap input.
In the STMap node, set the UV channels to rgb, like this:
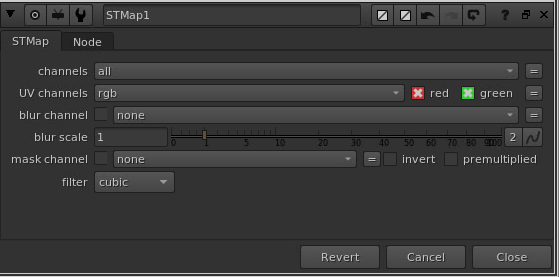
The STMap settings.
Et voilá! You can now paint distortion in your image.
💡 Change the opacity of each stroke in the RotoPaint node to adjust the strength of the distortion, and lower the brush spacing value in the Stroke tab to smooth out the strokes.
The difference between doing it this way, and just simply smearing the image directly, is that you get a clean distortion without the smudging that the Smear tool usually adds. (Copy the RotoPaint node and connect it directly to your image to see the difference).
If you want to get creative and make an interesting effect, you can paint your distortion and then animate the brush strokes using the write on start or write on end knobs in the Stroke tab.
For example, if you animate the value in the write on end knob between 0 (no stroke) to 1 (100% of the stroke), you reveal the distortion over time. Make sure the brush strokes have a long enough lifetime set.
I hope you found this tutorial useful. For more Nuke tips & tricks, see Nuke.
Companions Exclusive Tutorial: Making A Setup With Even More Control
As a thank you to all Companions, I have added a bonus tutorial below.
If you change up the setup, you can gain even more control over your distortions:
