How To Make A Slapcomp In Nuke
A guide for building a basic slapcomp in Nuke: How to get the fundamentals right and avoid problems later on…

A guide for building a basic slapcomp in Nuke: How to get the fundamentals right and avoid problems later on…
Who This Guide Is For
This guide is intended for the lighters and FX artists out there, who are perhaps not so familiar with using Nuke.
That said, it also applies to junior compositors who want to learn a basic approach for building CG + live-action composites.
What We'll Make
In this guide, we'll build three simple setups in Nuke for making lighting/FX slapcomps:
- A setup for full-CG shots.
- A setup for shots in which the scan goes on top of the CG. E.g. when you're replacing the background in the shot.
- A setup for shots in which the CG goes on top of the scan. E.g. when you're inserting a CG object into the scan.
And while building these setups, we'll look at best practices as well as pitfalls to avoid along the way.

The setups we'll be building.
Let's get into it.
Building The Slapcomps
Each setup is super simple, and we’ll build them in the order above.
Making A Nuke Script
First, make a fresh Nuke script and save it under your relevant shot directory.
Most studio pipelines will have automation in place for opening and saving scripts, so this will vary between different companies.
The important thing is to save your script under the correct shot, and give it a sensible name, such as:
[project]_[sequence]_[shot]_lighting_slapcomp_v001.nk.
Importing All The Elements
Next, import all the relevant files that you will need into this Nuke script:
- The scan (and any retime or extraction associated with the scan).
- The CG beauty render(s) and all the CG render passes.
- The lens distortion node for your shot camera.
- Any roto available for the shot.
- Any prep available for the shot.
Again, this process will be different depending on which company you work at. Many have their own, custom importers.
The basic way of importing your elements is to click on an empty area in the Node Graph in Nuke and press R (for Read) to bring up the file browser. Navigate to, and select the files you want to import and then click Open.
Once you have everything you need in the Nuke script, you can start making the slapcomps.
We’ll build each section of the three setups, one step at a time.
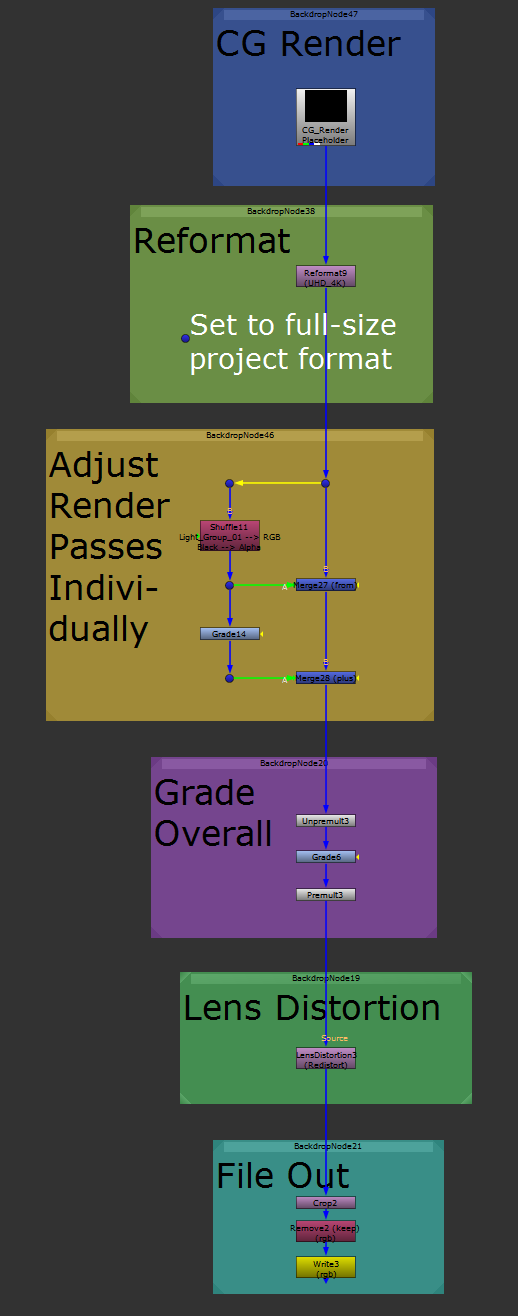
The Full-CG Setup

The Full-CG setup.
You’ll have noticed when comparing the three setups introduced before, that a large portion remains the same between each setup.
Everything we will build for the full-CG setup, we’ll also be using for the other two setups, so let’s start with these shared nodes:
Backdrop: CG Render
Typically, you'll have imported an EXR image sequence which has the beauty render in the RGBA channels and all the render passes embedded as additional layers.
Place that render in this backdrop.
If you instead have imported the render passes as individual image sequences, you would only put the beauty render here.
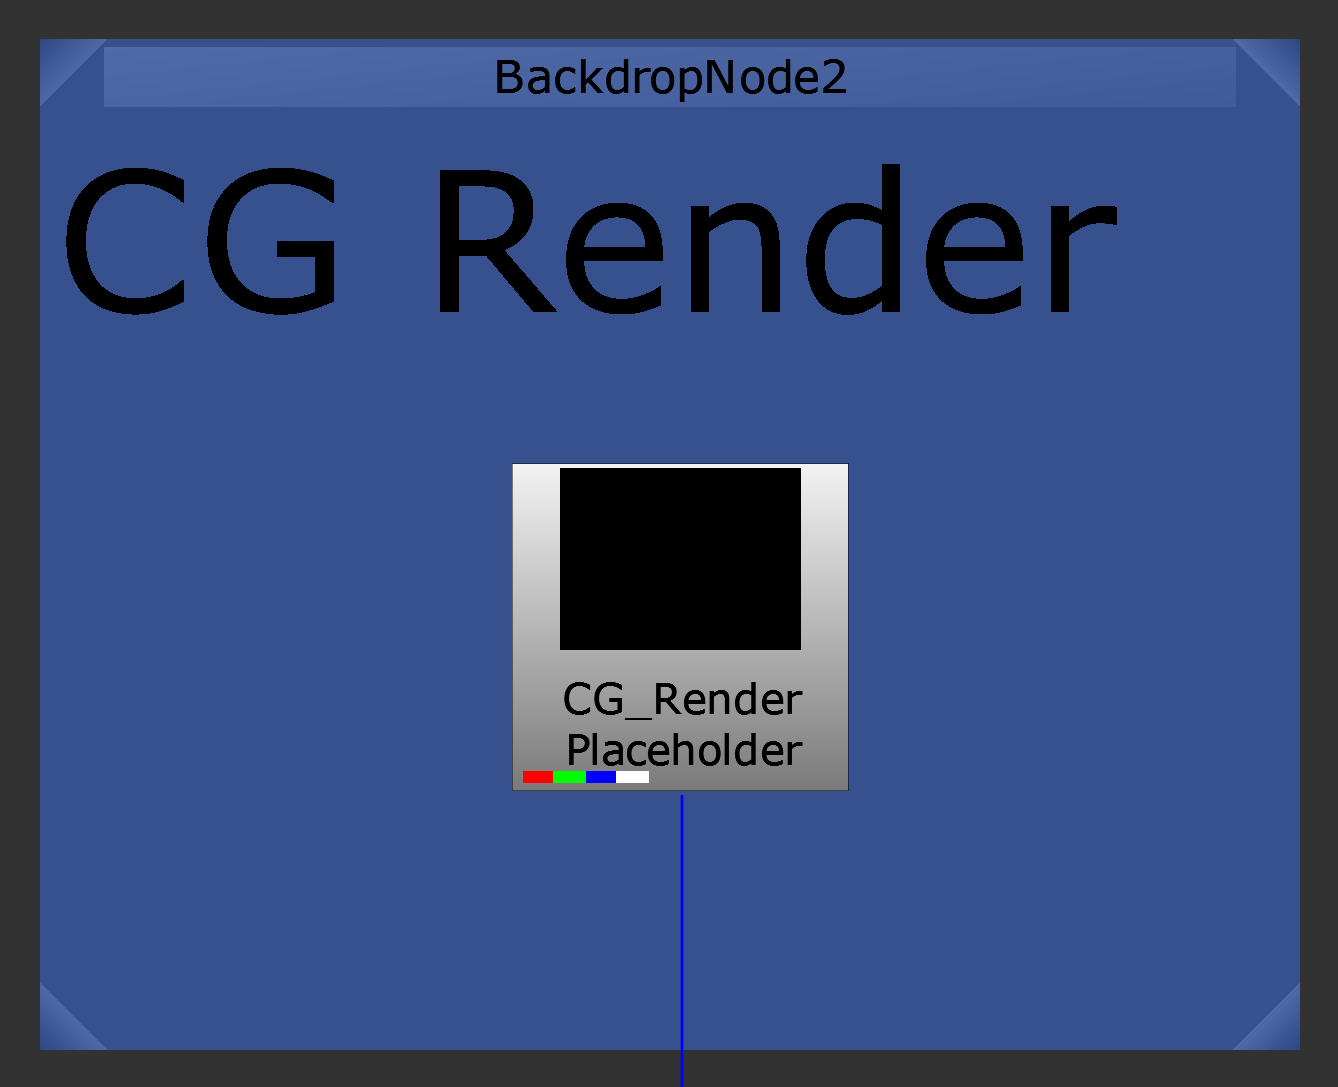
Starting with the CG render.
Backdrop: Reformat
Often, you’ll be rendering your CG with a lower resolution than the full-size project format, in order to save time.
Especially for WIP renders early on in the project.
And so, in order to make sure everything lines up as expected in the slapcomp, add a Reformat node after your CG render, and set the output format to the full-size project format.
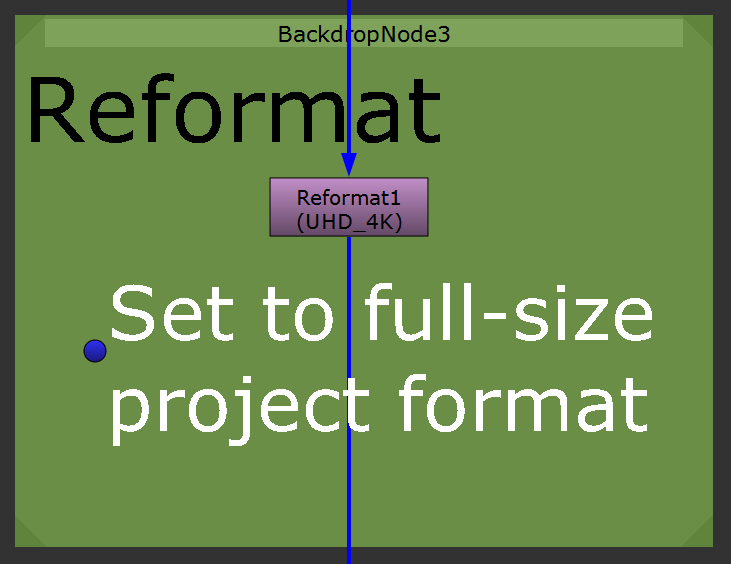
Reformatting the CG render to the full-size project format, in this example UHD_4K.
Backdrop: Adjust Render Passes Individually
Next, make any changes intended for the individual render pass contributions.
There are two ways of doing this:
- The additive method, which involves shuffling out all of the render passes and combining them together in a full beauty rebuild.
- The subtractive method, where you only shuffle out the render pass that you want to change.
The first method would need a whole other tutorial as the setup gets much more complex (and you shouldn’t need it for a slapcomp, anyway), and so we’re going to use the second method.
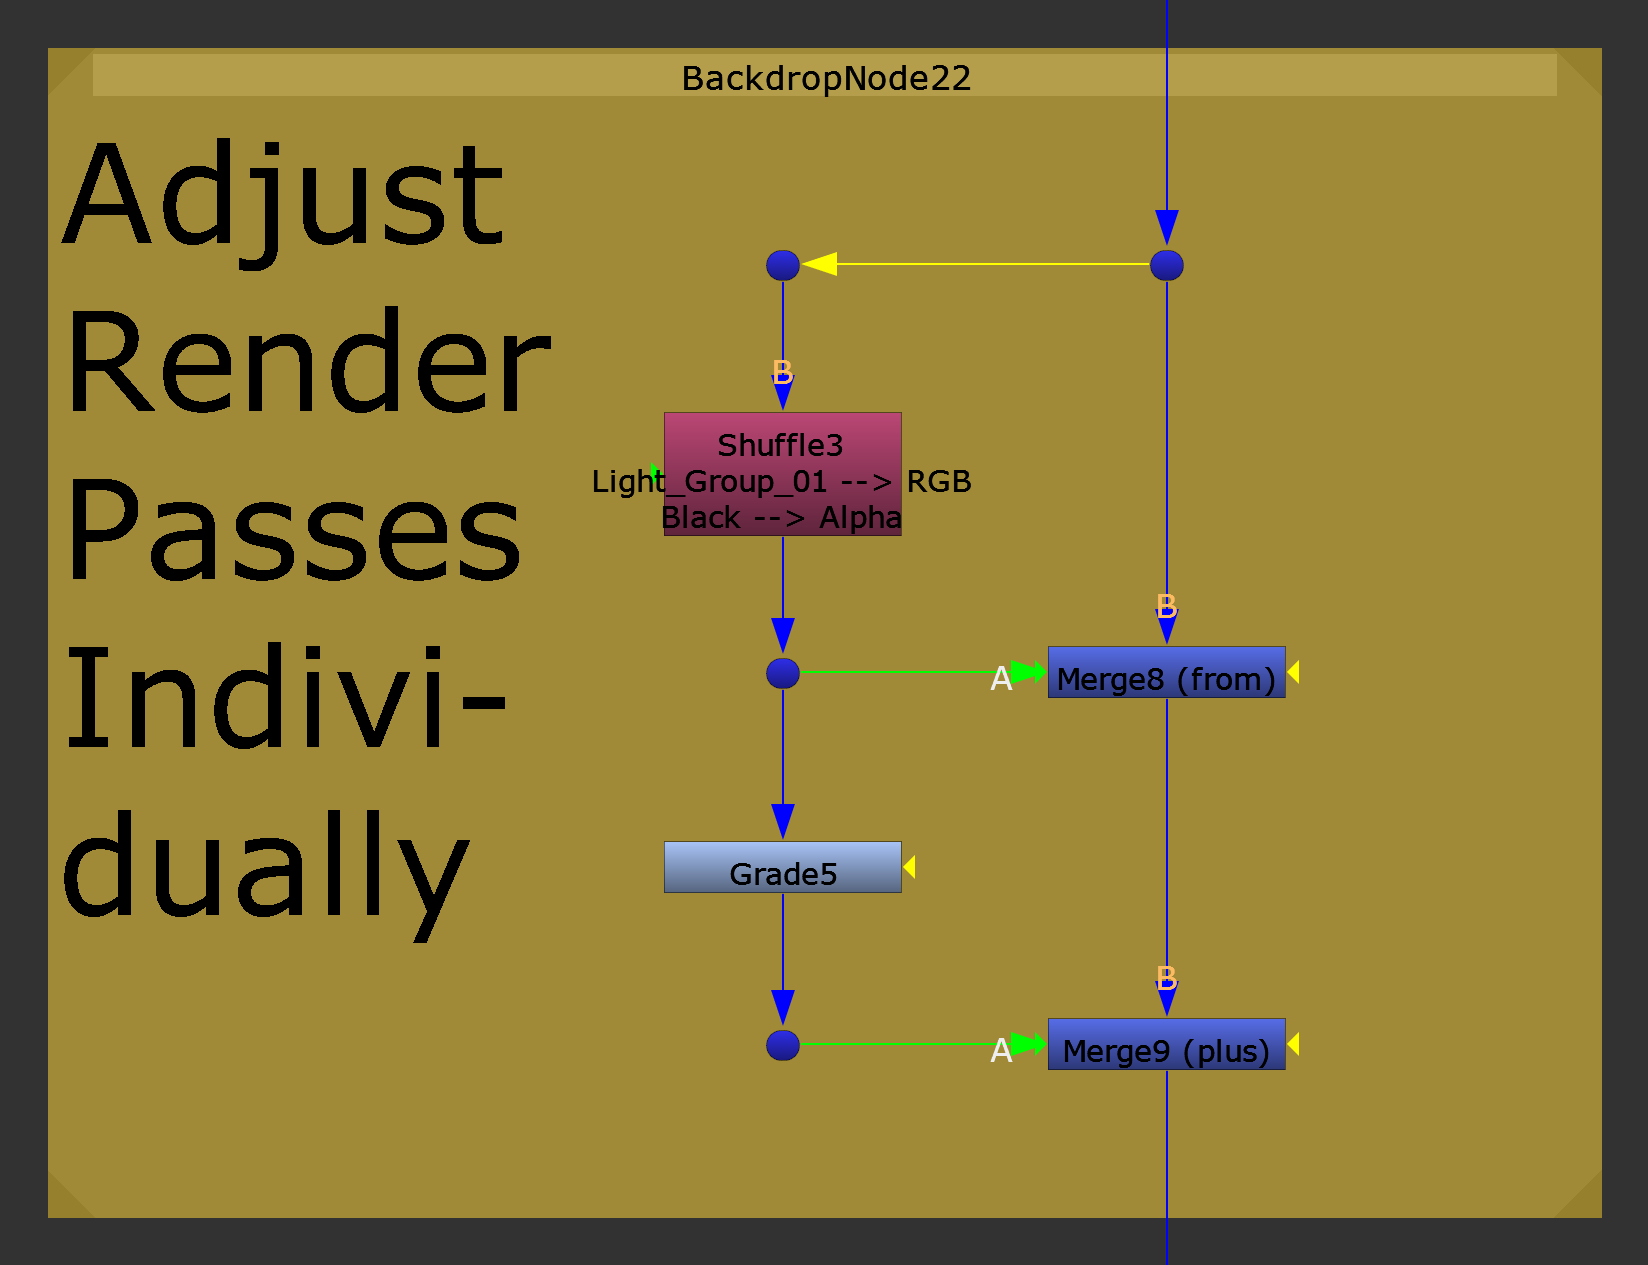
Adjusting the render passes individually.

Shuffling the Light_Group_01 into RGB and setting the alpha to black.
- Using a Shuffle node branched off from the main pipe, shuffle the render pass that you would like to adjust into the RGB channels. (In this example, Light_Group_01).
- In the same Shuffle node, set the alpha to black to avoid any alpha issues.
- Then, Merge (from) the shuffled out render pass (A) with the beauty (B). In the main pipe, you will now have removed the contribution of that specific render pass from the beauty.
- Branching out again, grade the shuffled out render pass in a new pipe, and Merge (plus) the graded result (A) with the output of the Merge (from) node in the main pipe (B). Now, you will have reintroduced the contribution of the render pass to the beauty, including any changes you have made to the pass. You can change the colour of the render pass’ contribution, or make it brighter or darker. And you can even stencil out sections of it that don’t work too well.
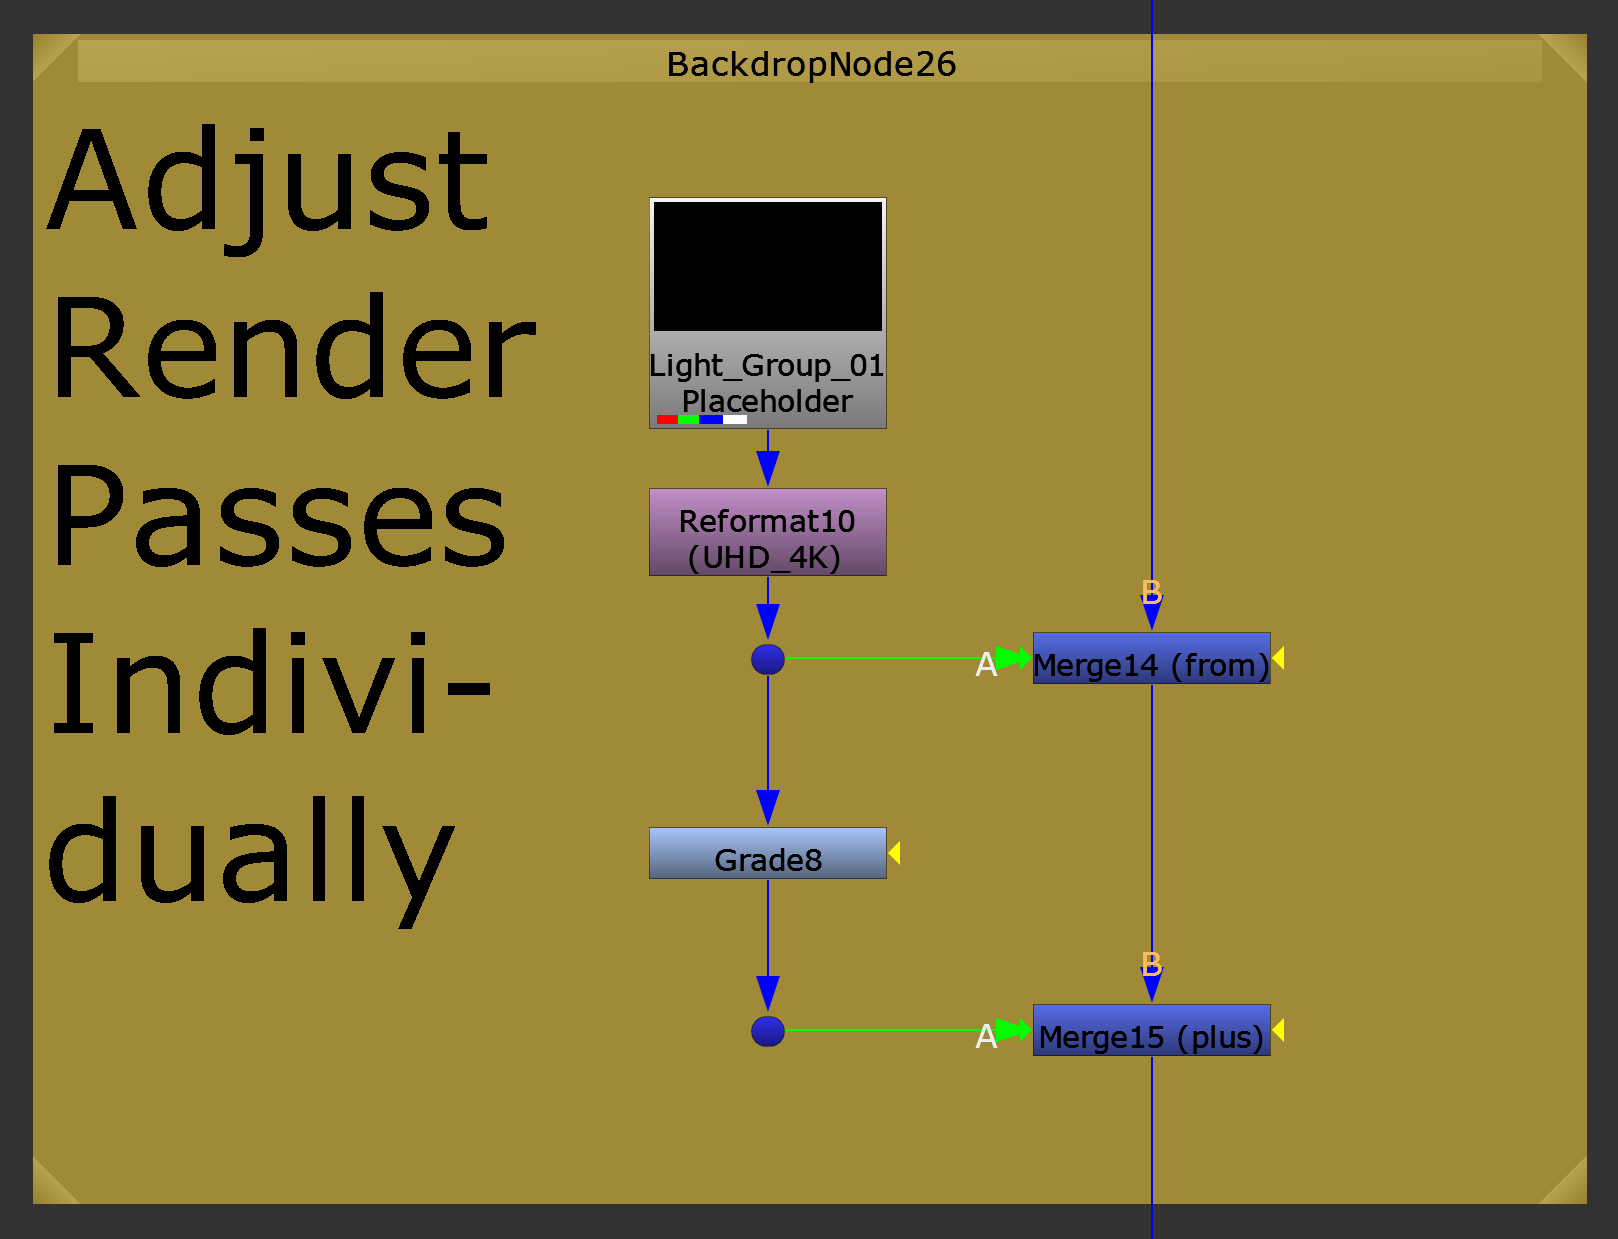
Using a separately rendered image sequence instead of shuffling out the pass.
Ok so that was one render pass contribution taken care of. If you would like to adjust others, copy and paste this little setup as many times as you need.
For each copy, change which render pass is being shuffled out in the Shuffle node and the adjustments made for it, and daisy chain the copy below the first one in the main pipe.
💡 Multiple Renders
If you have multiple CG renders, for example foreground, midground, and background, you would just copy everything above, swap in the other renders, and merge them all using Merge (over) nodes:
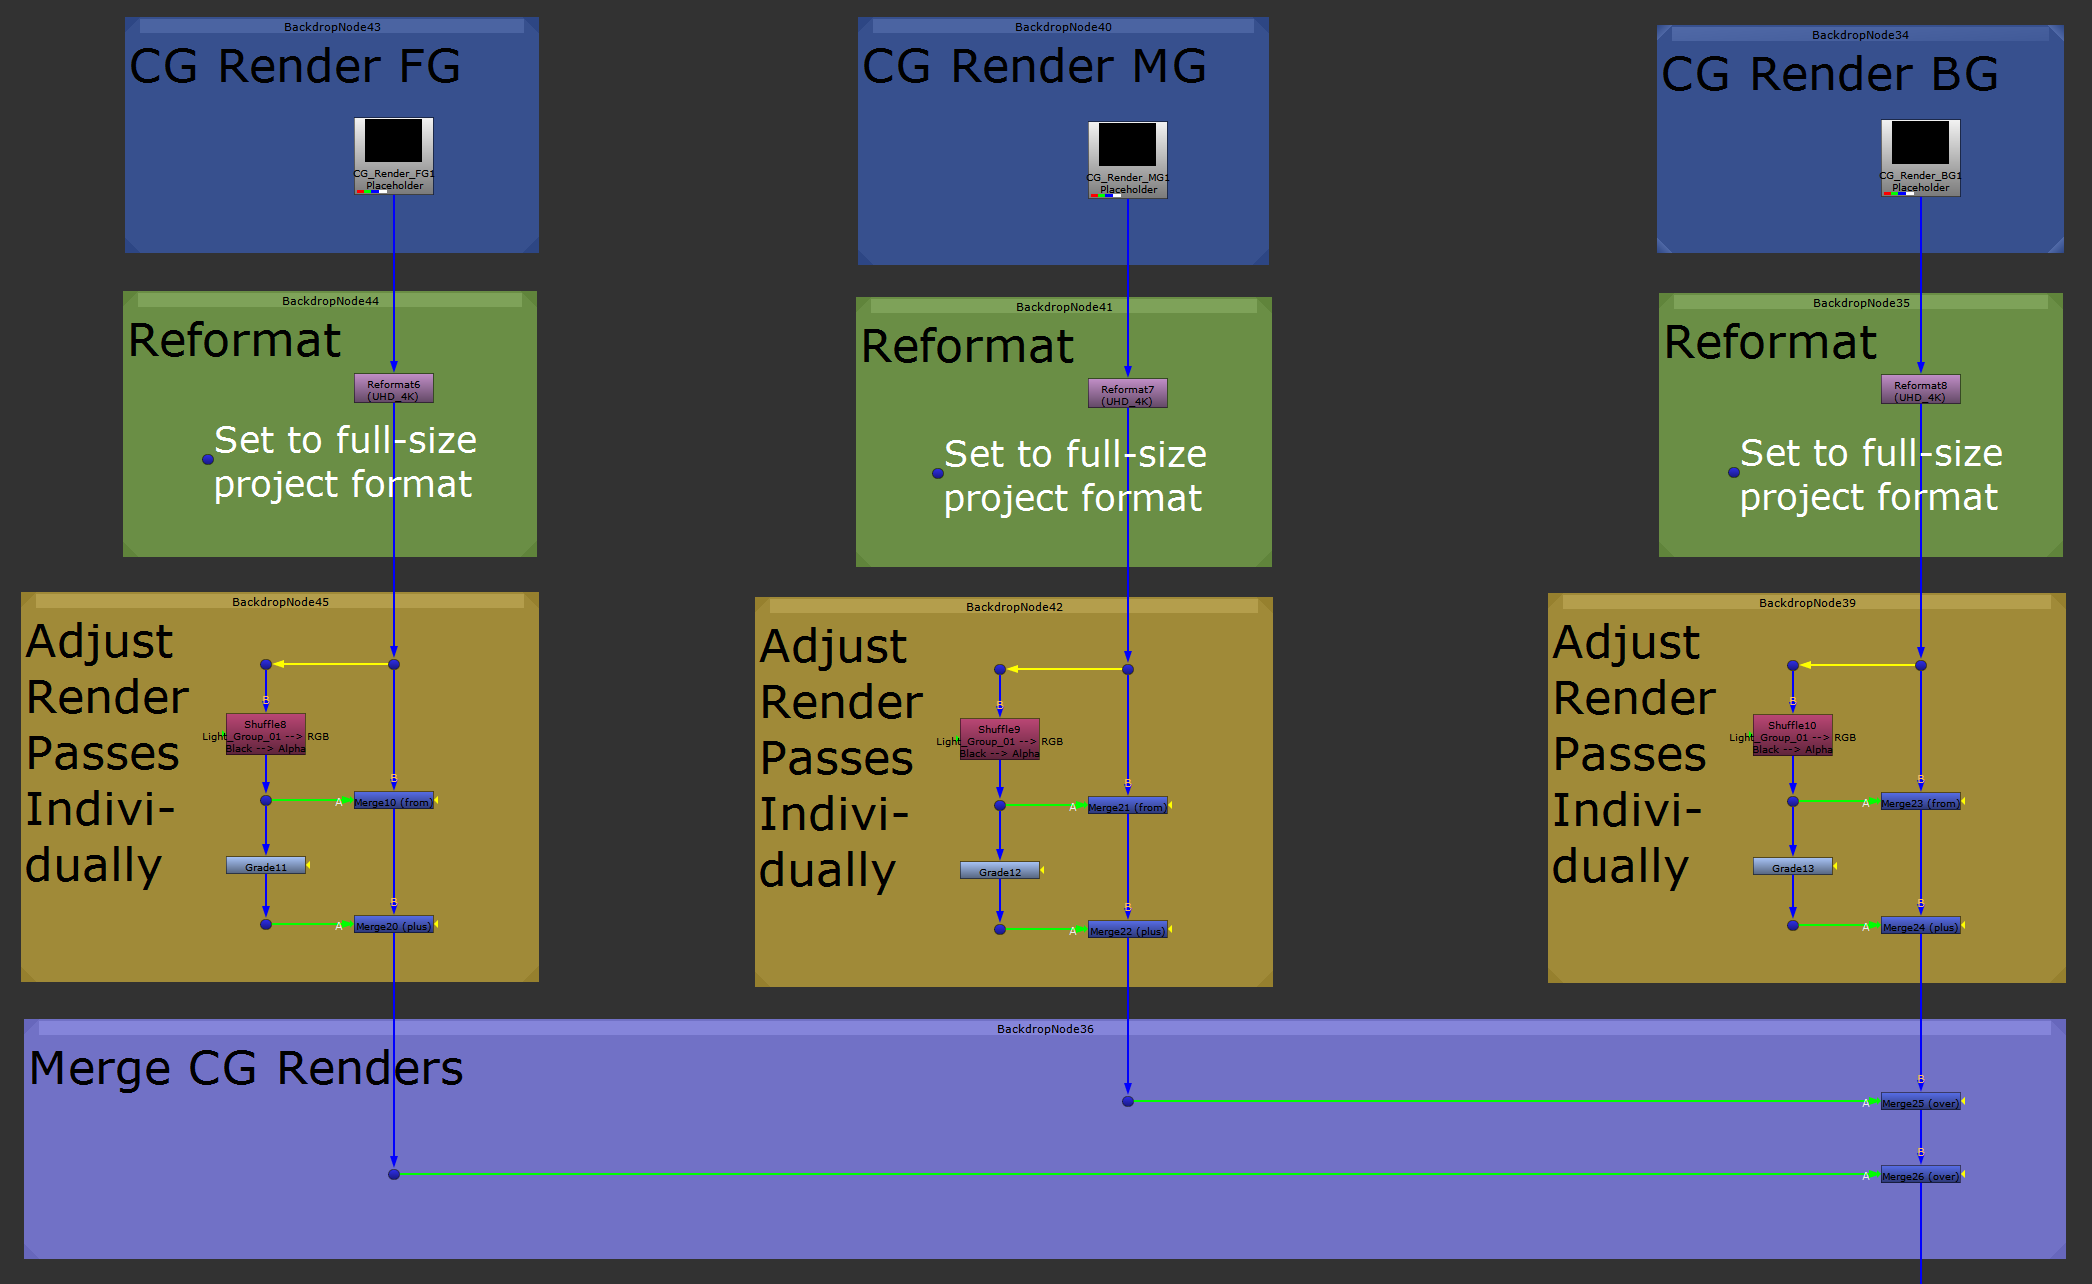
Merging three CG renders.
Or, if you have Deep renders, you would merge them using DeepMerge (combine) nodes:
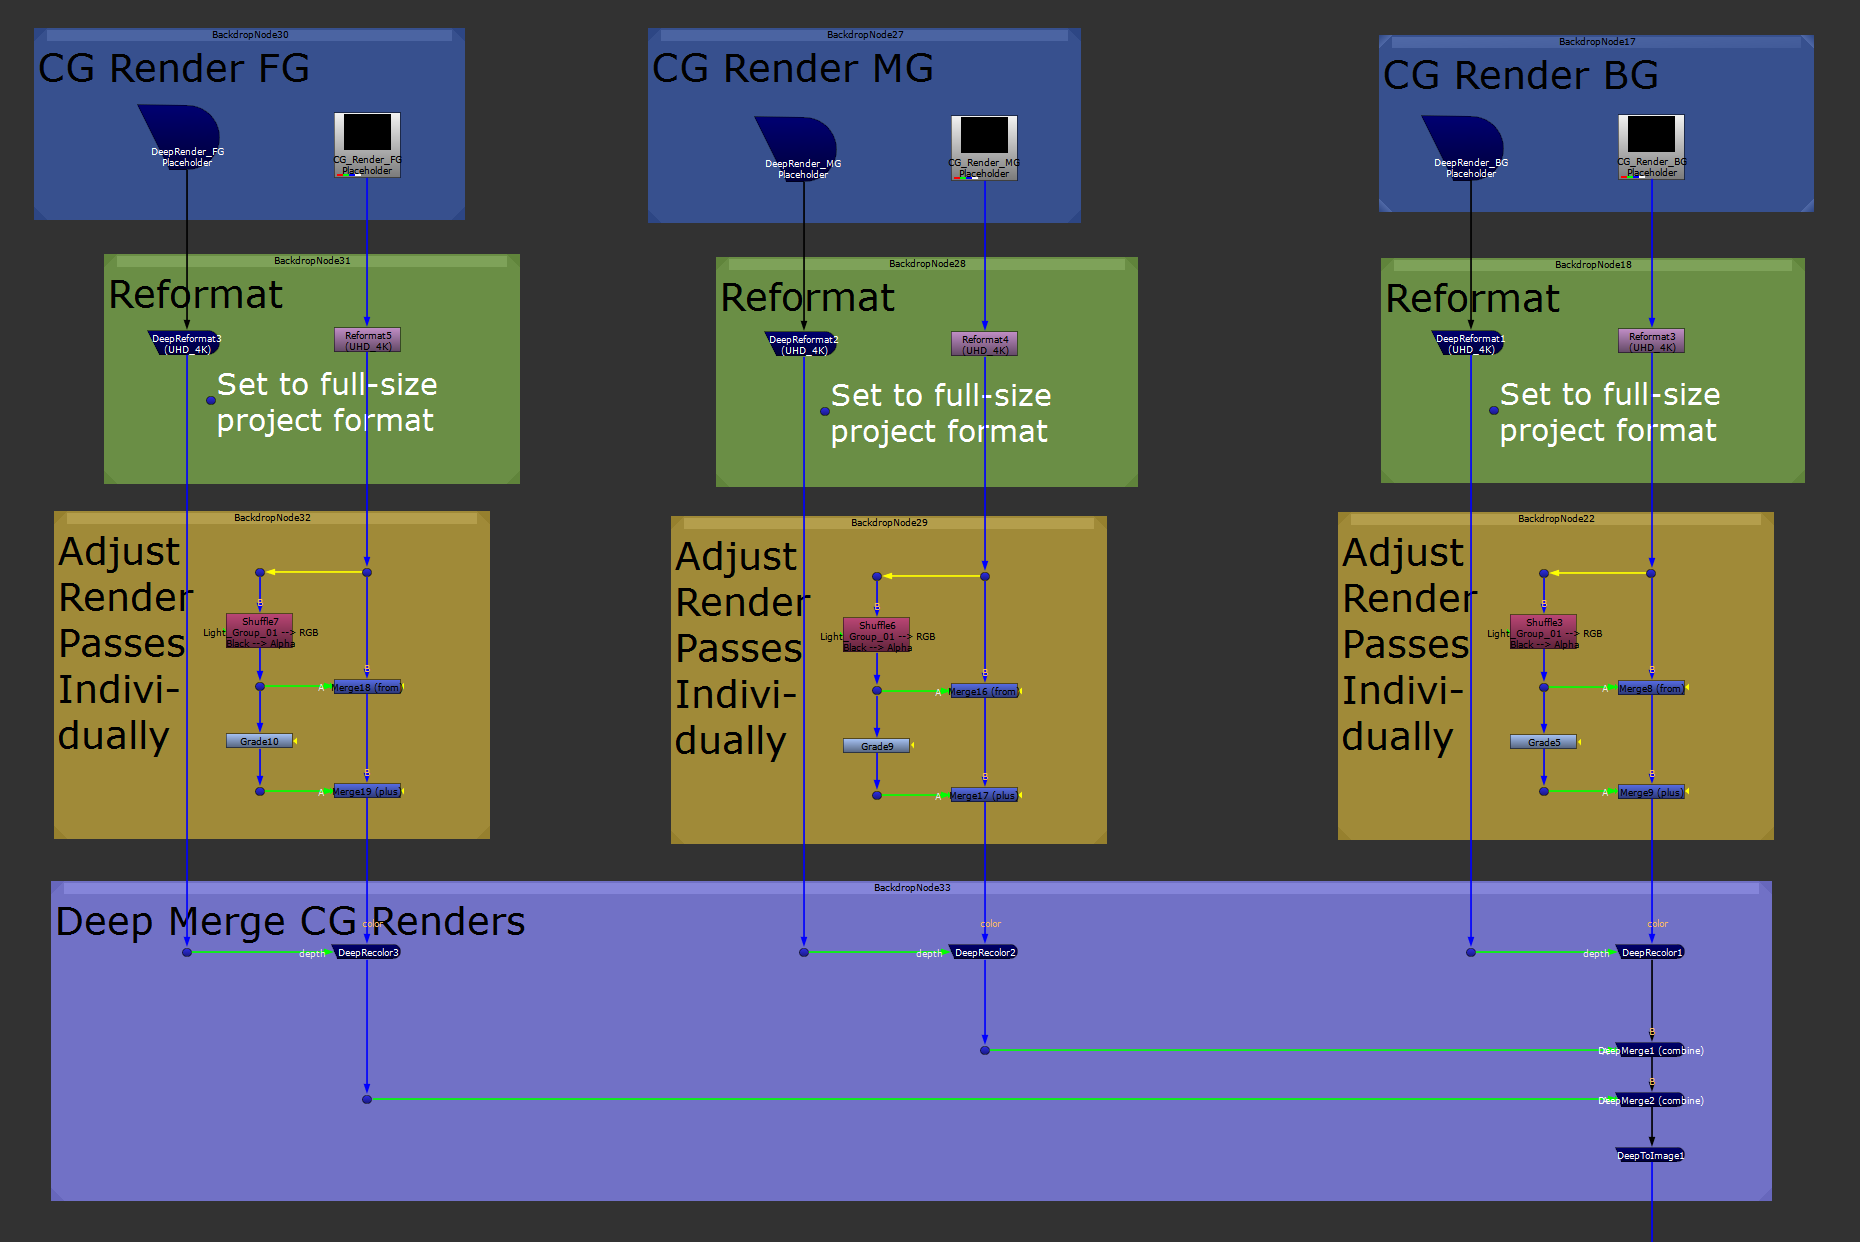
Merging three Deep renders.
Reformat your Deep renders to the full-size project format using DeepReformat nodes. Then, connect DeepRecolor nodes between the output of the DeepReformat and the output of the backdrop where you adjust the render passes individually.
DeepMerge (combine) all the DeepRecolor nodes together, and finally add a DeepToImage node to bring it all back to 2D.
Backdrop: Grade Overall
Once you've adjusted the render pass contributions to taste, you can do any overall grading adjustments to the CG.
This will usually be pretty minimal, like correcting exposure and setting the black levels. (Depending on the standard practices at your company, you may potentially skip adjusting the black levels completely).
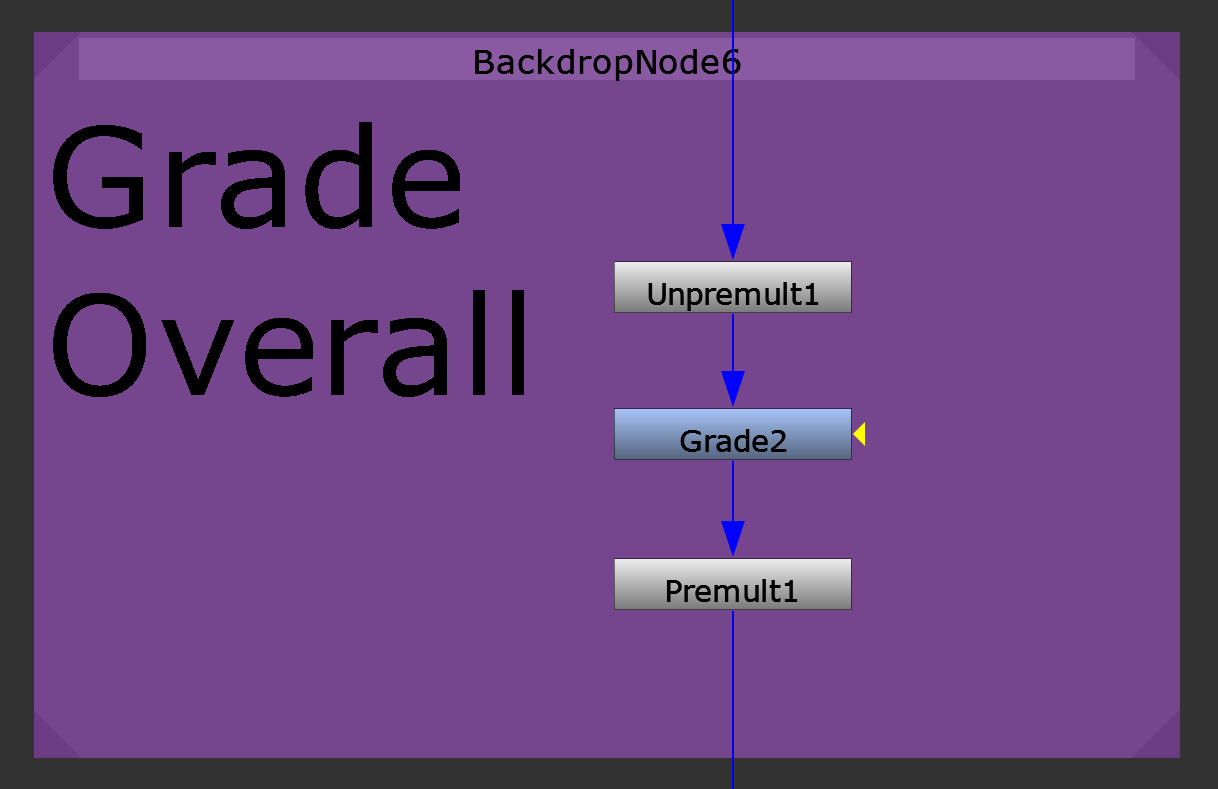
Grading the CG overall.
Make sure to unpremultiply the CG before applying any grading, and premultiply it after. That way, you avoid nasty outlines around the edges of your CG.
To set the black point, first increase the Viewer Gain to be able to see the darkest areas of your CG and the scan.
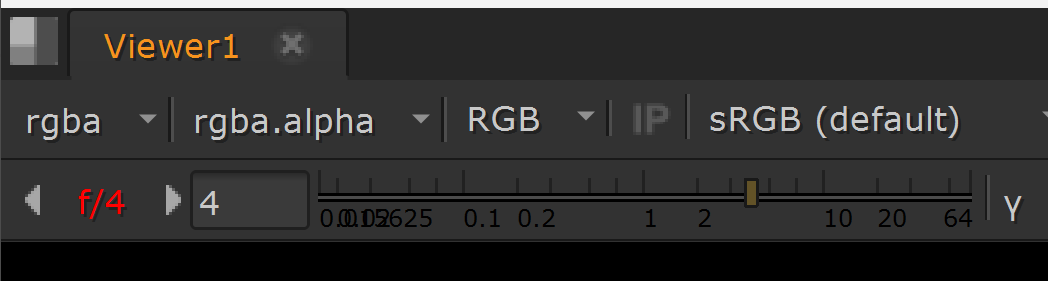
At the top of the Viewer, increase the Viewer Gain.
Then, in the Grade node, colour pick the darkest part of your CG for the blackpoint value: Enable the colour picker next to the blackpoint value, and press Ctrl/Cmd + Alt + Shift and left-click-and-drag over the darkest area of the CG in the Viewer to sample the black level.
Next, in the same Grade node, colour pick the darkest part of the scan for the lift value using the same method.
You may have to try colour picking a few times, or manually adjust the values to get them just right for the CG to sit in nicely.
Backdrop: Lens Distortion
It’s very important to apply the correct lens distortion to your CG.
Without it, your CG may no longer line up with the scan, and the tracking may look like it’s sliding.
Applying lens distortion will also indicate whether or not you have rendered the CG with enough overscan. If you see black or stretched pixels being pulled in at the edges of the frame, it usually means that you don’t have enough overscan to cover the lens distortion.
So always remember to apply lens distortion.
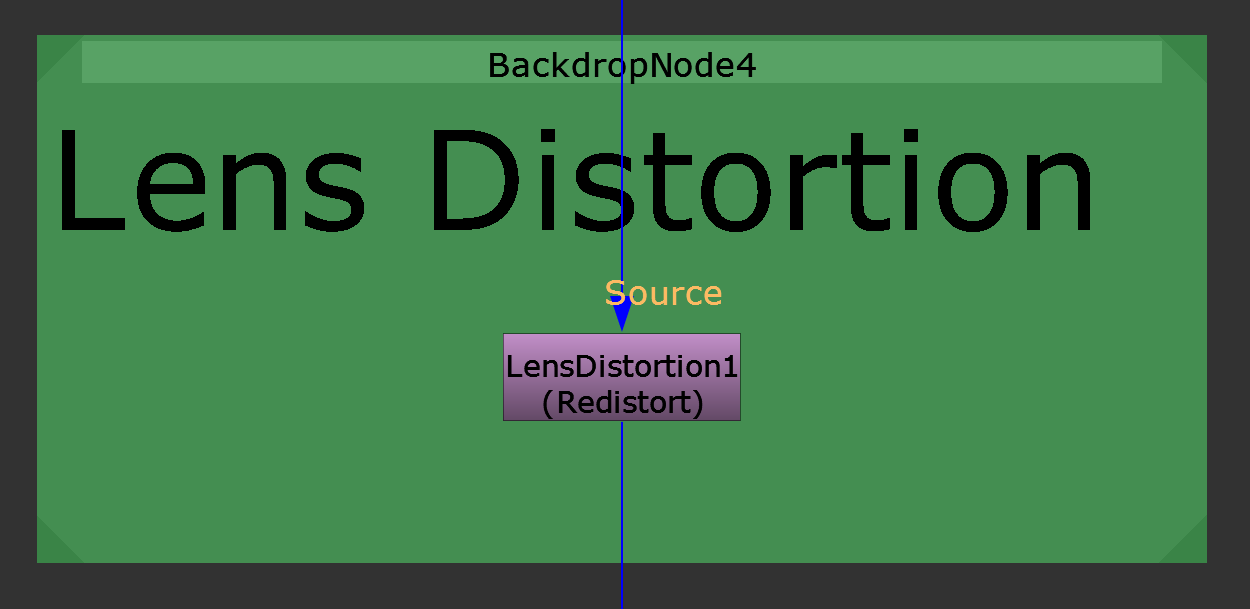
Adding lens distortion to the CG render.
You may be used to working with the undistorted scan in for example Maya or Houdini, but that will almost never be used in the comp in Nuke.
That's because undistorting and then redistorting the scan will soften details and ruin the grain.
So you’ll want to apply lens distortion to your CG only, and leave the original scan as it is. That means, don’t use the undistorted scan, merging the CG over it, and distorting everything at the end in your slapcomp. That is not how it will be composited.
And we want to be looking at the same thing between departments – a 1:1 comparison. Removing variables will help to identify the origin of any potential issues.
So, unless you’re reprojecting the scan in some way, avoid using the undistorted scan in your slapcomp. Build the slapcomp similarly to how the compositor will composite the shot so that you are both on the same page.
And other than the lens distortion, there is no need to apply any lens effects to the slapcomp. Avoid adding lens flare, vignetting, chromatic aberration, field curvature, and so on.
I.e. don’t hide anything behind lens effects (the comper will do that). The supervisor just wants to see how the CG looks and works in the shot, and it’s easier to spot issues when there is nothing covering up the CG.
💡 Focus
Unless the focus(/bokeh) or the motion blur of the CG is a specific feature in the shot, a slapcomp will typically be rendered with sharp CG.
That way, the supervisor can see the CG more clearly and get a good idea of how it fits into the shot. (I.e. nothing is being hidden in the defocus).
And so there is usually no need to add defocus or 2D motion blur to the CG for the slapcomp. (But make sure to check with your supervisor what the expectations are in your specific company).
If you need to add depth of field, you can do that using the Bokeh node or the ZDefocus node.
And if you need to add 2D motion blur, you can do that using the VectorBlur node.
Backdrop: File Out
It's good practice to crop the bounding box and remove any superfluous channels before rendering out your slapcomp.
By doing this, you will save render time and disk space, and it will be quicker to buffer and play your slapcomp during the review.
Apply a Crop node set to the project format, and a Remove node set to keep only the RGB channels.
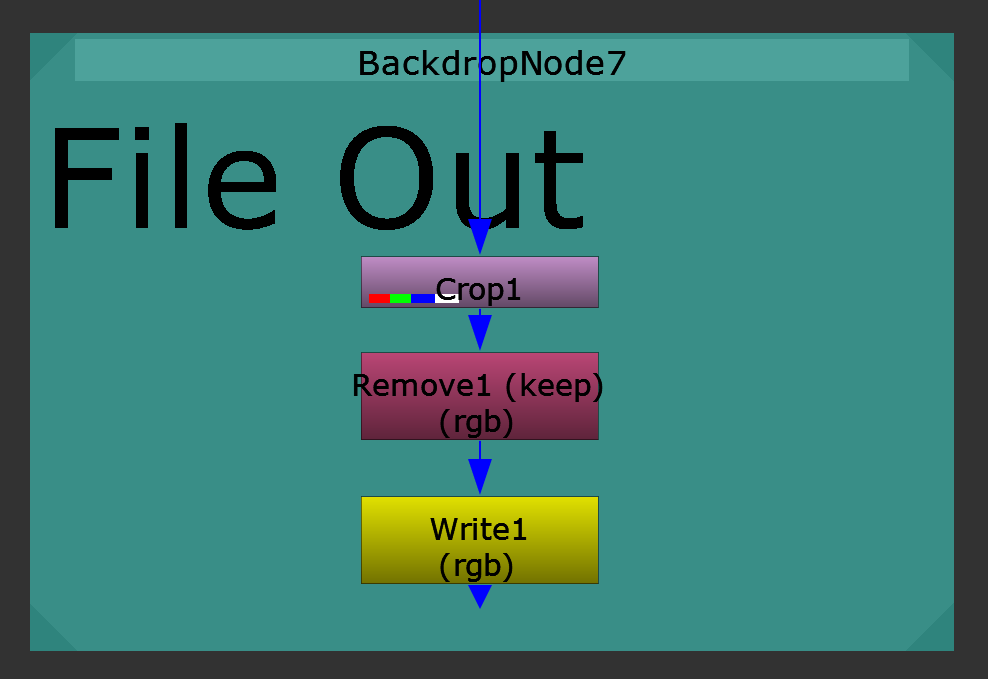
Rendering out the slapcomp.
Again, depending on the company you’re at, there may be automation in place for writing out image sequences. If not, add a normal Write node, and choose your shot directory and filename/filetype sensibly like before.
That’s the full-CG setup completed. And we’ll be using all of the above in the other two setups – we’ll just be adding extra bits to them.
The Scan-Over-CG Setup
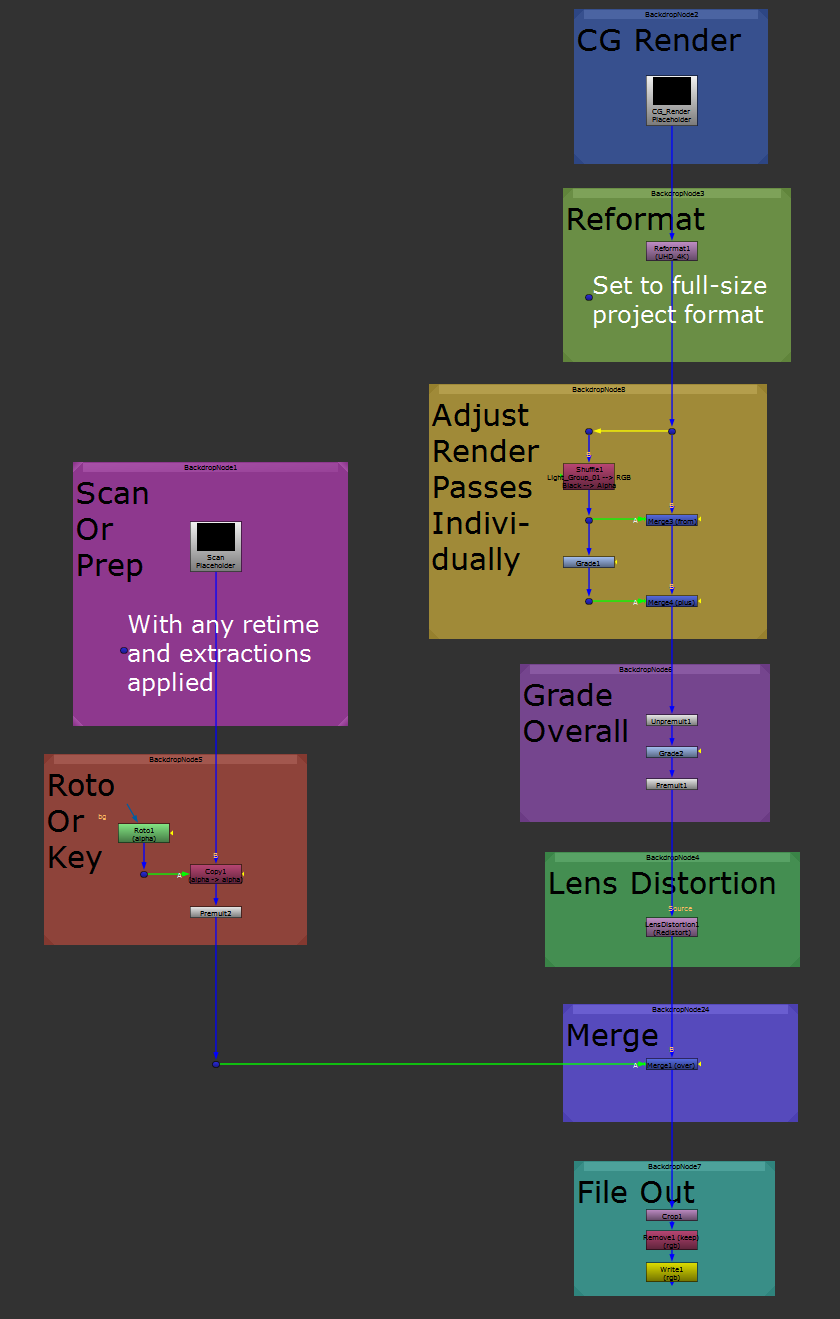
The Scan-Over-CG setup.
For this setup, start by copying everything you did for the full-CG setup.
Next up, let’s get your scan in there.
Backdrop: Scan Or Prep
Grab your scan, or the prep plate if you have one, and make sure that any retime and/or extractions have been applied.
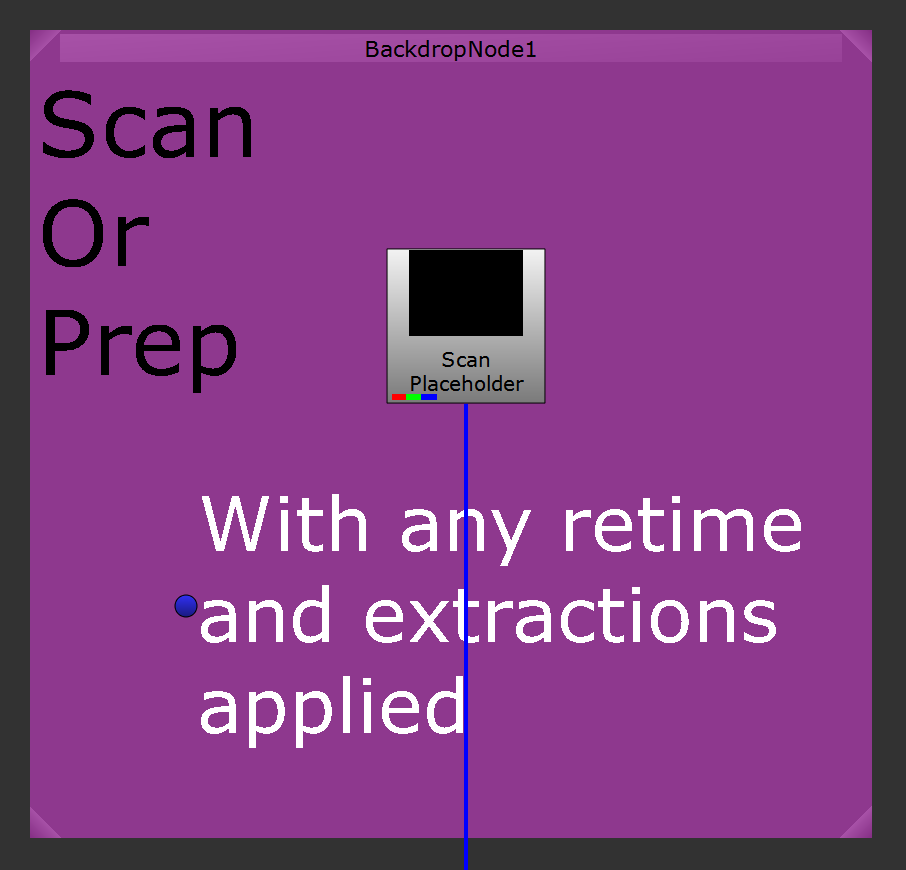
The scan or prep, with any retime and extractions applied.
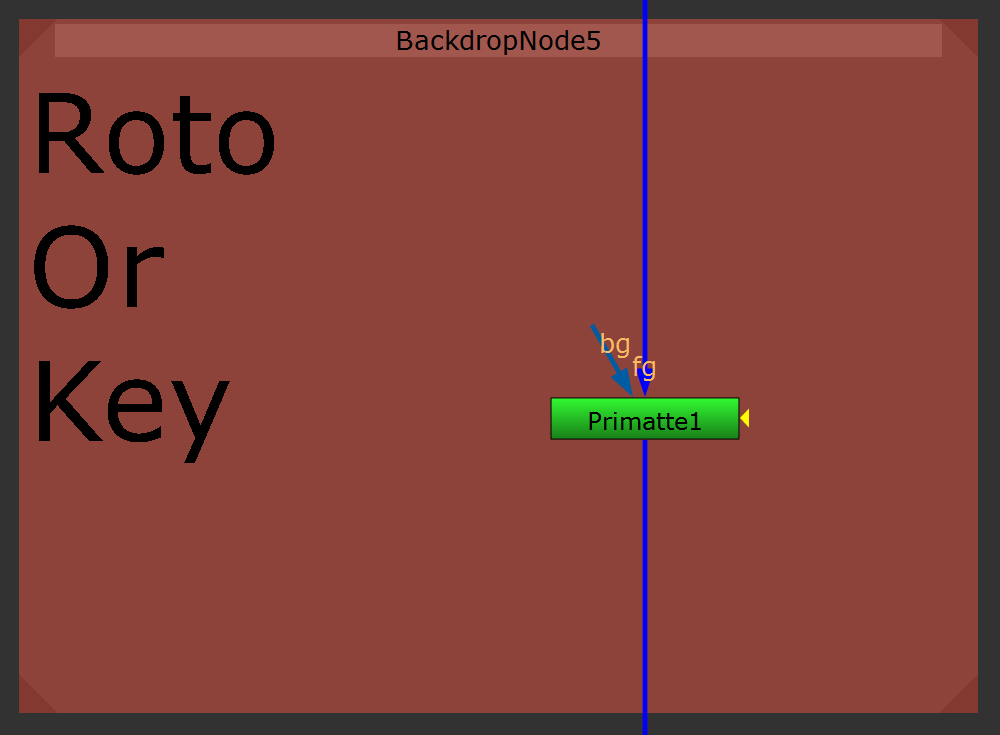
Backdrop: Roto Or Key
Next, copy in the matte for the scan and premultiply.
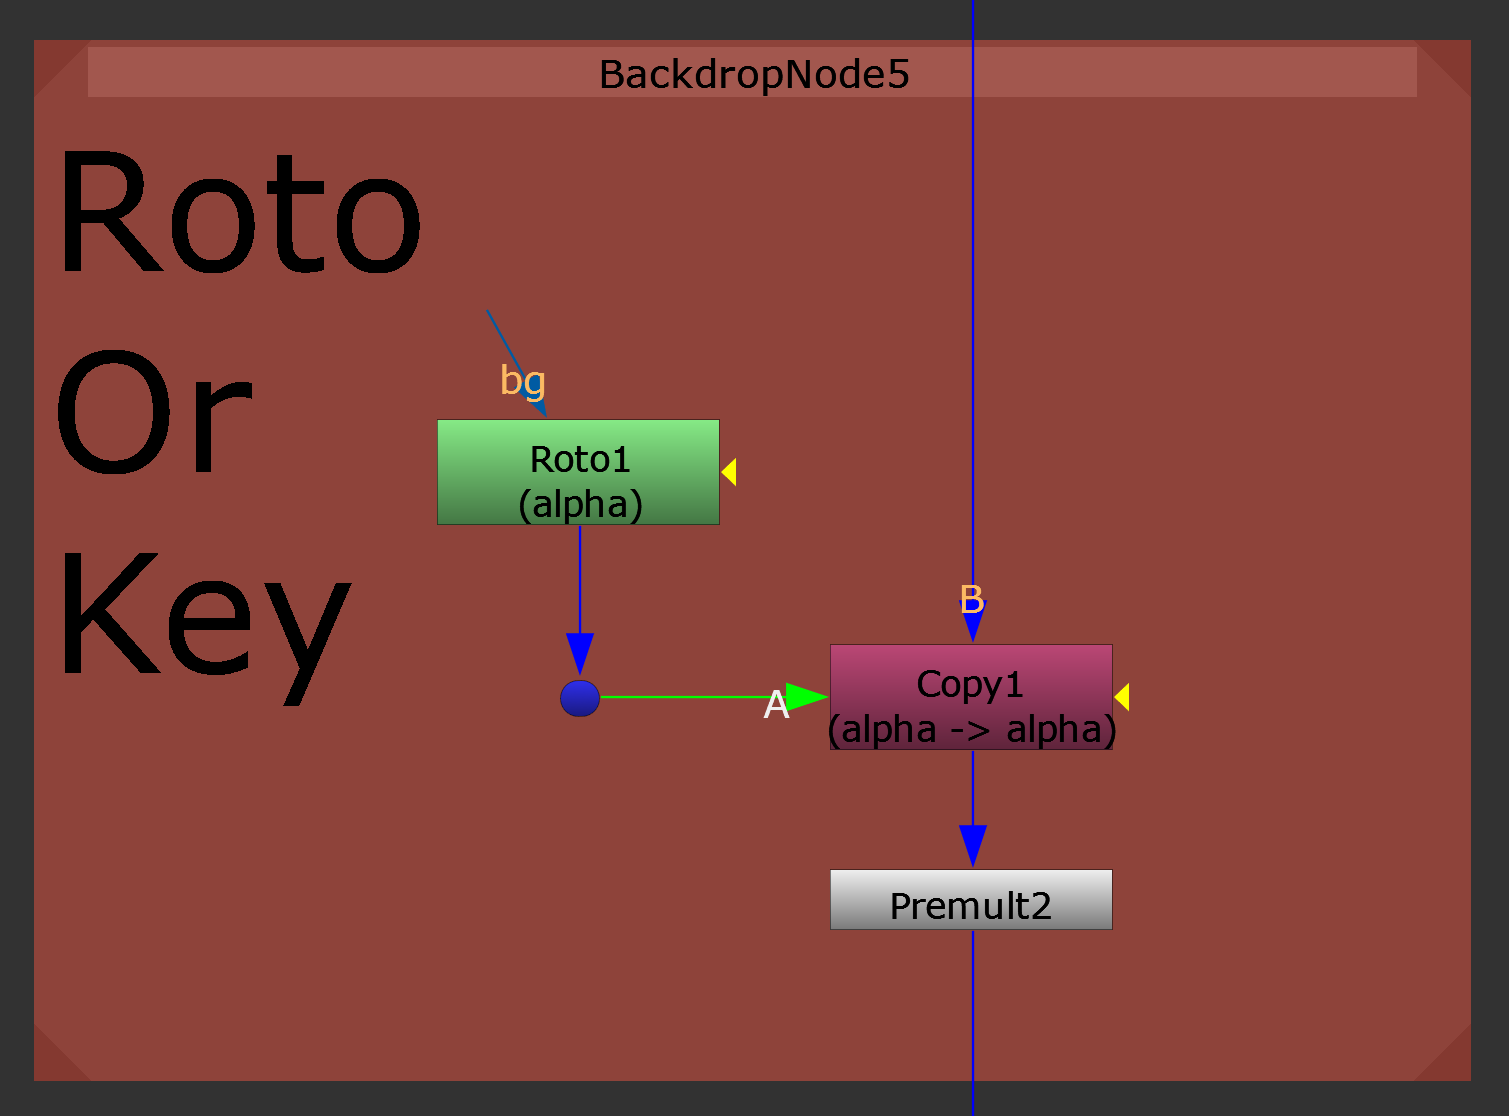
Copying the matte to the scan and premultiplying.
If you have roto available for the shot, you’d put that here in place of the Roto node. If not, either create your own rough roto or key depending on the shot, and copy the alpha (A) to the scan (B) using a Copy node, before premultiplying using a Premult node.
If the scan has heavy spill and you would like to reduce it, you can also add any despill node available to you just before the Copy node in the B-pipe. For a quick despill, you can for example use a Keylight node, and put a value of 1 into either the green or blue part of the Screen Colour knob:
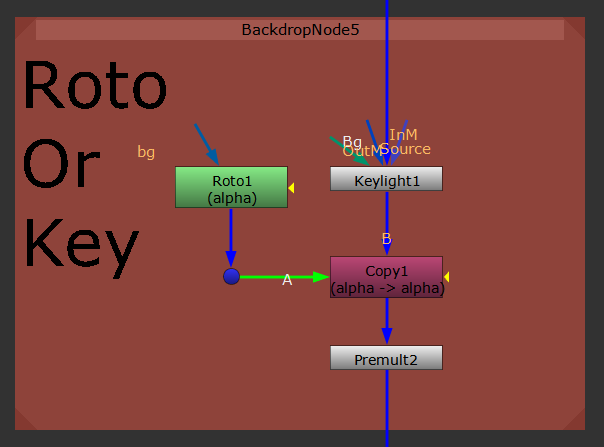
Using a Keylight node to despill the scan.
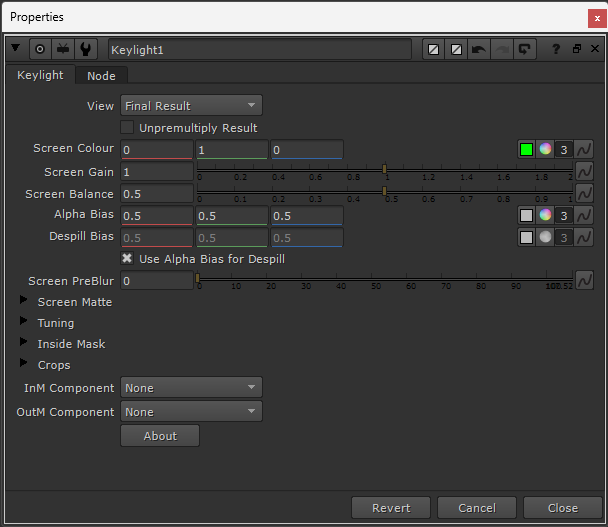
The Keylight settings for despilling: Only the Screen Colour has been changed from the default value, in this case the green value has been set to 1 (to despill the green spill).
If you don’t have roto for the shot, you can make a simple, rough mask yourself using the Roto node. Create a Bezier shape around your subject/object and animate it over the length of the shot (tutorial). It doesn't have to be very accurate, just enough to get the idea of how the scan will look over the CG.
If you need to make your own quick and dirty key, I would recommend using the Primatte node (tutorial). It’s very easy to pull a key good enough for a slapcomp using this node. You just have to colour pick some areas of your green/blue screen as well as the foreground, across a few frames.
Using a Primatte node to extract a key.
Backdrop: Merge
Finally, using a Merge (over) simply merge the premultiplied scan (A) over the CG (B).
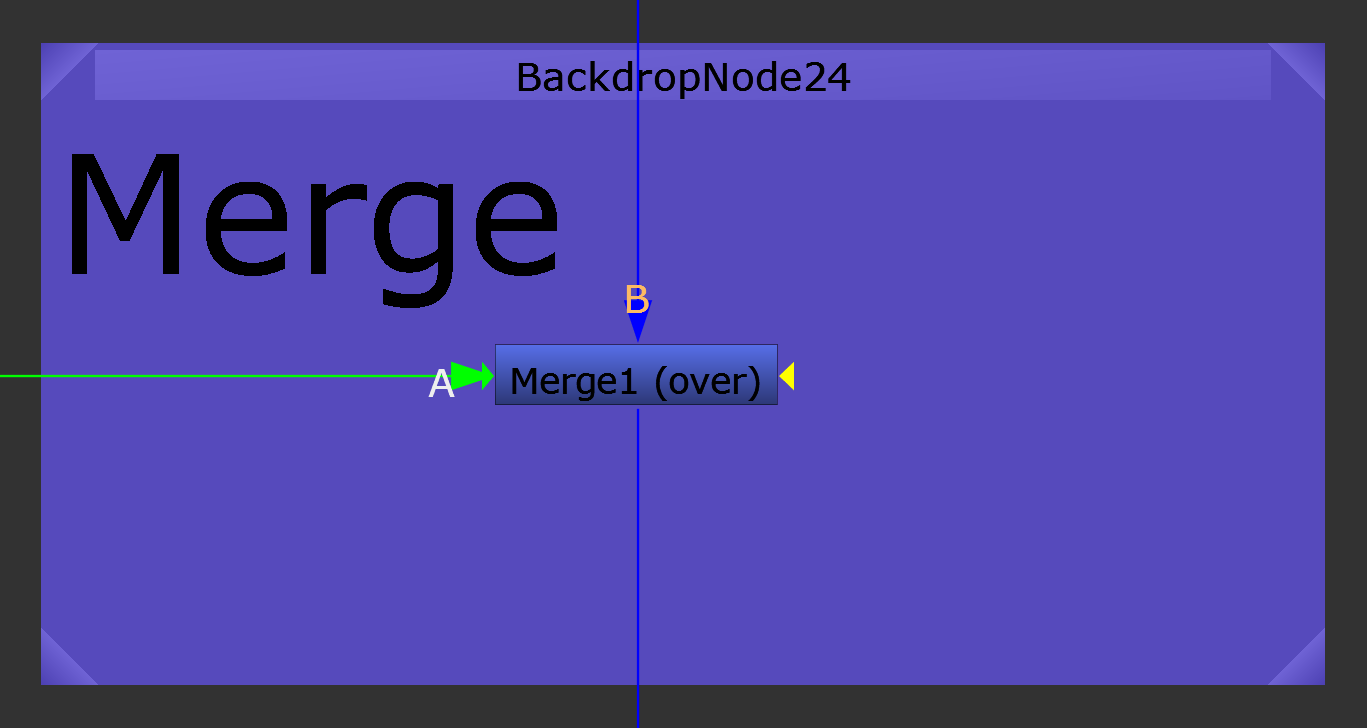
Merging the scan over the CG.
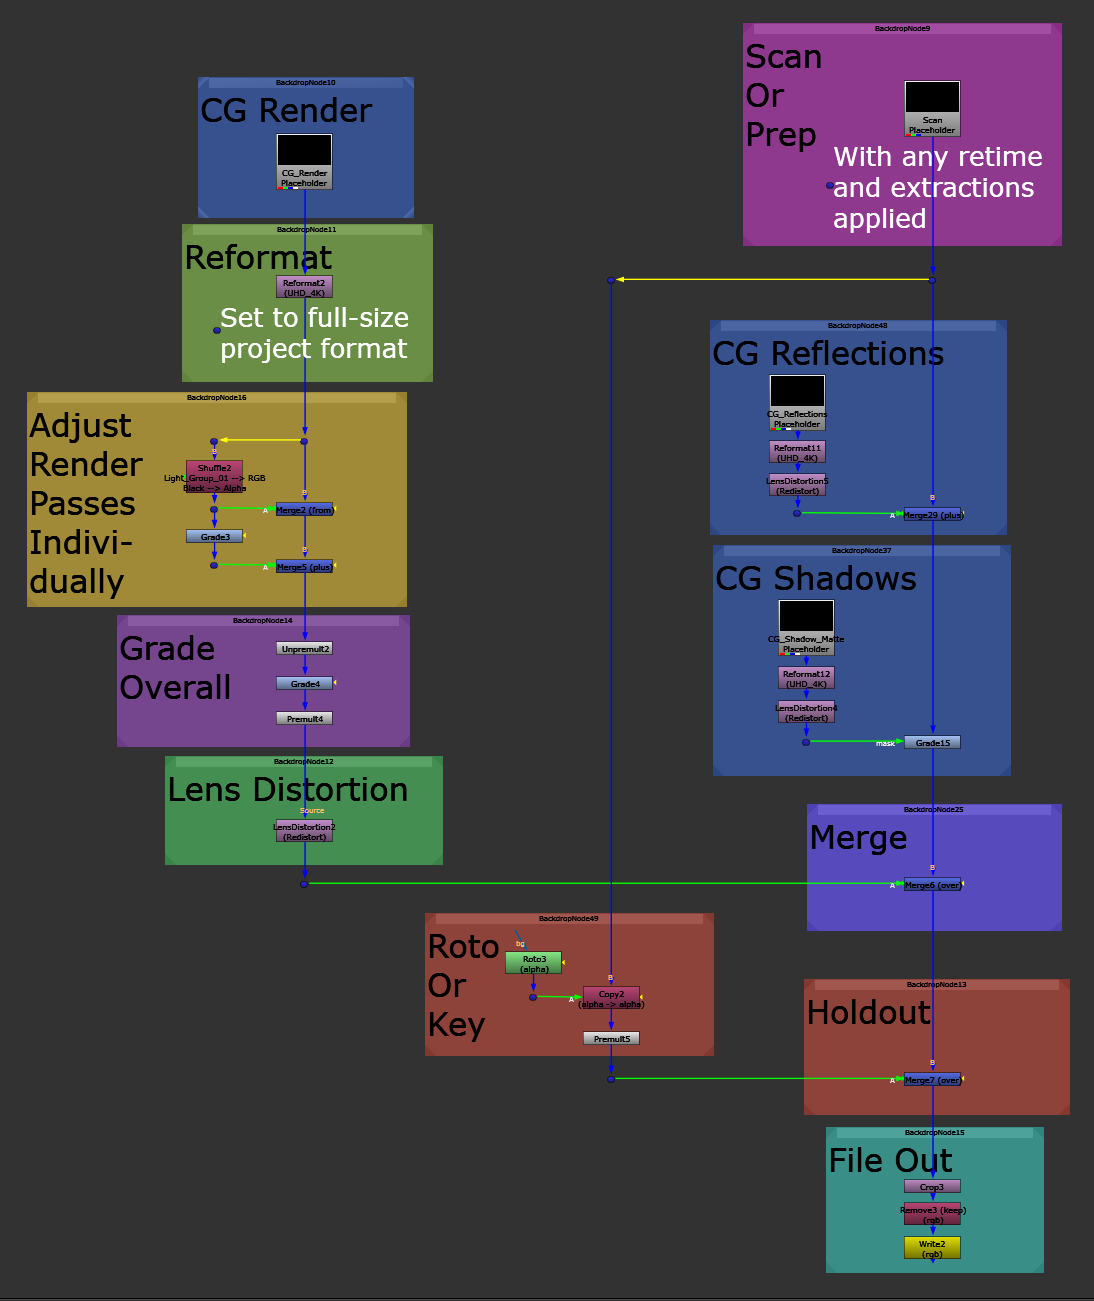
The CG-Over-Scan Setup

The CG-Over-Scan setup.
For this final setup:
- Copy all of the second setup.
- Swap the A and B inputs in the Merge node in the Merge backdrop.
- Rearrange the Roto Or Key backdrop like in the picture above. If there are any foreground subjects or objects passing in front of the CG, you can roto/key them and put them back over the CG with a Merge (see the Holdout backdrop).
- For more specific use cases: Add the backdrops listed below.
Backdrop: CG Reflections
Sometimes you’ll have a separate reflection pass, for example if there is a mirror or a window in the scan that needs to reflect the CG.
Make sure to to reformat and add lens distortion to the CG reflections render, and then Merge (plus) it (A) over the scan (B):
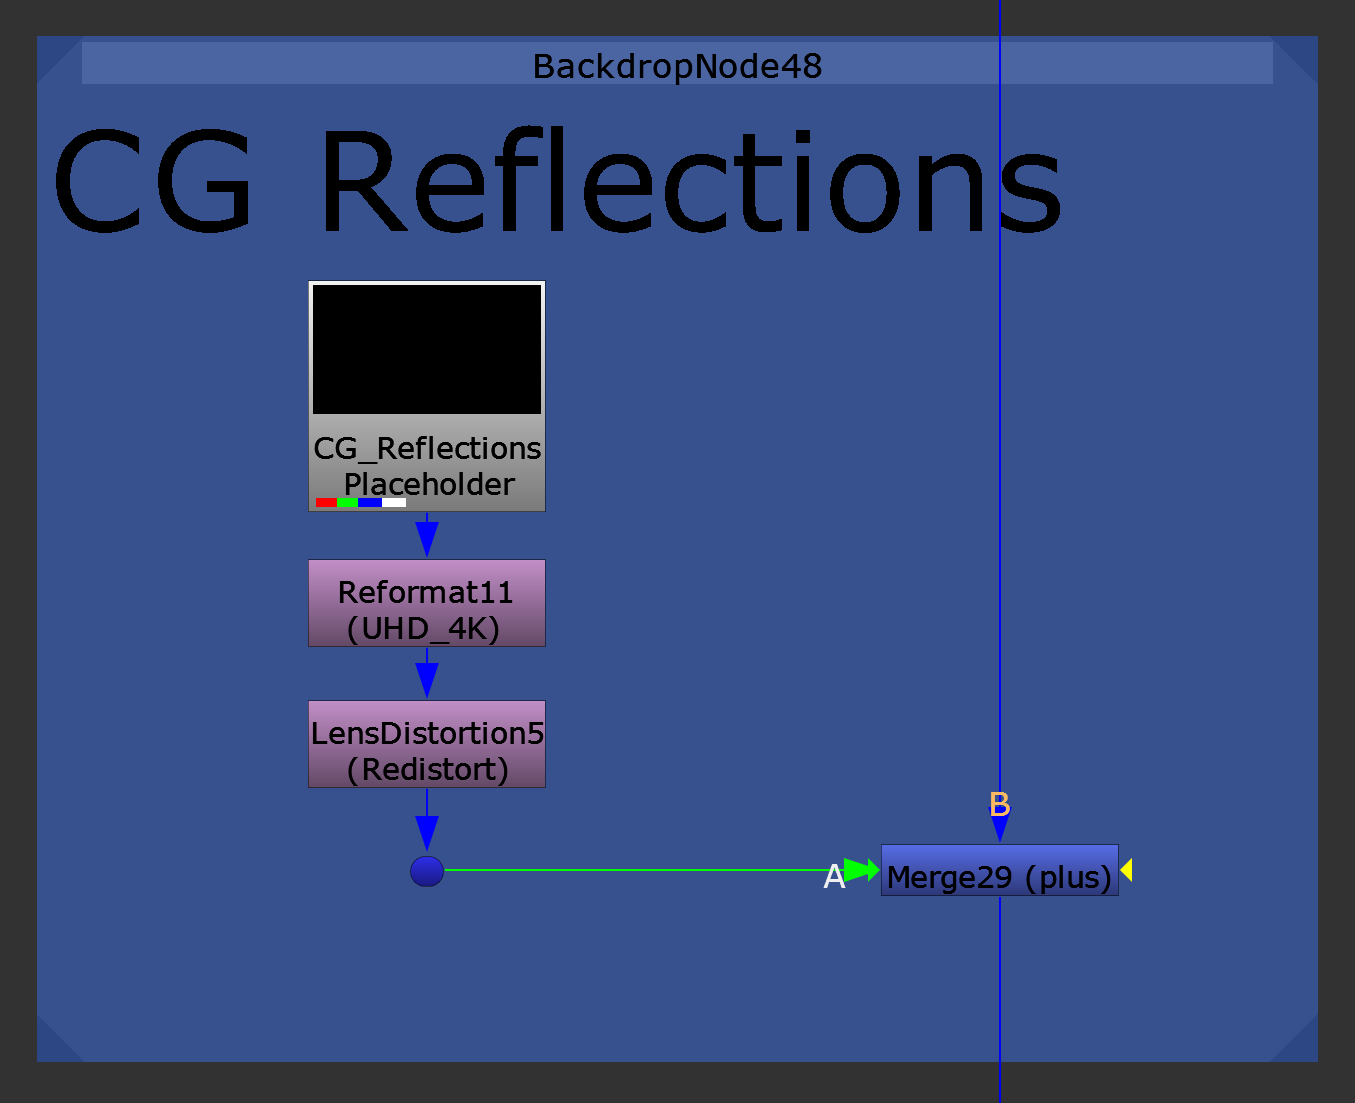
Adding reflections to the scan.
Backdrop: CG Shadows
Sometimes you’ll have a shadow matte pass, for example if there is a CG vehicle driving along a road in the scan.
Again, make sure to to reformat and add lens distortion to the CG shadow matte render, and then use it as a mask for a Grade node to grade down the scan:

Adding shadows to the scan.
If the matte has been rendered in the RGB channels, you can change the mask input in the first Grade node to one of the RGB channels instead of the default alpha channel:
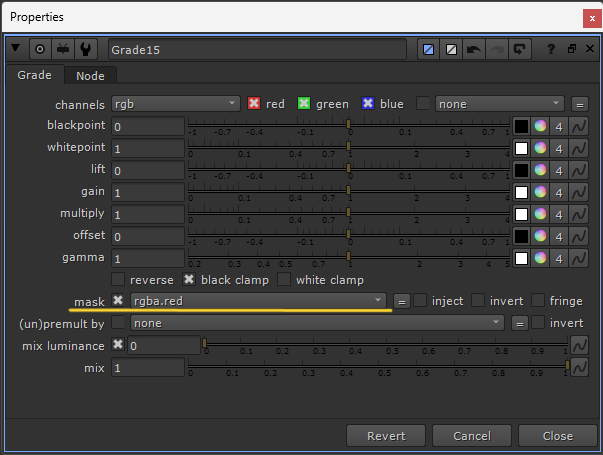
Using the red channel as a mask for grading the shadows.
And that’s it, you’ve built all three setups.
If a CG render is being reused across a sequence of shots, you would normally only make a slapcomp for the hero shot. The compositor(s) would then re-project the CG render in the other shots.
Bonus Tip
Although you should re-render any missing or broken frames, you can replace them in Nuke – in a pinch.
With the help of a tool such as FrameFiller, you can generate missing/broken frames using the surrounding frames.
I hope you found this tutorial useful. For more Nuke tips & tricks, see Nuke.


