Add Or Remove Flickering In Nuke
Being able to composite subjects/objects into dynamically lit scenes is an essential part of any compositor's skill set. And so is...

Being able to composite subjects/objects into dynamically lit scenes is an essential part of any compositor's skill set. And so is removing unwanted flickering from a shot.
There are many scenarios where there is an element of dynamic lighting in a shot. A certain animated interaction with the lighting and the scene which you have to accurately analyse and then match or remove to properly integrate your composite.
Let’s look at two methods for achieving this.
Dynamic Grade Method
The first method is my go-to approach and works really well in the majority of cases. Especially when there are flickering lights with multiple colours in the scene, such as the images from a TV set, the lights at a concert venue, or a flashing child's toy.
This approach involves accurately analysing the lighting changes and dynamically match-grading what you are compositing into the scene. (Or, reversing the lighting changes if you want to remove the flickering).
You can do this with the super useful CurveTool node, a Grade node, and some simple expressions:
Start With A Curve Tool
Create a CurveTool node and set the operation to Avg Intensities.
Adjust The Region Of Interest
Resize and reposition the Region Of Interest (ROI) in the CurveTool node near to where you want to composite your subject/object. You want to capture the lighting changes in that area only, and not potentially different lighting changes elsewhere in the frame.
💡 It's usually best to pick a relatively flat area so that sharp highlights or other anomalies don’t pollute the intensity data.
If needed, track/animate the ROI to follow the area you picked. (For example if there is a camera move, or the subject/object moves).
Analyse The Image
Hit the Go! button in the CurveTool node, select your frame range, and hit OK to analyse the lighting changes. Once it is done calculating you will end up with animated values in the IntensityData tab of the CurveTool node. These describe the average intensity of the lighting in the selected ROI for every frame that was analysed.
Use The Intensity Data
We want to use the intensity data from the CurveTool node to drive an automated grade. To match/remove the intensity changes over time, we need to pick a reference frame, and compare each frame with it to calculate the changes. We can do that with a simple divide operation.
Create a Grade node, make sure black clamp and white clamp are unticked, and add the below expressions in either the gain or multiply knob, for each of the red, green and blue channels, respectively (substitute 25 with your reference frame number):
CurveTool1.intensitydata.r / CurveTool1.intensitydata.r(25)
CurveTool1.intensitydata.g / CurveTool1.intensitydata.g(25)
CurveTool1.intensitydata.b / CurveTool1.intensitydata.b(25)
(Here, the CurveTool node is named CurveTool1 and the reference frame is frame 25).
These expressions simply take the intensity data on the current frame and divide it by the intensity data on the reference frame, for each channel. Which gives you per-frame ratios describing the changes in the average lighting intensity from the reference frame.
Grade your patch, element, CG render, matte painting, etc. to sit into the scene on the reference frame. Then, connect the Grade node with the expressions above to it, to match the flickering to your scan.
To stabilise the intensity changes instead, i.e. to remove the flicker, simply tick the reverse checkbox in the Grade node and connect it to your scan.
Dynamic Dissolve Method
The second method is great for when the lights in the shot only change between two main states. It could for instance be a dying light bulb flickering on and off, a Neon sign blinking in an alley, or the camera shutter speed being out of sync with the on-set lighting, resulting in lights flickering in the shot.
(There may still be more lighting states, but all of them would fall somewhere between the two main states. For example, fully on, halfway on, and fully off).
This approach involves the exact same lighting analysis as before, and then making two versions of what you are compositing into your scene (e.g. patch, element, CG render, matte painting, etc.):
A version graded to sit into the first main lighting state (i.e. light fully on), and another version graded to sit into the second main lighting state (i.e. light fully off). Then, automating a Dissolve node to animate between the two states frame by frame using a normalised intensity data curve.
💡 You can make even more versions if you have multiple main lighting states, but it becomes more work mixing between them. I would only recommend this method for shots with two main lighting states.
Normalising The Intensity Data
To drive a Dissolve node using the intensity data we have to normalise the values between 0 and 1.
The formula for normalising a value V on a curve is:
Vnormalised = (V – Vminimum) / (Vmaximum – Vminimum)
Translated into plain English this means the normalised value equals the current value minus the lowest value on the curve, divided by the highest value on the curve minus the lowest value on the curve.
To avoid doing this calculation by hand you can use a tool such as Ben McEwan’s CurveRemapper. Copy the intensity data from your CurveTool into the CurveRemapper, set the new minimum to 0 and the new maximum to 1, and run the calculation. Then, copy the output animation into the which knob of a Dissolve node.
Connect the 0 input of the Dissolve node to the darkest version of your patch, element, CG render, matte painting, etc., and the 1 input to the brightest.
And there you have it, your composite will match the flickering in the scan.
DeFlicker Tool
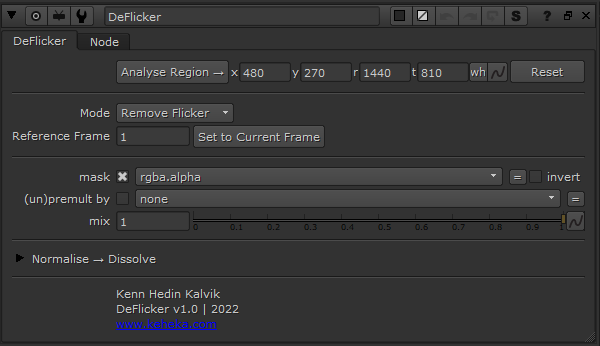
To make the whole process as easy as possible, I have made a DeFlicker tool which has options for using both methods described in this article.
For the Dynamic Grade Method, adjust the ROI and hit the Analyse Region button. Select your mode, i.e. Remove Flicker or Match Flicker, and set your reference frame. Connect a mask if you wish to limit the grading effect, and unpremultiply and mix back as needed.
For the Dynamic Dissolve Method, adjust the ROI and hit the Analyse Region button. Then hit the Normalise button, followed by the Create Dissolve button. You can either expression link the Dissolve node, or copy the animation to it, by ticking or unticking the Link Output checkbox.
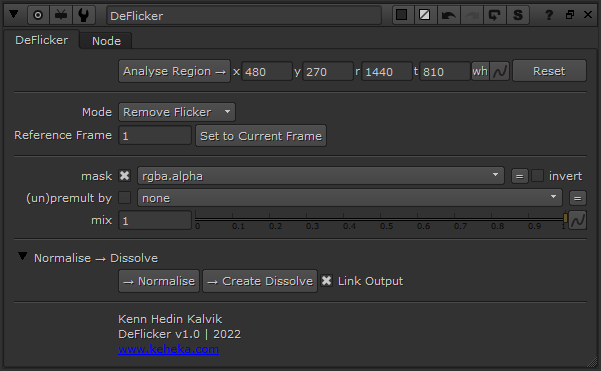
Credit goes to Rob Bannister and his Flicker tool for the Normalise → Dissolve part of the DeFlicker tool. I used his code as a base and modified the frame range part.
💡 There are plenty of variations of the above methods out there, and other ways of deflickering in Nuke such as using FurnaceCore DeFlicker2 or the Blur/Divide technique, but the two methods in this article usually work 99% of the time.
I hope you found this tutorial useful. For more Nuke tips & tricks, see Nuke.


