Troubleshooting Your Nuke Script
How to approach troubleshooting your Nuke script in order to increase your chances of successfully fixing the problem...

Diagnosing an issue with your composite is not always straightforward. Here is how to approach troubleshooting your Nuke script in order to increase your chances of successfully fixing the problem.
The Root Of All Evil
When there is an error in the comp, a common mistake is to tackle the issue by patching or painting over it at the end of the script. Band-Aid solutions like that often end up causing new problems when changes are made upstream. Instead, fixing the problem at its root is highly likely to be the better approach.
First, you will have to do a bit of detective work. A good way of locating the root of the problem is by using a systematic process of elimination; keep bisecting the script until you pinpoint the cause of the issue:
Connect your Viewer halfway down the script from the top.
If the issue is present in the first half, then you connect the Viewer halfway up from the middle – i.e. a quarter of the way down the script from the top.
If the issue is not present in the first half, you instead connect the Viewer halfway down from the middle – i.e. three quarters of the way down the script from the top.
Keep going, splitting each half into halves, until you isolate the issue.
💡 Having an organised script with a clear B-spine is very beneficial here, as it will be much easier to split the script in halves. You can also enable and disable the Merge nodes in the spine to help find which branches contain a problem and exactly where it starts occurring.
Once you have found the cause, you can fix the problem at the source. That fix will propagate throughout the script, and you can safely make other changes later on without the risk of breaking the composite.
Have You Tried Turning It Off And On Again?
Once in a while, even after diligently troubleshooting a script, an issue might elude you. It might only show up in the render, and not when viewing the composite in Nuke. Or, it might only show up when viewing the composite in Nuke, and not in the render. Worse yet, the problem might occur on different frames every time you render the composite or view it in Nuke.
These situations can be very frustrating as the mismatch may seem completely random and difficult to fix. Just remember, both Nuke and your computer are complex machineries with many, many moving parts. Sometimes bugs can crop up, or processes can hang. Often, clearing the cache is just what is needed.
💡 To clear your cache in Nuke, in the top menu bar go to Cache → Clear All.
If that does not solve your problem, try restarting Nuke and/or your computer.
Divide And Conquer
If a restart does not solve the issue, it is time to go to war. In order to isolate and eliminate the problem, you can use the divide and conquer technique.
Start by making a fresh, empty Nuke script and copy/paste your entire problematic script into the new script. Sometimes a bug can cause a script to become corrupted, and transferring the contents to a new script may solve the issue.
If it persists, the problem could be caused by the computer's RAM filling up, or the CPU not being able to handle an intensive load. (More likely with larger, heavier scripts). Split a section of the script into a separate precomposite script, and render it out. Then, only bring the precomposite render into the main script. There is a Precomp node in Nuke that simplifies this task for you.
Rinse and repeat until you find out what is causing the problem. That way, either you will be able to fix it, or, in case of RAM/CPU issues, the problem disappears by itself because the more lightweight script can now be handled by your machine and the render farm.
Non-trivial Pursuits
The problem may yet persist, and so it can be useful to ask some questions to shed more light on the issue:
Can the issue be replicated?
If you can make the error happen at will, you will also know when it is fixed. However, if the issue seems to happen randomly, you will have to dig a little deeper and do more testing to ensure it has been fixed properly.
Have any nodes been (dis)connected by accident?
Occasionally, when copy/pasting or even moving around a selection of nodes in a script, some of the nodes do not get connected correctly. Instead, they are left floating above or below the pipe:
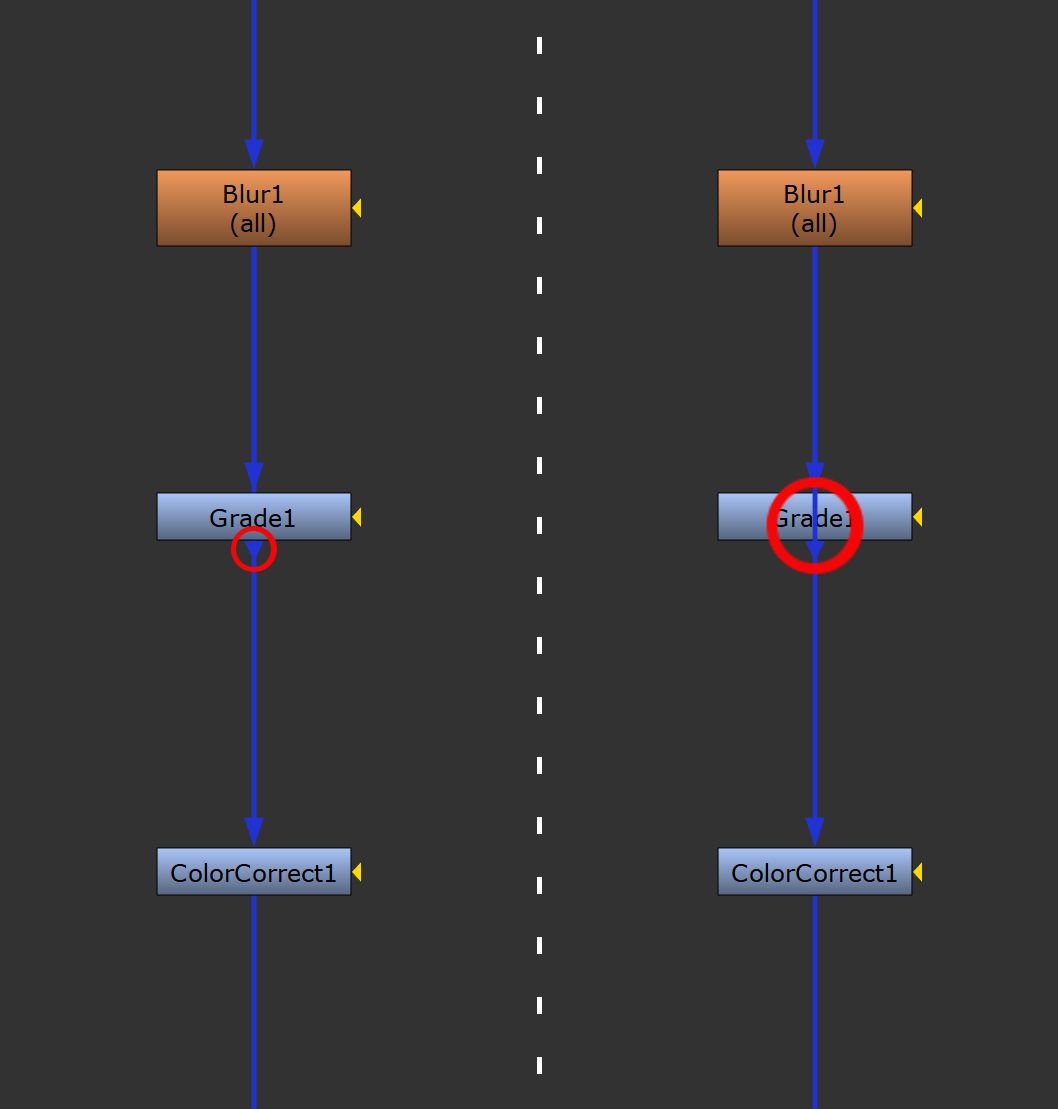
In both cases above, the Grade node is not properly connected to the pipe. On the left, it is floating above the pipe. You can tell by the short, unconnected output arrow below the Grade node. (Circled in red).
On the right, the Grade node is underneath the pipe. You can tell by the pipe visually going over the node. The same short, unconnected output arrow below the Grade node is also present. (Both circled in red).
If you moved the Grade node to one side, you would see that there are two pipes there. One connecting the Blur node to the Grade node, and one connecting the Blur node to the ColorCorrect node.
If that was not enough, the opposite issue can also happen: nodes can accidentally get connected in the wrong place. Double-check to make sure all your nodes are connected correctly.
Can you change the order of your nodes?
Try to change the sequence in which you are connecting nodes; it could make all the difference. Concatenating your transformations may for example solve filtering artefacts.
Are you working with the correct unit of measurement?
Different software may use different units of measurement. The lighting artist may be working in Houdini where 1 unit = 1 metre but your camera may be in Maya scale where 1 unit = 1 centimetre. If so, then you will have to multiply the utility passes (position, depth, etc.) from the Houdini renders by 100 to get the correct scale in relation to the camera in Nuke.
Are you sure it is not just a human error?
We all make mistakes. For example, have you forgotten about a $gui expression in a node, which is causing it to behave differently when rendered as opposed to when viewed in Nuke? Or have you left a node or setting disabled that should be enabled? Look closer at your script and double-check if you or someone else have made a mistake.
Is there useful information in the error logs?
Nuke and/or your render farm could be giving you clues as to what the issue is. Have a look at the logs and see what they can tell you.
When did it stop working?
Perhaps you can revert to a previous, functioning version. Have a look in your auto-save folder and see if there are any versions saved before the problem started occurring.
Is there another, working setup?
A correctly working setup may already exist which you can duplicate, removing the need to troubleshoot yours.
Did you recently change something?
A change to a default setting, or the installation of a new tool might have had unintended consequences. It could be worth it to return your system to a more primitive state, or you could try running Nuke in safe mode.
Do other people encounter the same issue with your script?
It could be a local setting or an outdated software version on your specific machine that is causing the problem. Or, it could even be the hardware itself. GPU acceleration requires a compatible graphics card, for instance. Compare and investigate as needed.
Are you changing multiple things at a time?
You may have to limit yourself to only change one thing at a time, methodically, until you can say for certain where the root cause of a problem is located. If you change several things at a time they may counteract each other. Besides, this way it will be easier to keep track of which solutions you have attempted.
Could the problem be external?
If your script unexpectedly starts running very slowly it could be because of a network issue. Or perhaps files on your system have been moved, causing Read nodes to error out. Ask if others are having similar issues.
Is there a colleague you can ask for help?
Know your limits and if you need to, ask a colleague to help diagnose your script. It does not necessarily have to be a more senior artist, sometimes you just need a new or different perspective.
Have you taken a break?
You can not always force a solution. Try to step away from the problematic script for a while and come back with fresh eyes.
Is it time to start over?
It is definitely worth attempting to restore a corrupt script, or troubleshoot a broken setup. However, if nothing is working after a reasonable amount of effort there is little point in wasting more time. Rebuild or reinstall as needed.
The Usual Suspects
When it comes to troublesome nodes and settings, Nuke does have a few repeat offenders. And sometimes, an issue might not even stem from the composite itself. Rather, it can arise from something else, such as a bug in Nuke – for example with the user interface. Here are some things to keep in mind:
➔ The maths behind all masking, premultiplying, or anything alpha-related in Nuke, is based on the premise that alpha values stay between 0 and 1. Therefore, values outside of that range can break the maths and cause issues. Make sure to clamp your alphas to avoid this.
➔ Before you apply any blur or defocus operation, ensure the size of your bounding box is reasonable. Adding a heavy defocus to an image with a massive bounding box can slow down or crash your script. Instead, crop your bounding box to a more manageable size first.
➔ The default setting to affect All channels in ZDefocus, VectorBlur and other such heavy nodes can also slow down your script or cause crashes. Instead, change them to only affect the RGBA channels, or remove unnecessary channels upstream. It could greatly reduce the number of calculations needed.
➔ The CornerPin node can balloon your bounding box to the extreme if you are not careful. Make sure to connect a Crop node after it to keep your bounding box in check.
➔ The various Erode nodes can cause streaking artefacts, sometimes appearing as horizontal black lines in the rendered image. It seems to happen more often when the bounding box is smaller than the format, so try cropping the bounding box to the format first. Erodes can also introduce negative values to your alpha. Remember to clamp your matte after using them.
➔ The Project3D node is not too fond of overscan. If you are projecting a matte painting or a patch with a large bounding box outside of the format, try instead to reformat the image to the bounding box before projecting it: Add a Reformat node, and in the Properties panel set the type to scale and the resize type to none. Then, increase the scale until the format covers the bounding box.
➔ The Roto node can suddenly stop creating keyframes, or you may become unable to delete keyframes or select your roto shapes. If so, restart Nuke to fix the issue.
➔ The RotoPaint node tends to cause issues when it contains a massive amount of paint strokes. Try to limit each RotoPaint node to a maximum of around 200-300 paint strokes, and create new RotoPaint nodes if you need to continue painting beyond that soft limit.
➔ It is usually a good idea to work on particle systems in a separate script to your main script, as these can be extremely heavy to load and render. The particle emitter can also be buggy unless it is set to start at frame 0. If so, start your frame range at frame 0, render out the particles, and then TimeOffset the render to the correct range in your main script.
➔ Heavy setups such as multiple Kronos nodes combined with projections, particle systems, etc., can lead to the frame buffer breaking. Make use of precomping to avoid this.
➔ Using the Proxy mode in the Viewer can cause issues: projections, Roto shapes, etc. may no longer line up as you expect. Disable the proxy mode as needed.
➔ If you cannot seem to interact with any of the node connections in your script, check if they have accidentally been locked in the Project Settings → Lock all connections. Untick that setting to unlock them.
➔ If your node properties will not open in the Properties panel, check if it has been locked. Untick the little padlock icon at the top of the Properties panel to unlock it.
Optical Trickery
In some cases, an issue can be caused by how you view your render, or by certain optical peculiarities.
Moiré Patterns
If you take a picture of your monitor while it is switched on, you are likely to pick up some strange grid patterns in the picture. The sensor in your camera is not able to perfectly capture the fine, repetitive detail of the small grids of pixels in your monitor. The result is a wave-like, shimmering pattern that changes as you move your camera around at different angles to the monitor.
This type of effect can sometimes happen when you transform an image in Nuke using a standard filter such as cubic. In particular, the combination of slow, animated transformations and fine detail in the transformed image may cause this effect. It can manifest as the same wavy pattern, or as jittery motion that looks a bit odd.
If you find that an image starts behaving strangely after applying a transformation to it, try changing the filter type in the node that is performing the transformation. (Or, in the last transformation node in a concatenated stack). There is a filter called Notch that you can use specifically for these situations. It does add some softening to the image but it should hide the Moiré patterns.
💡 If you are experiencing issues with Moiré patterns, make sure you are viewing your render with proxy mode disabled, at a 1:1 ratio, and at 100% zoom level in your Viewer. If the pattern is still present, try to apply the Notch filter to your transformations.
Frame Rate And Compression
Many of us are working remotely, and are streaming from our office workstations to our laptops or desktops at home. There is a cost of quality associated with this. It comes in the form of reduced frame rates and increased compression. This can result in not being able to spot issues in a render on the run, or seeing issues which are not actually in the render and flagging false positives.
🙃 I remember watching several versions of a comp in remote dailies as the comp progressed over a week. At the end of the week, we went into the office and watched the comp in the screening room. Only then did we spot that there was a subtle but noticeable jitter in the animation.
Viewer LUTs
If your colours seem off it could be because you are applying the wrong Viewer LUT when viewing your composite. Ensure that you have selected the correct LUT in the viewerProcess dropdown menu (above the Viewer Gain slider) in Nuke.
How To Handle Corruption
On occasion, a Nuke script may become corrupted. The first thing you should check is your auto-save folder. There could be a working version of the script saved from not too long ago, and you would not lose much work by reverting to the older version.
There are often several versions saved in the auto-save folder. One method to determine which of them could be working is to look at their file sizes. If most of the auto-saved scripts are, say 1 MB, but the recent ones are only 5 KB, then try opening the latest script with the normal file size.
Break Out The Notepad
However, if you would like to restore something from a corrupt script, you can open it in a text editor and attempt to salvage nodes from there. The code for each node will follow a similar pattern:
ClassOfNode {
settings
settings
settings
…
}
Knowing that, you can find and copy specific nodes from a script directly from the text editor.
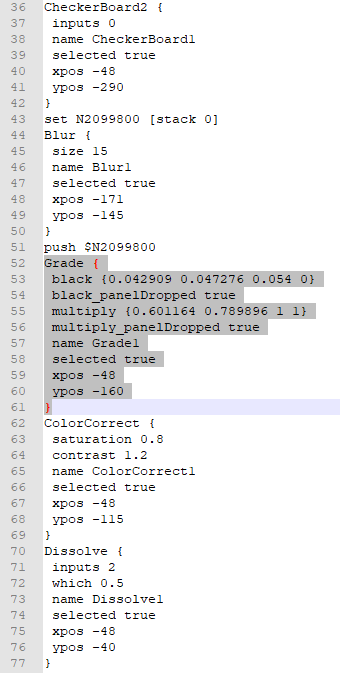
Example: Salvaging a Grade node from a text editor by copying the text highlighted in grey and pasting it into a fresh Nuke script.
Connect The Dots
There are two main ways that nodes are connected to each other when you are looking at a script in the text editor. The first way is by one node following directly after another in the text. The exception to this is when it says inputs 0 below the node’s class name, meaning there are no inputs connected:
ClassOfNode {
inputs 0
settings
settings
settings
…
}
In the previous picture with the text editor, an example of the first way of connecting nodes is the ColorCorrect following directly after the Grade node. Meaning, the output of the Grade node is connected to the input of the ColorCorrect node in Nuke.
The second way nodes are connected is by the use of the set and push commands:
set <variable name> [stack 0]
The set command stores the previous node (the one directly above the set command in the text editor) in a variable. That way, it can be referenced for connection later via the push command.
In the picture, the Checkerboard is being stored in a variable named N2099800. That happens on line 43: set N2099800 [stack 0].
push $<variable name>
The push command tells the following node (the one directly below the push command in the text editor) to connect to the node stored in the variable, instead of to the previous node.
In the picture, the Checkerboard is the source for two separate pipes. One pipe with the Blur node, and one pipe with the Grade and ColorCorrect nodes. First, the Blur node is connected to the Checkerboard. (It follows the Checkerboard in the text – starting on line 44).
Then, the Checkerboard is being used again as an input for the Grade node. That happens on line 51: push $N2099800. Without line 51, the Grade node would instead be connected to the Blur node. And as mentioned, the ColorCorrect node follows directly after the Grade node, and is therefore connected to it.
Finally, the two pipes are connected to a Dissolve node. The order of the two pipes in the text editor dictate the order in which they are connected to the Dissolve node. The Dissolve node follows directly after the ColorCorrect node, and so its main input (labelled 0 on the Dissolve node in Nuke) is connected to the ColorCorrect node.
Line 71, inputs 2, tells us that the Dissolve node’s second input (the input labelled 1 on the Dissolve node in Nuke) is connected. If only the main input was connected, line 71 would not be there. And so, the second input of the Dissolve node is connected to the second pipe. (The one with the Blur node).
If, however, one or both of the inputs of the Dissolve node were to be disconnected, leaving one or both of the pipes with no output connection, the special command push 0 would appear in the relevant pipe(s).
push 0
This command clears the stack so that the next node is not automatically connected to the previous one.
There are many more nuances to the syntax in a .nk script, and the documentation is sparse. It gets a bit more complicated the more inputs you have. For example, there would be several push commands stacked (in order) before a Switch node with multiple connected inputs in Nuke. Or, connecting the additional A2, A3, etc. inputs of a Merge node would lead to text lines such as inputs 4+1.
There is a logic behind it all, but it can get confusing and hard to keep track of things. Especially if the script has become corrupt and parts are missing. Hopefully, with the above knowledge you will be able to salvage some of your work.
Report Issues
Lastly, if you encounter bugs in Nuke, The Foundry’s website explains how you can report and track software bugs or issues.
I hope you found these troubleshooting tips useful. For more Nuke tips & tricks, see Nuke.


