Professional Rotoscoping In Nuke
A deep dive into best practices for elevating your rotoscoping skills to a professional level in Nuke...

A deep dive into best practices for elevating your rotoscoping skills to a professional level in Nuke.
Get Into The Right Frame Of Mind
First things first, before you begin any rotoscoping work it is useful to have the right mindset.
Until Machine Learning, Artificial Intelligence, and/or other technologies can produce sufficiently high quality mattes, rotoscoping will remain laborious manual work done by human hands. While I just cannot wait for when manual rotoscoping is a thing of the past - and we are seeing promising progress in that direction - it is currently very much a part of the visual effects industry and our everyday work.
So for now, I think it is important to approach rotoscoping with the right expectations. While much of rotoscoping can be semi-automated, and approaching the task in a smart way can definitely reduce the workload – expect there to be focussed, manual work required.
Yet, approaching the work intentionally and with a clear vision can actually make it an enjoyable and Zen-like experience. It is the type of work that has a tangible goal line from the start, and you can see concrete proof of progress along the way. Dopamine rewards from your brain come both often and easily as you mentally (or physically) tick checkboxes for goals and sub-goals.
Keeping this in mind, the first stage of rotoscoping is familiarising yourself with the work at hand.
Check The Brief
Start off by examining the roto brief in detail. It may be in the form of an annotated brief in Shotgrid (or a similar project management tool), a discussion with your supervisor (or client for smaller freelance jobs), or a combination of both. Get as much clarity as possible, and make sure that you have all the information you need. Do not be afraid to ask again if something is unclear.
Before you begin the rotoscoping work, you should know the answers to the following questions:
What is your time frame? When are you expected to complete the roto for your shot? Does that deadline seem reasonable? Remember to underpromise and overdeliver, rather than the other way around.
Which scan will you be working on? There may be multiple scans under the same shot, or there could even be a scan filed under a different shot name that is being used for your shot. Make sure that you are using the correct one – triple-check, if needed.
Which frame range will you be working on? It may only be a section of the shot's work range. Or, it could even be a longer range than the work range, if rotoscoping is being done before retiming the scan.
Is there any retiming of the scan? Will you be working on the retimed scan, or the original?
Is there any extraction or reframing of the scan? Will you be working on the scan before or after that happens?
Should the different elements in the shot that you will be rotoscoping be split into separate channels? Which ones go where? For example, the foreground character in the Red channel, and the background car in the Green channel.
Will you be rendering your mattes with motion blur, or without – or perhaps both options?
What is the naming convention for each matte? Make sure you set the correct names in each Write node.
Which portion of the scan exactly will you be rotoscoping? And how much coverage will you need? For example, a full-body roto of actor A, but only from the knees and up. It may be worth asking the compositing artist for a quick mock-up if it is unclear what coverage will be required.
How accurate does the roto edge need to be? Is it a very precise shape for a close-up shot, or more of a background garbage matte?
How much detail is required? Will for instance the compositor handle the hair detail of a person, and you will only need to roto the general head shape?
Does any shape have to be specifically split out from the rest of the subject/object? For example, when rotoscoping a car, do the windows need to be rotoscoped separately, or is only one matte for the whole car required?
Do subjects/objects overlap in the frame, and if so, how should that be handled? Will you still need to accurately roto each of them as they overlap, or are you allowed to be looser with your splines in the overlapping areas?
Does it make sense to combine multiple things in one matte? Such as, rotoscoping the outline of a background crowd versus splitting each person out separately.
Could something more easily and accurately be keyed? It might be worth suggesting that the compositing artist creates part of the matte. (Or, asking if you are allowed to use keying for part of the matte creation). For example, the hair detail of a person.
Once you have confirmed the exact requirements of the brief, you can plan how to best approach the task and decide on your angle of attack.
Plan Your Approach
Play the scan that you will be rotoscoping, on repeat, and analyse the movement that you will be tracing. Sometimes it helps to also play the scan in reverse, or at a lower frame rate, to really focus in on what is happening in the shot.
Look for things such as:
Is the camera moving? The majority of the time, even with small camera moves, it is worth the effort to track the shot to assist with rotoscoping.
Does the subject/object that you will be rotoscoping have an overall motion that you can track? For the same reason as in the point above.
What type of movement is there? For example, is there fast-changing or jittering motion in the shot? Or, more straight and linear movements? This will let you know how many keyframes you can expect to place.
Where are the key moments that define the gross motion of the subject/object in the timeline? Finding these will help you reduce the amount of keyframes needed overall.
How complex are the shapes that you will be rotoscoping? This will inform where to make use of segmentation to manage the rotoscoping task and keep your splines from becoming unwieldy.
Does what you will be rotoscoping significantly change shape over the shot? It may make sense to create different splines to fit each form, and hand over between them. For example, if a person turns away from facing the camera to showing their profile.
Does what you will be rotoscoping go out of frame or get occluded at some point(s)? This will inform if setting a Lifetime per spline will be necessary. Also, see if the subject/object comes back into frame or gets revealed again later in the shot. Perhaps you can continue using the same splines throughout.
Is there significant motion blur? This will inform where to align your splines and how much motion blur is required to be added to them.
Is the subject/object that you will be rotoscoping out of focus? Similar to motion blur, this will also inform where to align your splines. (And, how much defocus is required to be added to them – although the compositor will usually handle the defocusing).
Now that you have a good idea of what to consider when approaching your rotoscoping task, let us look at how to proceed in more detail.
Make The Computer Do The Heavy Lifting
Even without the advanced tools of the (hopefully near) future, to rotoscope efficiently you should aim to make the computer do as much of the work as practical. There are two main ways to achieve this:
Track the shot. Your shot may have a camera move, and/or the subject or object may move around in frame. This adds complexity to the motion path of what you are rotoscoping. It is highly likely worth it to track the camera or the subject/object, and remove this additional motion from the equation. Applying the tracking data to your roto will typically reduce the amount of keyframes needed for rotoscoping a subject or object dramatically.
Set smart keyframes. Let the computer (correctly) interpolate between your keyframes as much as possible. By setting keyframes in logical places you will reduce the amount of keyframes needed overall. You will also reduce or eliminate the amount of counter-animation needed to align your splines between keyframes.
Let us break down each of these two ways of making the computer work for you.
1. Track The Shot
When starting your rotoscoping task, always consider if you could benefit from tracking the shot, whether it be the camera's or the subject/object's motion. Unless the camera is locked off and the subject/object is not moving, chances are the answer will be yes.
Initially, check if there is already a matchmove camera for your shot. If not, it could be worth requesting it or making one yourself. Having a matchmove camera means you will get the camera’s motion for free in your roto, reducing the amount of keyframes needed for your splines.
You could set up Cards or other geometry in 3D space, and project your roto onto them with your Camera. You could also use a 2.5D solution such as the Card3D node in conjunction with the Camera. Or you could generate 2D tracking points using Reconcile3D nodes with your Camera and strategically placed Axis nodes.
Otherwise, you could go down the 2D tracking route. There are a number of options, the most common being the standard Tracker node in Nuke – with a 1, 2, 3, or 4-point track, depending on how your subject/object and camera are moving.
A 1-point track captures the X and Y position only.
A 2-point track captures the X and Y position, and the Z-rotation (clockwise or anti-clockwise rotation of the image). In some cases, you can get sufficiently accurate scaling with two points, but three is recommended.
A 3-point track captures the X and Y position, the Z-rotation, and accurate scaling. Three points are usually enough for most 2D tracking needs.
A 4-point track captures all of the above but also allows you to export a CornerPin2D node which can distort and matchmove your roto within the features that you have tracked.
Any more points only add to the accuracy of the 2D track, and bias the center, i.e. the origin for rotation and scaling. (However, you could also add the points as UserTracks in a CameraTracker node for a 3D camera solve).
💡 Before you track using the Tracker node, remember to first choose the warp type under Auto-Tracking in the Settings tab according to how the feature that you want to track is moving. It defaults to Translate, but if your feature rotates or scales it might lose the track. Also, enable the adjust for luminance changes checkbox in the same tab if your shot flickers, to help with the track.
Whichever method you use for tracking your shot, there are several ways of using tracking data effectively.
A straightforward way would be to export a Transform_Matchmove node from the Tracker, and add it after your Roto node to apply the tracking data. A superior way, in my opinion, is to link the tracking data in the Tracker to the Transform tab of the Roto node, on the Root layer. That way, no matter where you connect your Viewer in the script, your splines will retain the tracking information and display correctly.
Another benefit is that any changes in the Transform tab (such as scaling) will affect the splines themselves – changing the matte before pixels are output from the Roto node, and not after. That means your mattes do not get softened edges from filtering hits, like when you add a Transform_Matchmove node after the Roto node.
To link the tracking data of your Tracker to your Roto node, open up the properties of both nodes and go to the Transform tabs of each. Select the Root layer in the Roto node and hit Ctrl (Cmd) and Left Mouse Button drag the Animation menu buttons next to the translate, rotate, scale, and center knobs in the Tracker node to their respective buttons in the Roto node. I would suggest renaming the Root layer to RootTRACK, or similar, in order to make it very clear that there is now tracking data linked to it.
💡 By applying the tracking data to the Root layer, every spline in the Roto node that you have created, and any that you create going forward, will automatically get matchmoved.
You could of course copy the tracking data over, instead of linking it. I prefer to link it so I know where the tracking data is coming from at a glance. I also like to keep one central source for the tracking data instead of making multiple identical copies around in the script.
Stabilise As Needed
It is easier to judge how something is warping if you view and roto it while stabilised. Then after you finish your roto work, apply the matchmove to the Roto node. Incidentally, a good way to check if your track is solid is to stabilise your scan using it. And so, you can hit two birds with one stone with this approach.
Stabilising your scan using the Tracker node is quite straightforward. Just export a Transform_Stabilise node from the Tracker and connect it to your scan. Then roto on the stabilised scan. Finally, export a Transform_Matchmove node from the Tracker and apply it to your Roto. It will then line up with your original scan.
💡 If stabilising using multiple trackers, invert their order when matchmoving again to ensure you correctly reverse the stabilisation.
To stabilise your scan using a matchmove camera is also fairly simple:
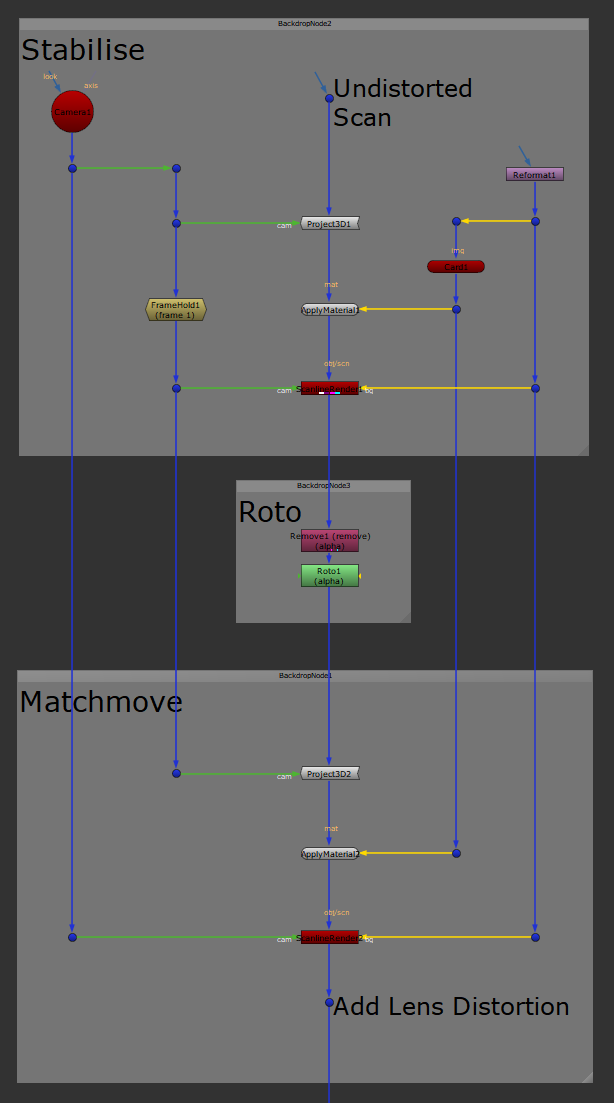
Let us break down the setup in the picture above.
First, in the Stabilise section, the incoming undistorted scan is being projected onto a Card which has been placed at the desired position in 3D space. This could be on the wall of a building, the front of a street sign, or anywhere you want to stabilise the undistorted scan.
💡 You can use the point cloud or tracking cones to help set up Cards or geometry in the right position in 3D space. Use the snap feature (snap_menu button) in the Cards’ or geometry’s properties to snap to vertices, or manually move your Cards or geometry into position.
Since we are stabilising, the order of the projection is inverted compared to normal projections. The matchmove camera is being used as the projection camera – as is. That means each frame of the undistorted scan will be projected live onto the Card, from the position of the matchmove camera on that frame.
The first ScanlineRender node is being used to render out this projection. It renders through the same matchmove camera which importantly now has been frameheld on the desired reference frame. This will stabilise the undistorted scan at the position of the Card, relative to the reference frame.
💡 When creating a projection camera, instead of making a copy of the matchmove camera and deleting all the keyframes on the reference frame, simply add a Framehold node and input your reference frame.
Next, the Roto section is where you would do your roto work on the stabilised scan.
Finally, the Matchmove section projects the roto onto the same Card, using the projection camera and matchmove camera the normal way around. Here, you would also add your lens distortion at the end.
💡 Using ApplyMaterial means that you can use the same Card twice and avoid having to make another copy. (And having to remember to update it if you move the first one).
Always remember to plug a Reformat node into the BG input of the ScanlineRender nodes (and into your Cards if using the ApplyMaterial method) to set your format correctly. If nothing is connected they will take the Root format from the project which may or may not be what you want.
Now that tracking the shot is accounted for, let us move onto the next way of making the computer work for you.
2. Set Smart Keyframes
When rotoscoping, where you place your keyframes on the timeline has an impact on how much work you will need to do, and the likelihood of getting boiling edges. Ideally, you want to set the fewest amount of keyframes as is practical, to accurately follow your shape and get a clean edge.
To begin with, as you start playing through the scan, look for the frame where the subject/object that you will be rotoscoping is the closest to the camera and has the most detail. It should have all or most of its edges visible. Make that frame your starting point. Create your spline there, and establish the first keyframe.
Then, work your way outward from that point. By doing this, you avoid having to add further control points to the spline later on when more detail would be revealed. Adding more points can affect and clutter the spline on previously set keyframes, and make it harder to work with the spline going forward.
As you move outward from the starting point, identify the extremes of the movement. The highest point of a jump, the lowest point of an arm swing, etc. Find the apex of the motion and set your next keyframe there. Continue looking for the other apices of the motion and set keyframes there. The computer will interpolate between the extremes, and move your splines (close) to where they need to be for the in-between keys.
(If you instead were to set a keyframe on the median of the motion, you would have to go back and add extra keyframes for the peaks and valleys, and potentially have to 'fight' the motion of your splines).
The next thing to look for is the moment when the motion comes to a rest. Set a keyframe where this occurs. That way, the computer will interpolate motion only as it happens, and not continue moving the splines into the resting phase. (Forcing you again to fight the motion with more keyframes). Make sure to also set a keyframe before the motion starts up again to allow the computer to better interpolate the resting period. Continue setting keyframes at these moments throughout the shot.
Once you have set up the main keyframes at the apices of the motion, and have defined the resting phases, you can start working on the in-between frames. Use the same approach again; adding keyframes at the secondary apices and resting phases in between your main keyframes. Look for where your splines deviate the most from the subject/object, and you will know where to set your in-between keyframes.
Rinse and repeat, adding as many in-between keyframes as needed until the splines accurately follow the subject or object.
💡 For quick and dirty rotoscoping such as garbage matting for a temp comp, the above still applies and is a useful approach. However, if you just want to hammer out some rough keyframes, you can use the Shift + Left/Right Arrow Key shortcuts to jump back or forth on the timeline by the amount of frames set in the Viewer. This is by default set to 10 frames. I would suggest changing it to 8, as you can more easily add keyframes halfway in between, when more granularity is needed. From every 8 frames, to every 4 frames, to every 2 frames, to every 1 frame.
Now that you have a better understanding of where and when to set keyframes, and how to make the computer work for you, let us dive into spline management.
Segment Your Subject/Object
To achieve a high quality matte you should aim to segment the subject or object that you are rotoscoping into multiple shapes. By breaking a complex shape such as a person into smaller, more manageable shapes, it becomes much easier to keep a consistent edge - especially when parts go in and out of view.
Splitting a large job into smaller tasks also makes it easier to tackle and keep track of the job. It even makes it simpler to share the workload between multiple people. And, if you need to make changes later on, it is much easier to adjust smaller sections rather than one giant, unwieldy spline.
Make sure to pick logical places such as bone joints or hinges for segmenting your subject/object. If you for example are rotoscoping an arm, then making splines for the upper arm, forearm, and hand is a good start.
💡 Keep enough overlap between the separate splines so that you are not inadvertently leaving gaps in your matte.
When you have multiple splines in a Roto node, it can be easy to accidentally include a spline in your selection that you did not intend to, and inadvertently change it. To avoid this, you can tick the padlock symbol next to the spline in the Roto node’s properties when you have completed work on it. This will temporarily lock it and make it uneditable. That way, you will be unable to select it by mistake in the Viewer. Should you need to edit the spline later on, you can just untick the padlock symbol again.
If your subject/object significantly changes shape throughout the shot, make separate splines for each variation and hand over between them. It is normally the better approach over attempting to make one spline fit multiple scenarios. Especially when one shape has less detail than the other, and you would have to move a lot of superfluous control points around to fit.
Stay Consistent
Staying consistent with your splines helps you avoid sliding, boiling or wobbling edges in your matte.
When you create a spline, place the control points at natural features of the subject/object. Then, keep the control points at their corresponding positions throughout the shot. For example, if you make a control point by the knuckle of a finger, keep that point locked on the knuckle for the whole shot.
💡 You can toggle label points to show control point numbers and make it easier to keep track of your control points. The label points option can be found in the top screen left Viewer menu of the Roto node.
Limit the amount of control points on your spline. You should be able to capture the detail of your subject/object, and no more. Having too many points makes animating your spline more difficult. Consistently being economical with your control points will reduce the amount of work needed to adjust your splines.
Rotoscope only one whole object at a time for the entire frame range, e.g. just a hand. That way, you will more closely follow its shapes and make adjustments specific to its movements. You will set keyframes on frames that are right for that particular shape. The best frames for keyframing the hand may be different to the best ones for the forearm or the upper arm.
When it comes to motion blurred or out of focus edges, it differs from studio to studio where you would align your roto edge. I would suggest that your splines should follow the centre point of the soft edge - the midpoint between fully opaque and fully transparent - to allow Nuke to correctly calculate the motion blur, and blur the edge. But whichever approach you take, stick to it, and keep it consistent throughout the shot.
Keep It All Organised
With sometimes dozens and dozens of splines in your Roto nodes it is a good idea to keep them organised. It will help both yourself and others that will pick up your script to work more efficiently.
Add labels to your Roto nodes with a brief description of what they contain, e.g. "BG Cars", or “SL Hand”.
Add layers in the Roto nodes for each separate section, e.g. "Legs" or "Head", or even more detailed such as "Left Upper Arm", depending on how many splines you have. Then sort the relevant splines into their corresponding layers. This makes it quicker and easier to find what you need if you have to make a change later on. You could also link separate tracking data to each layer, should you wish.
Add Backdrops to group your Roto nodes and describe what they contain. Or, simply label them as Roto to make it easy to recognise them at a glance.
Set a Lifetime for every spline that is not active throughout the whole shot. You can set a spline’s lifetime in the Lifetime tab of the Roto node. Or, by Left Mouse Button clicking on the spline under the Life column in the Roto tab, and picking an option from there. (All frames, start to frame, single frame, frame to end, or frame range). Alternatively. you could animate the spline’s opacity to 0. By killing splines like this when they are not active, you avoid rogue splines hanging around or tracking back into the frame.
Change the spline colours for easier differentiation between sections of roto. For example, you could have one colour per limb of a character, or different colours per artist if you are sharing work with someone else. Or, you could colour the splines according to progress, for example changing the colour to green when you have completed a spline.
Change the fill colours of your splines when outputting RGBA from the Roto node. This is useful if you are making a Multimatte-style roto with many shapes, each with their own colour, and you need to bypass the limit of the standard four mattes output to the RGBA channels. It can also be useful if you are rotoscoping overlapping shapes individually, and want to better visualise where each matte goes. (Instead of all of them merging into one white shape in the overlapping area).
Keep your B-pipe flowing straight by using the Mask and Stencil operations versus the In and Out operations when merging your mattes.
Layer your mattes and Roto nodes from background to foreground. Laying them out logically like this in your script makes it easier for you and others to find what you are looking for quickly.
Use Roto nodes instead of RotoPaint nodes when you are only rotoscoping using splines and do not need the additional paint features. This will visually make it clearer in your script that only rotoscoping is happening within the node.
Control Your Splines
A good method for keeping your edges clean and consistent, is to first and foremost transform your whole spline, and not its individual control points. You can do that by using the transformation box which appears when you select two or more control points on a spline. Once the spline has been transformed into position you can tweak the individual control points as needed.
Below are some tips for controlling your splines:
Move individual control points by selecting your spline and Left Mouse Button dragging a point in the Viewer.
Move multiple control points, or all of your spline, by Left Mouse Button dragging over and selecting multiple points, or the whole spline, then Left Mouse Button dragging the transformation box. You can also hit Ctrl (Cmd) + A to select all the points on a spline. Just make sure that you select the correct spline first if you have multiple splines in your Roto node. Otherwise Ctrl (Cmd) + A will select all the splines. This also applies to Left Mouse Button dragging over splines. Without selecting the spline you want first, it will select control points from all overlapping splines.
Rotate your spline or control point selection by hovering your mouse over one of the corners of the transformation box until the rotation controls appear, then Left Mouse Button dragging to the left and right.
💡 When rotating the transformation box, Nuke will snap to every 15 degree angle by default. To apply more precise rotation, hold Shift after you have started rotating.
Set the anchor point of a spline or control point selection to where it would be in the real world. For example, on the shoulder for the upper arm, on the elbow for the forearm, or on the wrist for the hand. Set the anchor point by Ctrl (Cmd) + Left Mouse Button clicking on the transformation box.
💡 The anchor point resets when deselecting the spline.
Scale your spline or control point selection by Left Mouse Button dragging any of the scale points along the transformation box. The two left and right side points will scale the selection separately in X, the two top and bottom points will scale separately in Y, and the four corner points will scale in both directions. You can lock in the proportions of your spline by holding Shift while scaling from a corner point.
Skew your spline or control point selection by holding Shift and Left Mouse Button dragging any of the non-corner points along the transformation box.
You can also use the Transform tab in the Roto node to move each spline, but since these knobs have separate keyframes to your splines it can get confusing if you use both. I would recommend using this tab only for globally offsetting all the keyframes after you have animated them, or for linking tracking data to your Roto node.
You can access per-spline and per-point options by selecting one or more control points on a spline and Right Mouse Button clicking above it/them. There you can do the normal things like adjusting the smoothness and feather, but also copy control point positions or animations between splines. Remember that you can also copy splines and their animation freely between Roto and RotoPaint nodes.
If you need to do temporary roto work on a proxy format, for instance if you have not received the full resolution scans yet, reformat the proxy scans to the full resolution before rotoscoping. Transitioning to rotoscoping on the full resolution scans when they arrive will be much smoother as you can just swap the scans directly. If that is not possible, for example if you do not know what the full resolution will be yet, you can roto on the proxy format and upscale your roto later like this:
In your Roto node, select the Root layer and go to the Transform tab. Set the center to x = 0, y = 0, and set the scale to [full format width] divided by [proxy format width]. E.g. 3840/1280 (= 3). That will upscale your roto work to fit the full resolution format. Or vice versa if you did roto work on a too high resolution format. By scaling up or down inside the Transform tab of the Roto node, you scale the splines and not the pixels output by the Roto node. So your mattes do not get filtered (soft) along the edges like with a normal reformat after the Roto node.
Focus On The Edges
Rotoscoping is all about edge work. Maintaining a clean and consistent edge that follows your subject/object accurately is key. By following the best practices described so far you should have come a long way already. There are, however, a few more things to consider:
Manage Your Feathering
The internal feather controls in the Roto node use a fairly crude box filter which can lead to undesired results around cusped edges. This applies to all the different types of falloff in the feather_type dropdown menu. Instead, either Ctrl (Cmd) + Left Mouse Button drag out a feathered edge from the control points, and/or use a Blur node to get a better soft edged result.
Soften Your Hard Edges
In almost no cases will a matte edge be razor sharp. The compositor (which might be you) should be softening the matte edges slightly, or in the case of garbage mattes, quite a bit. You want to avoid hard edges and obvious matte lines showing up in smoke elements, etc.
Apply Accurate Motion Blur
As mentioned previously, your splines should typically follow the centre point of the motion blurred edge - the midpoint between fully opaque and fully transparent - to allow Nuke to correctly calculate the motion blur for your matte.
Keep in mind that you will need to activate motion blur for each spline by Left Mouse Button clicking on the little motion blur symbol next to each spline in the properties. The symbol will change from one rectangle to three when motion blur has been enabled. (This procedure is the same as ticking the on checkbox in the Motion Blur tab).
Once motion blur has been enabled, control the motion blur in the Motion Blur tab. The Foundry’s website explains this in excellent detail.
Check Your Work
Please, do not be the person who hands over their work without checking it first. Take pride in your efforts and thoroughly examine your mattes both on the run and frame by frame, before delivering your work.
Matte holes. Check for any holes in your mattes where there might not be enough overlap between your splines.
Edge problems. Check for any sliding, wobbling or boiling edges, and any edge chatter.
Rogue matte shapes. Ensure that all splines that need it have their lifetime set correctly. They should not remain floating in frame, or track back into frame later in the shot.
Edge accuracy. Ensure your edges are accurately following your subject/object. Not too loose to bring in unnecessary background detail, and not too tight to lose edge detail from the subject/object.
Alpha values. Nuke expects alphas to only have values between 0 and 1. Values outside of this range may break the mathematical operations. For safety, clamp all mattes using the Clamp node.
Matte naming. Ensure all your mattes are rendered using the correct naming convention.
Format. Double-check that your format is correct.
Frame range. Double-check that your frame range is correct.
Channels. Double-check that you are separating your mattes correctly and placing them into the correct channels.
Motion blur. If rendering with motion blur, make sure each spline has its motion blur toggle switched on.
A great way of checking your rotoscoping work is to Keymix your plate (A) with a neutral grey Constant (B) using your matte as the mask input. This is useful for general roto checking because a neutral grey backing will make your rotoscoped plate stand out, better prepared for scrutiny. It is also specifically useful for spotting where the edge is not tight enough, and too much of the background has been included.
You can also Keymix a bright red or green Constant (A) with your plate (B) using your matte as the mask input. (Notice how the input order is inverted from the previous example). This is useful for checking where the edge is too tight, and not enough of the subject/object has been included.
💡 Do not roto while viewing these Keymix nodes, they are only for checking. They can give a deceptive edge, and you are much better off viewing your plate while working.
To check for holes in your matte, switch the colour of the neutral grey Constant in the first example above, to a bright pink or other high-contrast colour not found in your plate. It will show through any holes in your matte.
💡 If you search on Nukepedia, you will find a whole array of roto checker tools with many options for checking your mattes.
Nuke’s built-in matte overlay function (hotkey M in the Viewer) can be useful, however I have found the options above to be better for checking mattes more accurately and easily.
Find Your Rhythm
Getting into the “Zone” and finding a good rhythm when rotoscoping may take a little while at first. Try to set aside a chunk of uninterrupted time to allow yourself to really get stuck into your task. Armed with all the tools and techniques above, you should eventually be able to almost go into auto-pilot mode. You may even find it to be a Zen-like experience at times.
It is all about getting started, though. About overcoming the initial inertia, and building momentum. Once you have started, it becomes much easier to keep going. And before you know it, an hour or two have flown by and you will have been amazingly productive. Almost without recognising it.
By practising over time, your rotoscoping skills will become a well-oiled machinery, and you will be able to switch on more quickly and easily.
Speed Up Your Work
In addition to the methods that have been detailed so far in this article, there are several other ways of speeding up your rotoscoping work:
Learn The Hotkeys
Hit O in the node graph to create a Roto node.
Hit Enter to close the shape when you are creating a spline.
Hit Ctrl (Cmd) + Alt (Option) + Left Mouse Button click to add more points to your spline. (Select the spline first).
Hit Z to smooth out a control point, and Shift + Z to cusp a control point.
Alt (Option) + Left/Right Arrow Key jumps to the previous/next keyframe on the timeline.
Ctrl (Cmd) + Left/Right Arrow Key jumps halfway between your current frame and the previous/next keyframe.
Shift + Left/Right Arrow Key jumps a set amount of frames backwards or forwards on the timeline based on the increment set in the bottom of the Viewer. (The default is 10).
To move your spline accurately, you can use the Numpad numbers 1 through 9. Just pressing the numbers will move the spline around by 1 pixel. Pressing Shift + the numbers will move the spline around by 10 pixels. And pressing Ctrl (Cmd) + the numbers will move the spline around by 1/10th of a pixel.
Use Caching/Localising
When rotoscoping, you will be playing your scan over and over, and moving back and forth on the timeline very often. Caching and/or localising your scan will speed up your work because you avoid having to wait more than necessary for each frame to buffer.
Activate The ROI
If you are rotoscoping a small section of frame, make use of the Region Of Interest feature in the Viewer. This will stop Nuke from calculating more of the frame than necessary, speeding things up for you.
Make Use Of A Proxy Format
If you are working on high resolution footage it can be worth it to render out a proxy format, or scale down the resolution of the footage in the Viewer menu. If you do this, make sure to disable the proxy mode for fine edge work.
Limit The Bounding Box
Unless you specifically need it, crop any overscan from your Roto nodes and your matte renders. Keeping the bounding box to the format size reduces the amount of calculations Nuke will have to do.
Use Ripple Edit Carefully
The ripple edit function is very useful for adjusting multiple keyframes at a time, for example if you need to shift your splines globally across several frames. But ripple edit is a double-edged sword. If you forget to switch it off you could end up ruining a large portion of your roto work. Use it very intently.
💡 A red border appears around the Viewer window when ripple edit is activated.
Get Creative
The Roto node does not only have to be used for making mattes to cut out subjects and objects. You can play around with it and create interesting effects.
For example, if you set the output to RGBA and draw a straight line using an open spline, you can grade it, add a nice exponential glow, and voilà: you have a laser beam which you can animate. Ideal for plasma guns or light sabres, or just simple lasers. Multiply in a Noise pattern for added texture.
You could draw some splines into the shape of helicopter rotor blades (top view), animate them to spin fast and crank up the motion blur, then put that on a Card for some added motion and realism to an animated still of a distant helicopter.
Or you could draw some round shapes to create the lights on top of high rise buildings or bridges - the ones that flash for airplanes. Grade them for example red, animate their opacity up and down, and add some glow. Make sure to add another, smaller and brighter core to simulate the bulb inside - that always makes it look more realistic.
The above are just some simple examples, feel free to let your imagination run wild. You could create magic effects, graphic designs, wipes, experimental art, and a lot more. Combine the Roto node with other nodes or gizmos like for example Glows, TimeEcho or different types of distortions. Think a little bit outside of the box, and a wide range of possibilities will open up.
Save Money On Licencing
For every NukeX or Nuke Studio licence with a valid maintenance that you have (or the studio you work for has), you get two additional Nuke Assist licences. These are stripped down versions of Nuke specifically intended to be used for rotoscoping, painting and tracking. You can save money by using, or having your roto/prep artists use, these licences instead of a full Nuke or NukeX licence.
Consider Other Great Software
While this guide is specifically written for Nuke, it would be remiss of me to not mention some other excellent software which can help with your rotoscoping.
BorisFX’s Mocha Pro and Silhouette are fantastic tools for tracking and rotoscoping, among other tasks. Mocha’s planar tracker, for example, is leaps and bounds ahead of Nuke’s offering. It is well worth becoming familiar with these tools, and using them in conjunction with Nuke. Exporting solid tracking data from Mocha to use when rotoscoping in Nuke can be a real time saver.
I hope you found this rotoscoping guide useful. For more Nuke tips & tricks, see Nuke.


