Additive Keying Techniques In Nuke
An explanation of how additive keying works, and how you can use it to restore fine detail when keying…
An explanation of how additive keying works, and how you can use it to restore fine detail when keying…
I recently gave a presentation about additive keying to a group of students from Escape Studios.
At the end of the presentation – which, due to NDA, no one could record or take pictures of – I told the students that I would turn the presentation into a guide here on my website using stock footage – as future reference for them, and for everyone’s benefit.
Here it is, and I’ve even added some extra sections to it, to give you additional control during the additive keying process:
What Is Additive Keying?
Additive keying is part of a special category of keying, which I called auxiliary keying in my Professional Keying In Nuke guide.
Because, an additive key doesn’t replace your standard keying tools and techniques (e.g. IBK, Keylight, Primatte, etc.). Instead, it complements them – as a support key.
An additive key is used for catching the details which a standard keyer might miss.
– It’s great for capturing:
- Fine hair detail
- Fine edge detail
- Motion blurred edges
- Defocused edges
- Dust or particles
- Transparent objects
- Reflections
And so, it’s used for providing additional detail when keying.
However, you should know that an additive key can also very easily pick up stuff that you don’t want to include from the blue/green screen plate, such as shadows or tracking markers.
So, you’ll have to mask the effect as needed using a garbage matte.
In any case, the additive key is a powerful weapon in your compositing arsenal, and can help turn a good key into a great one.
How Does It Work?
An additive key doesn’t generate an alpha channel.
Rather, by using some very basic maths, it superimposes the blue/green screen plate over the background.
This gives us sort of a transparent image overlaid over the background. Which, importantly, includes things like fine hair detail and motion blurred edges.
After that, you merge your standard key on top of the result. And so, you’ll get the solid key and the fine details combined together over the background.
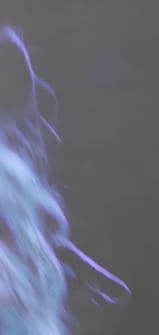
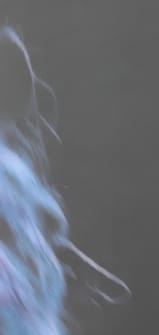
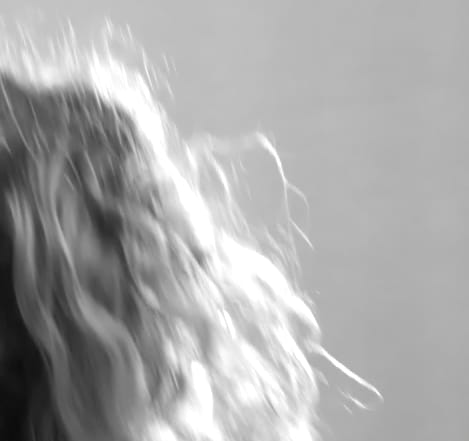
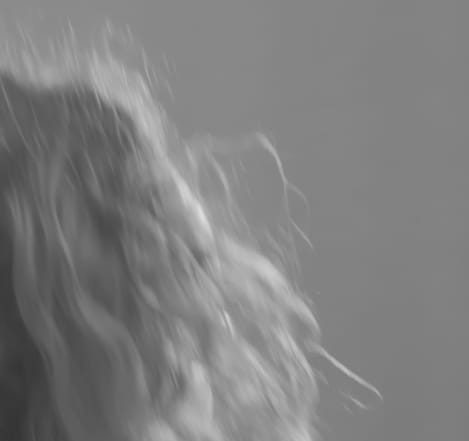
Below, I’ve created a quick example with an intentionally bad key – just to show how great the additive key is for restoring detail:
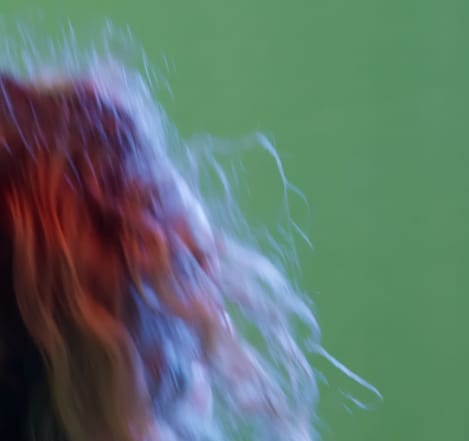
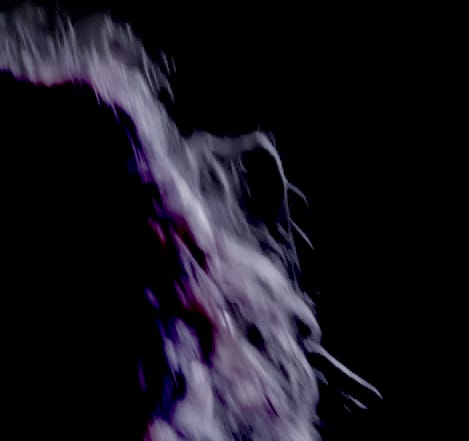
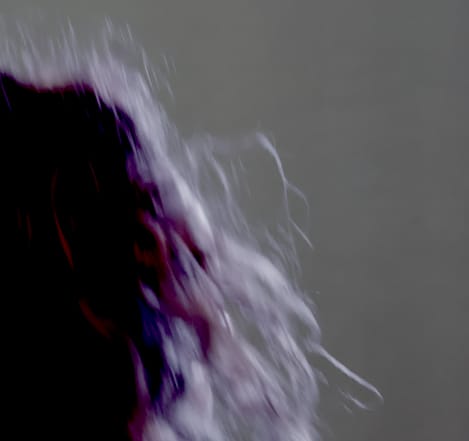
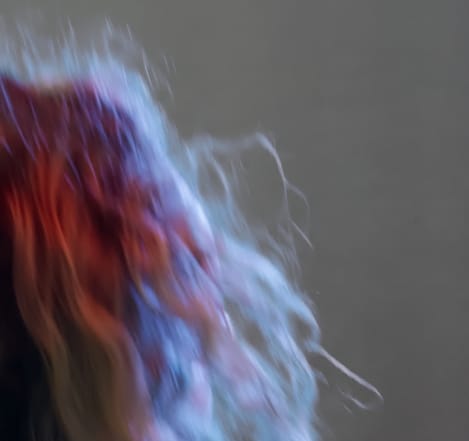
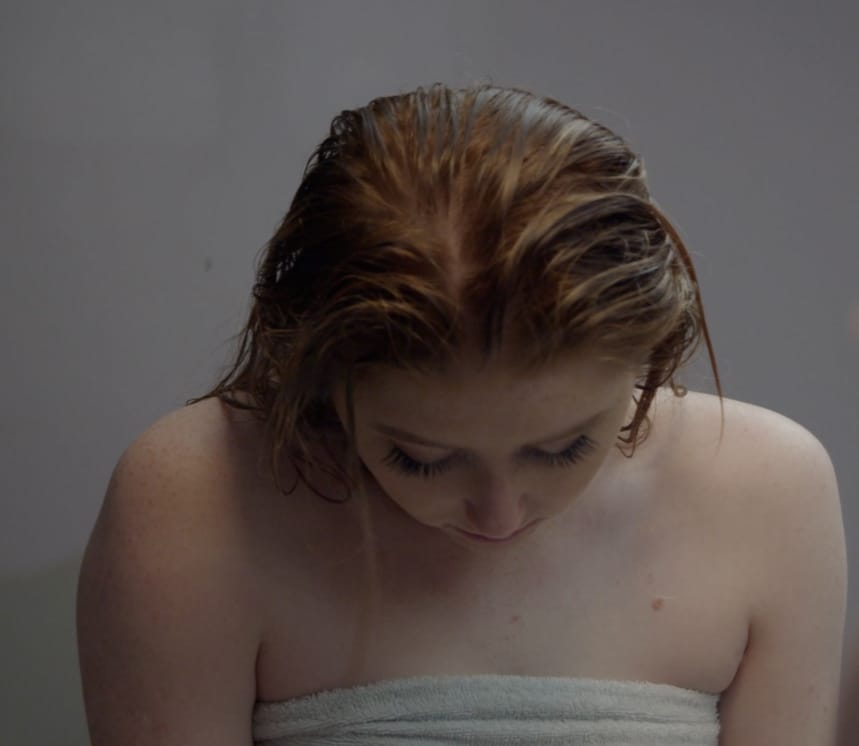
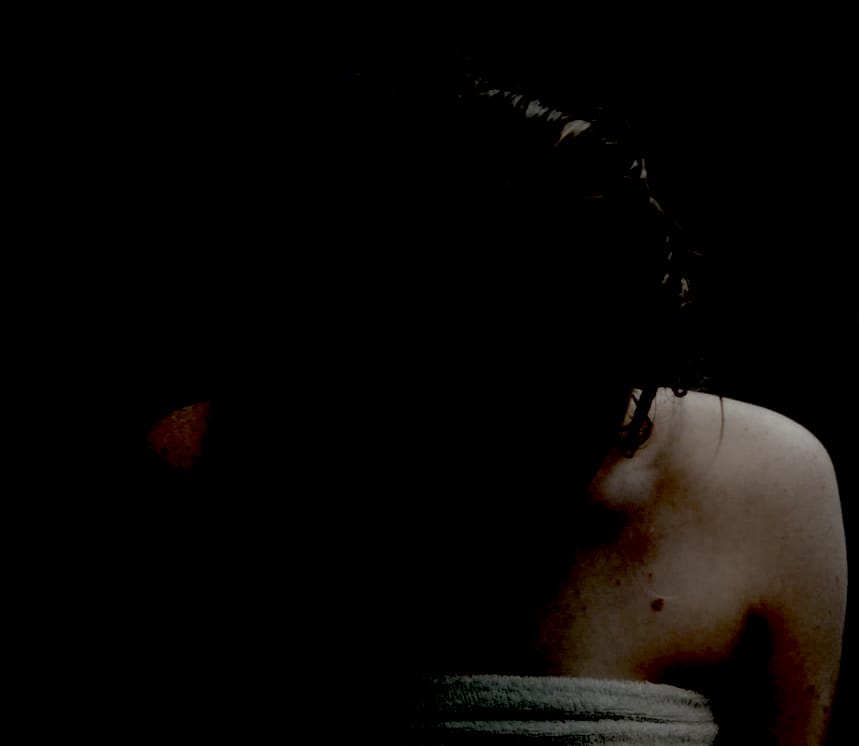
1) The green screen plate (source), zoomed in on the hair. 2) The image created by an additive key. 3) The additive key added over a new, plain grey background.
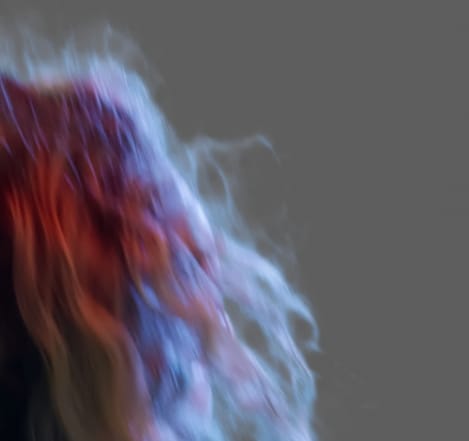
1) A standard key without the additive key included, merged over the grey background. Notice that the standard key doesn’t capture all of the hair detail. 2) The same standard key with the additive key included, merged over the grey background. Notice the additional hair detail that’s being captured.
It’s also useful to know that the screen/background colour doesn’t actually matter to the maths behind the additive key.
And so, the technique can work equally well for extracting reflections off a glass window, for example. It doesn’t have to be a blue screen or a green screen plate. Below is an example with just a grey wall as the background:

1) The original plate (source), zoomed in on the subject. 2) The image created by an additive key. 3) The additive key added over a new, plain purple background. Notice that we’re getting all of the hair detail, but we’re also getting some shadows and dirt from the original wall which will need masking out. Still, we’re pretty much ready to merge our standard key/roto on top, which will then be greatly improved by the additive key.
There are two main paths you can take to create an additive key: one using addition, and one using multiplication. And, each path has two main methods for creating the key.
(You can also combine the methods from the two paths).
Let’s take a look at the first path:
Addition
To understand how the Addition path works, you need to know three basic things:
- Colours in Nuke are represented by numbers. A pixel has certain values in the red, green, and blue channels, and those are just numbers. You can for example add to them or subtract from them – and in doing so, change the colour.
- Something subtracted from itself becomes 0 (black).
- Anything plus 0 stays the same.
Before we look at each method on the Addition path, it’s important to note that you should always denoise your footage before you start keying.
In addition to getting a cleaner alpha from the standard keyers, denoising the footage also helps you to avoid doubling up the grain when keying additively. Because, an additive key will very easily pick up any grain.
Okay, let’s look at the first method on the Addition path:
Addition – Constant Method
First, we have the original additive keying method – which is still really useful to us today.
This is the way they first did it back in the early days of VFX at Quantel, according to Rafal Kaniewski, and where the additive keying technique got its name from.
Translated into Nuke terms, the idea behind this method is that you take a Constant node, and colour pick its colour from an area of the denoised blue/green screen plate that you want to key.
Then, you subtract this Constant (A) from the denoised blue/screen plate (B) using a Merge (from).
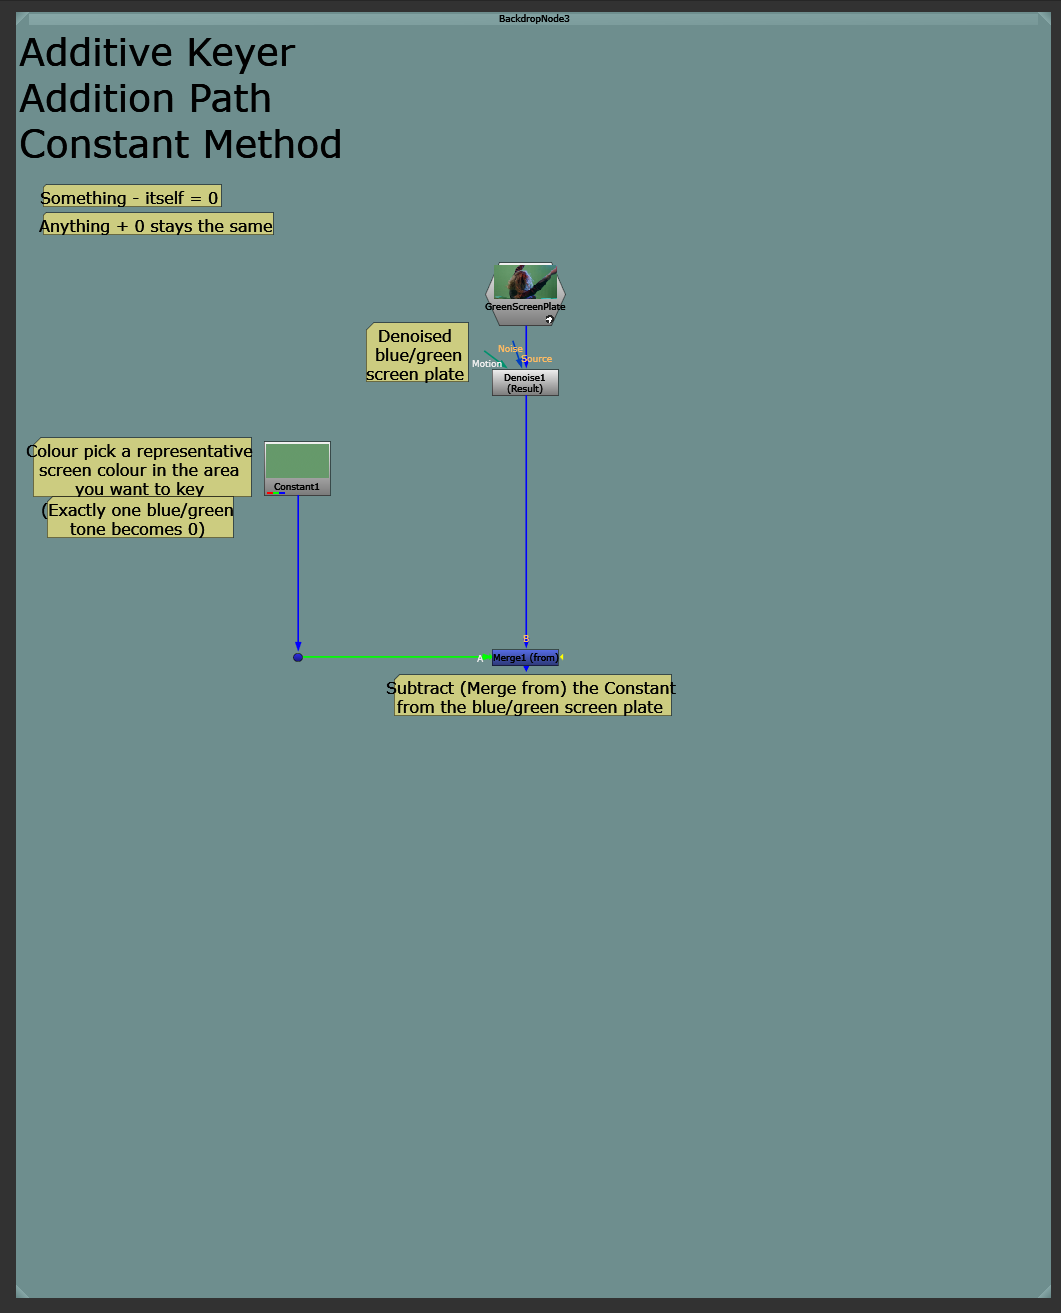
Picking a colour and subtracting it from the green screen.
By subtracting the blue/green colour from the blue/green screen, you make the blue/green screen black (a pixel value of 0) in that area.
However, in areas where there isn’t a blue/green screen, like where the actor is, there will be some visible values left over from the subtraction:
Where the denoised plate was brighter than the picked blue/green colour, there will be positive values. And, where the denoised plate was darker than the picked blue/green colour, there will be negative values.
By adding these values (A) to the background (B) using a Merge (plus), you then superimpose the actor onto the background, without any (or with very little) of the blue/green screen.
– Because of points 2 and 3 listed earlier.
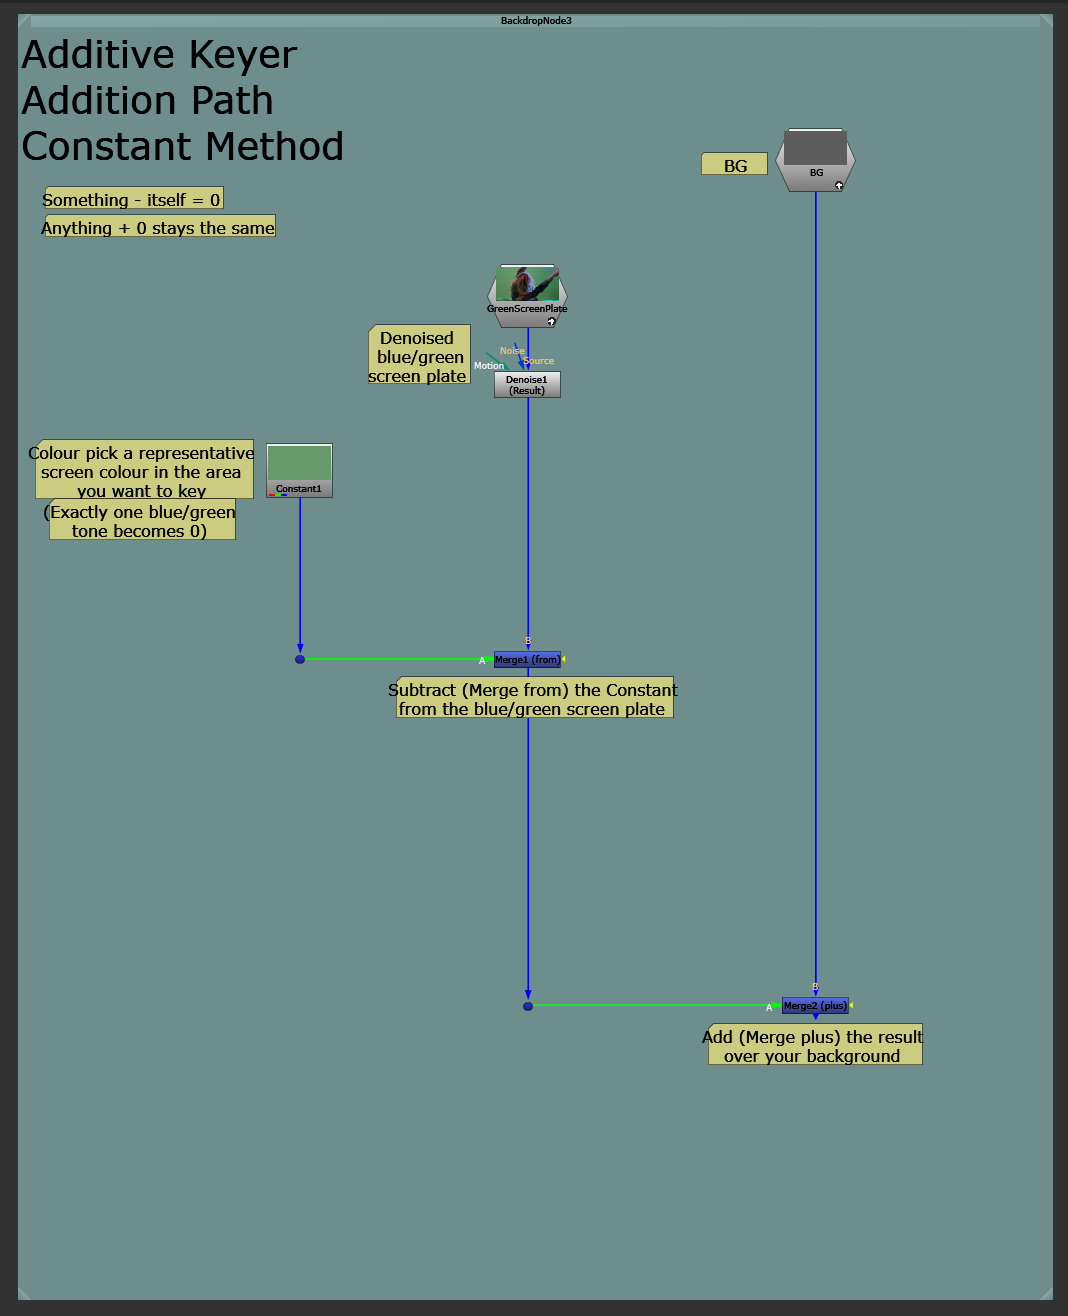
Adding the subtracted values to the background.
You may find, though, that there is a nasty colour cast on the resulting image. That’s because subtracting blue or green from for example skin tones will make them very yellow or purple.
Purple colour cast from the subtraction.
So, connect a Saturation node just after the subtraction, and set the saturation value to 0 (or somewhere below 1) in order to remove all (or some) of the colour from the image which we’re adding onto the background.
Removing the purple colour cast.
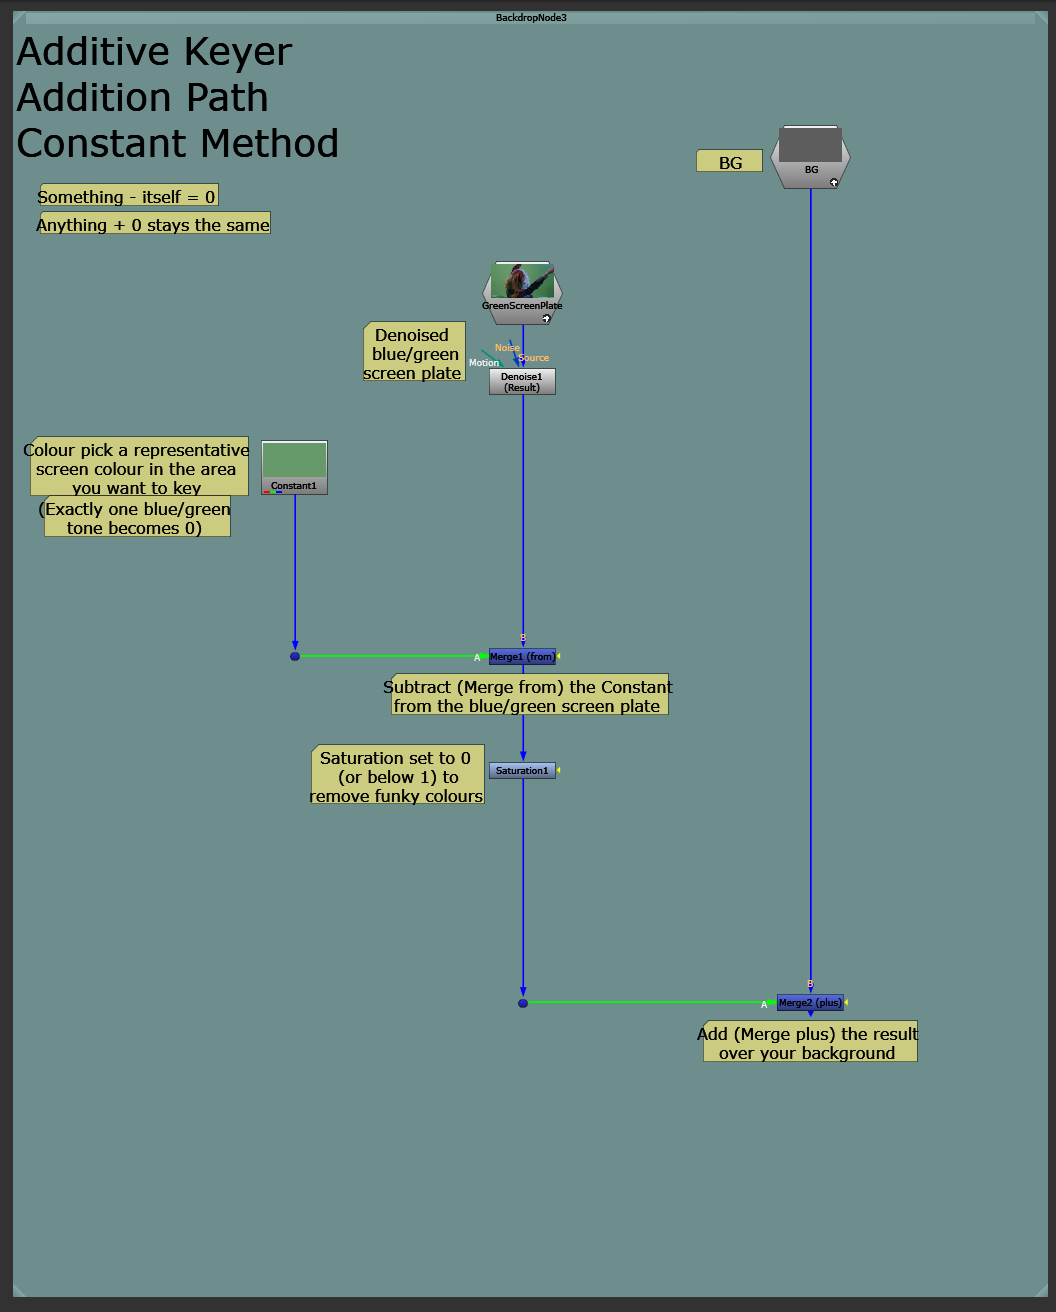
Removing the colour cast by adding a Saturation node to the setup.
Quick side note:
Saturation
Like mentioned earlier, colours are just numbers.
Each pixel has values representing how much red, green, or blue that pixel’s colour contains.
Colour (specifically hue and saturation) lies in the discrepancy between the amount of red, green, and blue values in an image.
A very red object will have much higher pixel values in the red channel than in the green and blue channels, for example.
The Saturation node’s saturation slider will equalise these different amounts the closer we slide it toward 0. And at 0, all three channels will have an identical value. Meaning, a purely greyscale image.
– You can also see this happening live as you drag down the saturation slider in a regular colour wheel in a Grade node, for example:
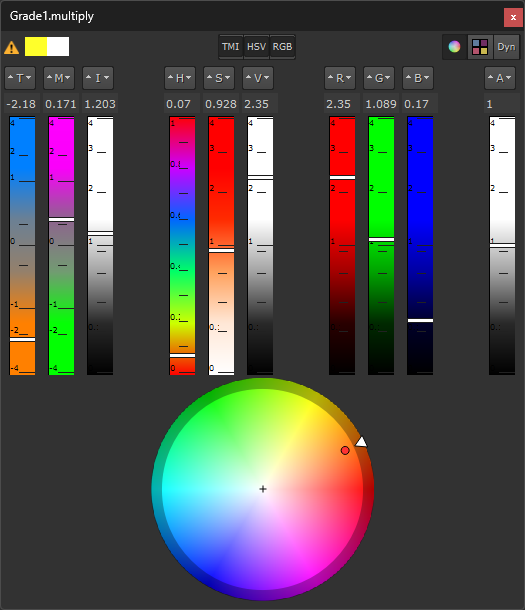

Lowering the saturation slider will equalise the three colour channels. 0.928 saturation on the left vs. 0 saturation on the right. Notice the RGB values.
And when you’re only adding grey tones to the background, you’re only altering its luminance, not its colour. So, you avoid getting that nasty colour cast.
Despill
An alternative/addition to desaturating the superimposed image, is to despill both the denoised blue/green screen plate and the Constant, using identical despillers with the same despill settings.

Despilling the blue/green screen and the Constant, equally.
This way, it’s possible to keep a bit of colour in the fine details over the background. However, you may still get some unwanted colours depending on your settings – so be vigilant, and use the despill in conjunction with the Saturation node.
Single-tone
It’s important to realise that with this Constant method, only exactly one blue/green tone will become 0. (The specific colour that you picked).
Any (even slight) variation in the blue/green screen shade will be captured by the additive key and turned into a value other than 0. – And, when added onto the background, will affect the background proportionately.
So, any gradients or colour differences in the blue/green screen will show up on the background as a difference in luminance. Any areas of the blue/green brighter than the picked colour will brighten up the background, and any areas darker than the picked colour will darken down the background.
However, you can adjust the values before adding them onto the background:
Grade To Taste
Add a Grade node after the Saturation node, and grade the result until you’re happy with the look.
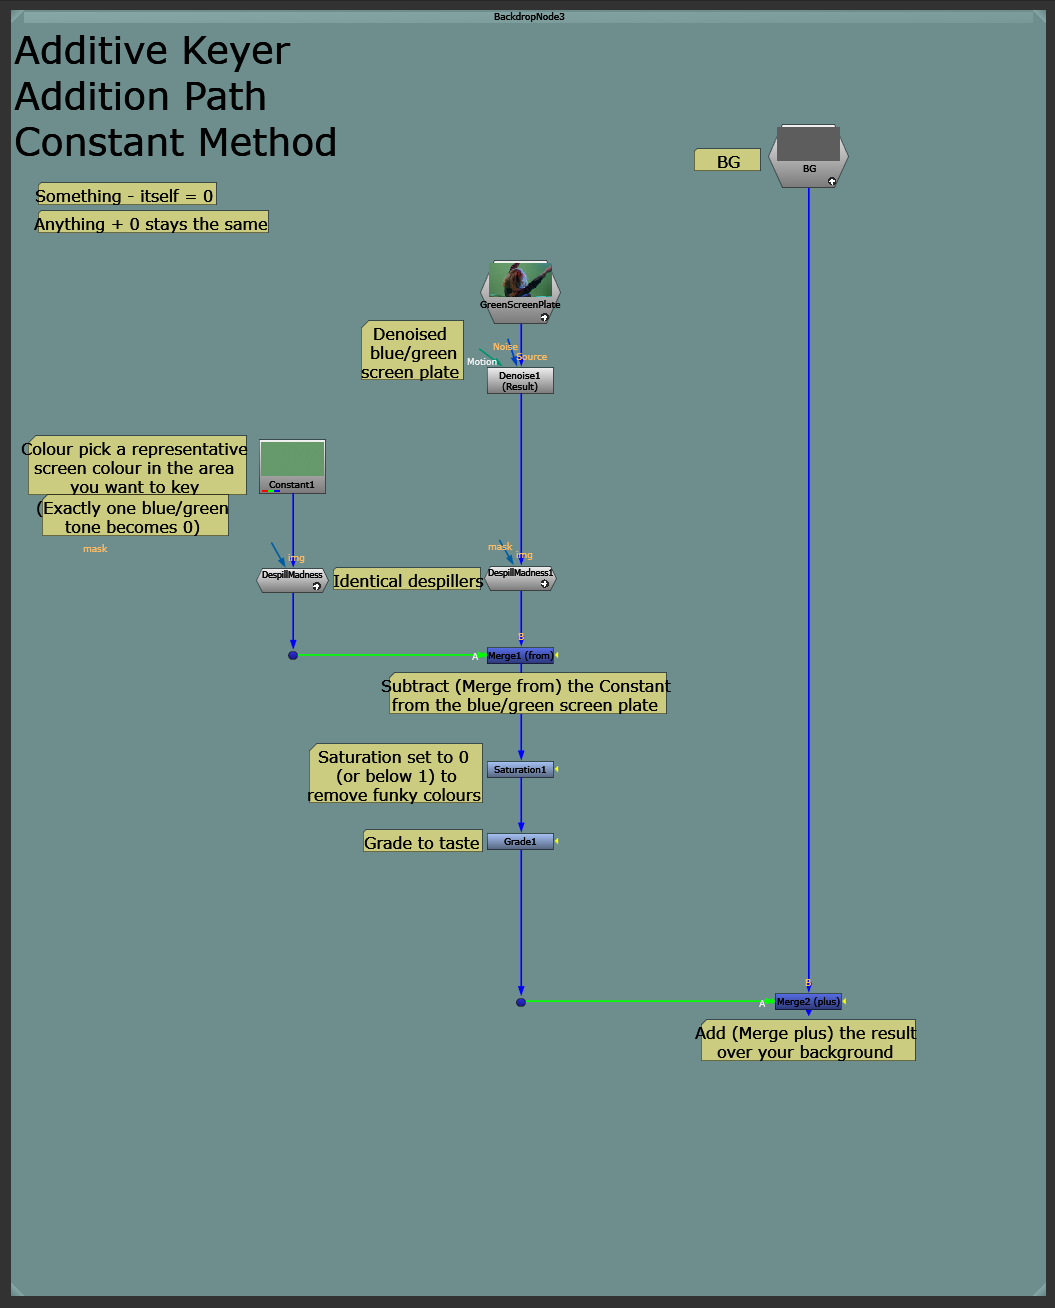
Grade to taste.
You can for instance gain the image up and down to make the superimposed image brighter or darker, or gamma it up and down to adjust the contrast. That way, you can make for example fine hair detail show through more clearly.
You can also enable black clamp in the Grade node to limit the additive key to adding just the lighter values.
– A trick, if you have super bright values (i.e. higher than 1), is to increase the gamma above 1 to mellow out those bright values. By increasing the gamma you bend the brightness curve upwards in the middle (between 0 and 1), which bends down the values above 1 (and also below 0 – they both act as pivot points) and suppresses them.
Increasing the gamma mellows out the super bright values.
You can also mask your Grade with a Roto or a Ramp to balance out any colour gradients or shadows in the blue/green screen.
– Turning more of the blue/green screen into a value of 0 before adding it over the background. I.e. making more of the blue/green screen disappear.
Background Luminance Limit
Another thing you can do, which can especially be useful if your new background is very different in luminance to your blue/green screen, is to multiply the image that will be superimposed over the background (B) by the luminance of the background (A) using a Merge (multiply).
– You can get the luminance of the background simply by adding a Saturation node to the background, and setting the saturation value to 0.
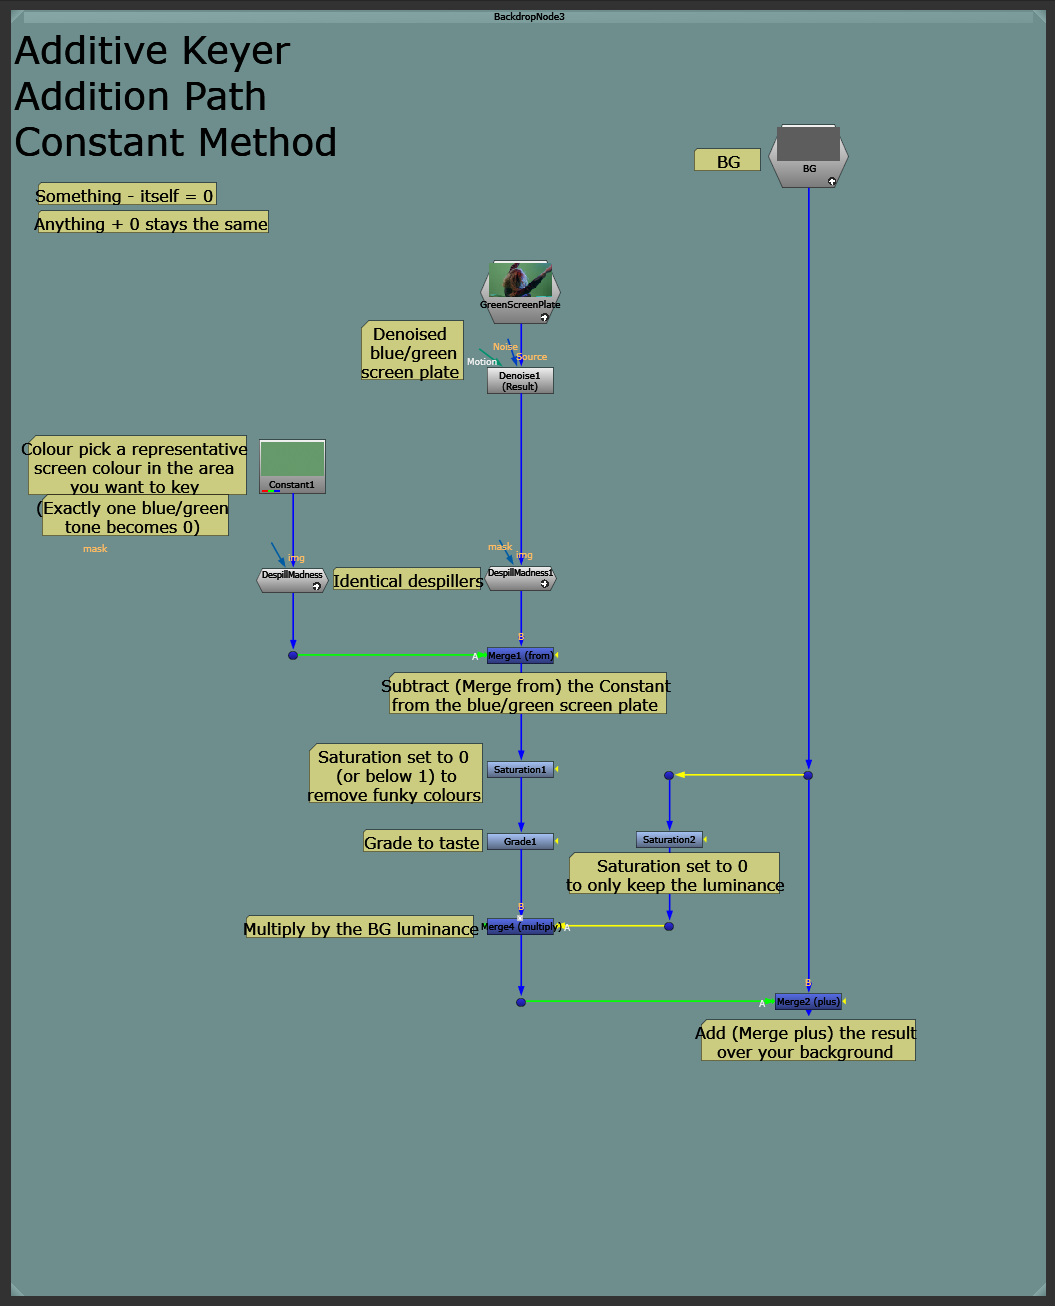
Limiting the added luminance by the background’s luminance.
This can help balance out the image and integrate the fine details better. It can also help reduce the unwanted background values coming through from the blue/green screen plate.
It might, however, start to kill some of the bright details. So, mix back the Merge (multiply) node as needed.
Next, as mentioned earlier, make sure to mask your additive key. Get rid of any garbage coming through from the blue/green screen plate, like C-stands, folds, shadows, lights, tracking markers, equipment, etc.
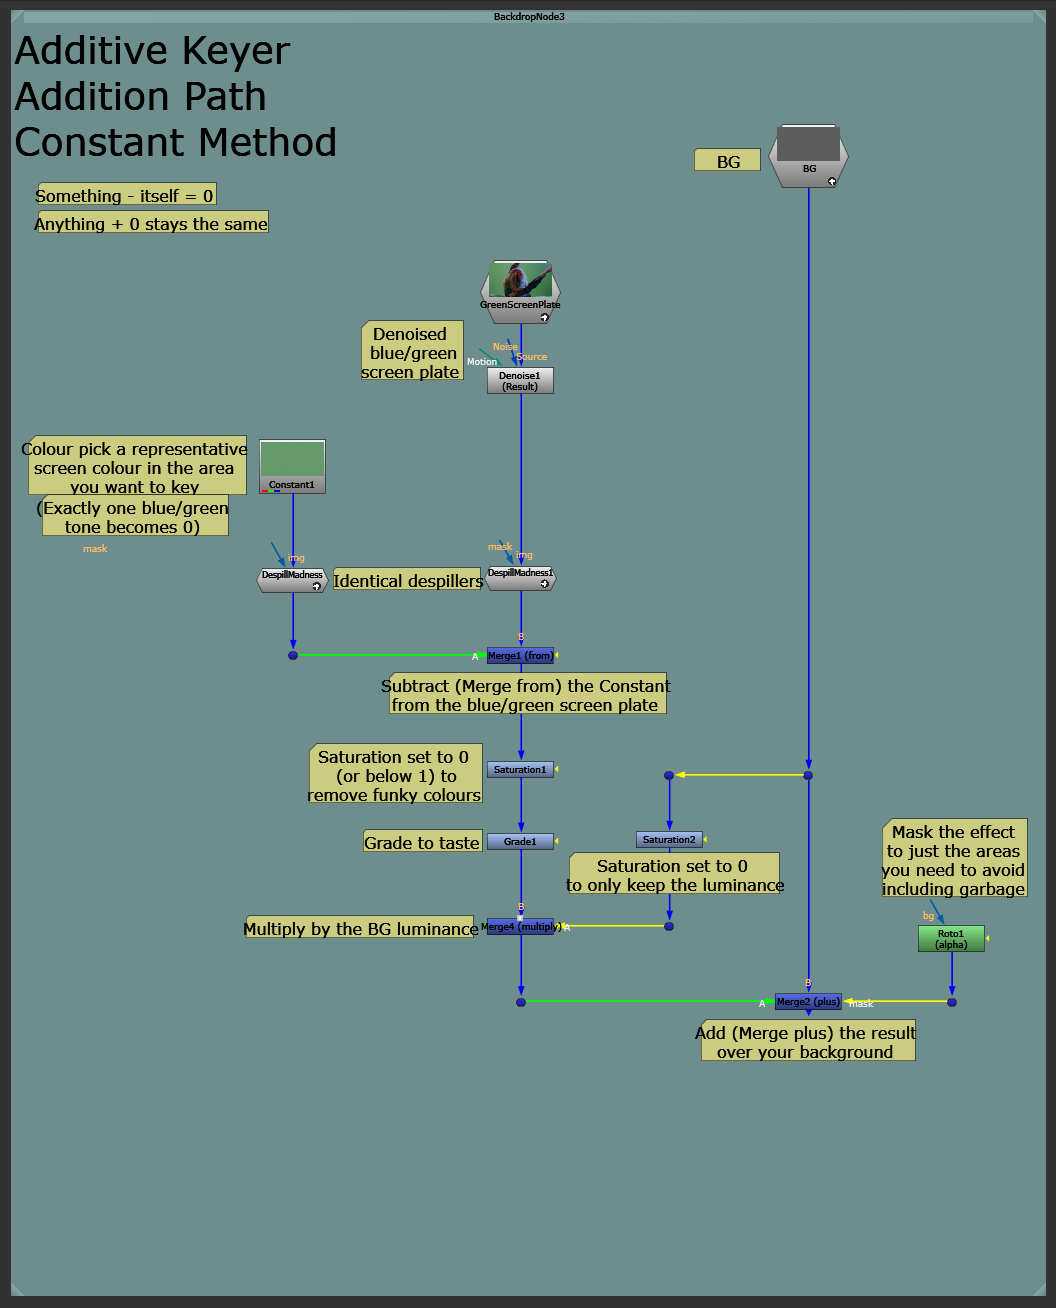
Masking the additive key.
And finally, merge your standard key on top at the end:

The final setup for the Constant method on the Addition path.
Next, let’s look at the second method on the Addition path:
Addition – Clean Plate Method
The second method is almost exactly the same as the first one – just instead of a Constant node, you connect a clean plate.
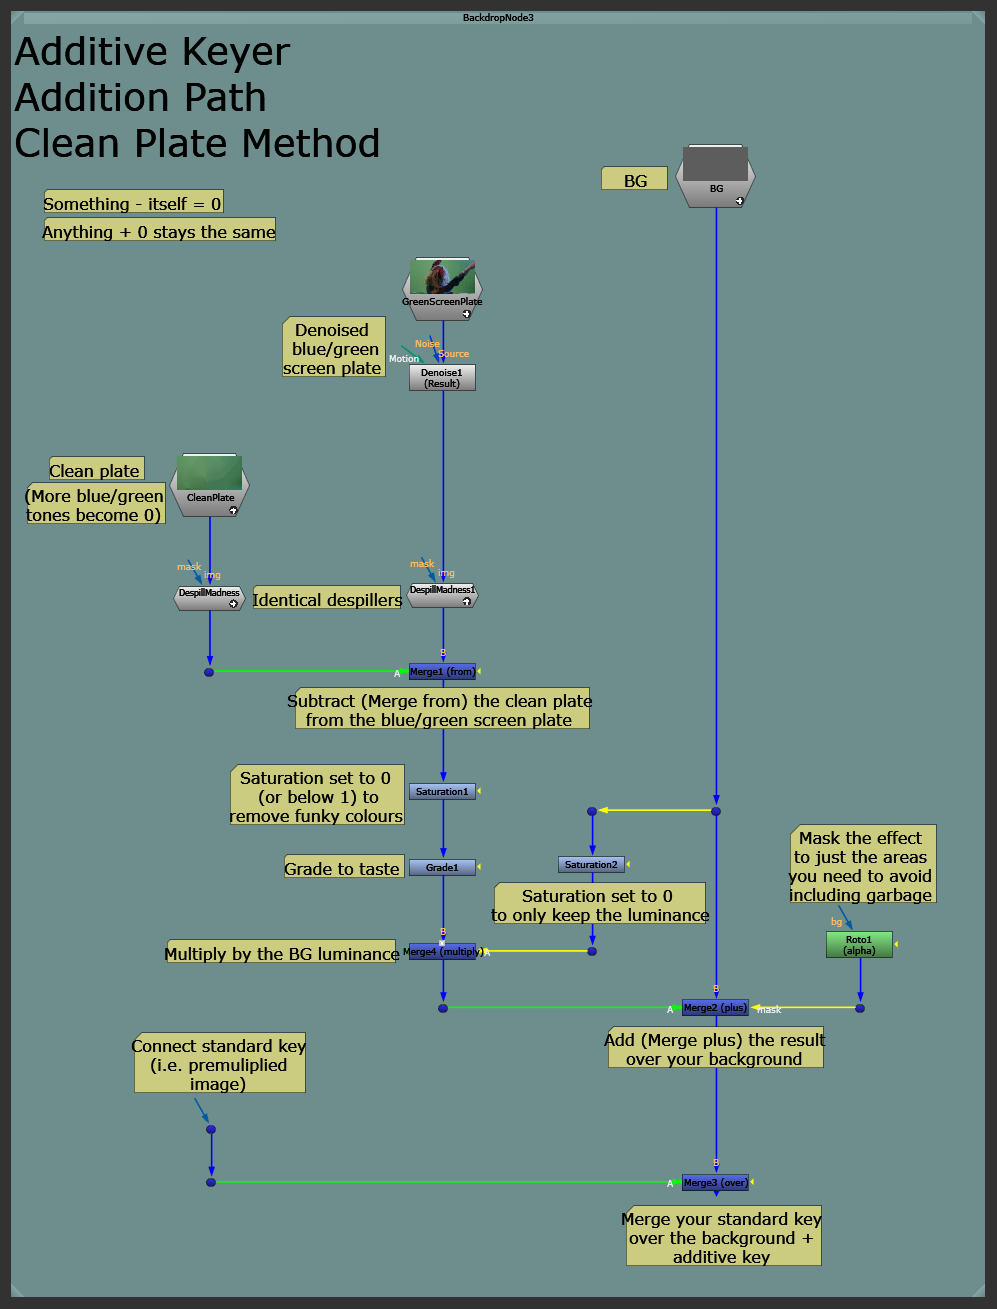
The setup for the clean plate method on the Addition path.
A clean plate is, ideally, a perfect copy of the blue/green screen plate without any of the actors or objects to be keyed in it.
It includes all of the different shades of blue/green, like gradients and shadows, so that when you subtract it from the blue/green screen plate, all of the blue/green tones (or at least many more than with the Constant method) will become 0.
And so, fewer variations in the blue/green shade will be captured by the additive key, creating a cleaner key.
This means, the additive key will not affect the background in most of the areas where there is a blue/green screen in the plate.
Depending on your shot, the clean plate method might work better, or the Constant method might work better.
If, for instance, there is a glow or a bloom in the plate that you would like to keep, the Constant method might help capture that better.
Or, if the blue/green screen is very uneven and is causing a lot of shadows to be added to your background, the clean plate method might be the better option.
Next, let’s take a look at the second path:
Multiplication
This path uses a variation of the additive key which takes advantage of multiplication instead of addition.
It gives a very similar result to the previous Addition method, but can sometimes look a little bit more contrasted. (However, the result can be graded more mellow).
To understand how it works, you need to know two more basic things:
- Something divided by itself becomes 1 (white).
- Anything multiplied by 1 stays the same.
The way you set it up is very similar to the two previous methods.
Let’s look at the first method on the Multiplication path:
Multiplication – Constant Method
Similar to before, take a Constant node and colour pick an area of the blue/green screen that you would like to key.
But, instead of subtracting the Constant from the denoised blue/green screen plate, divide the denoised blue/green screen plate (A) by the Constant (B) using a Merge (divide).
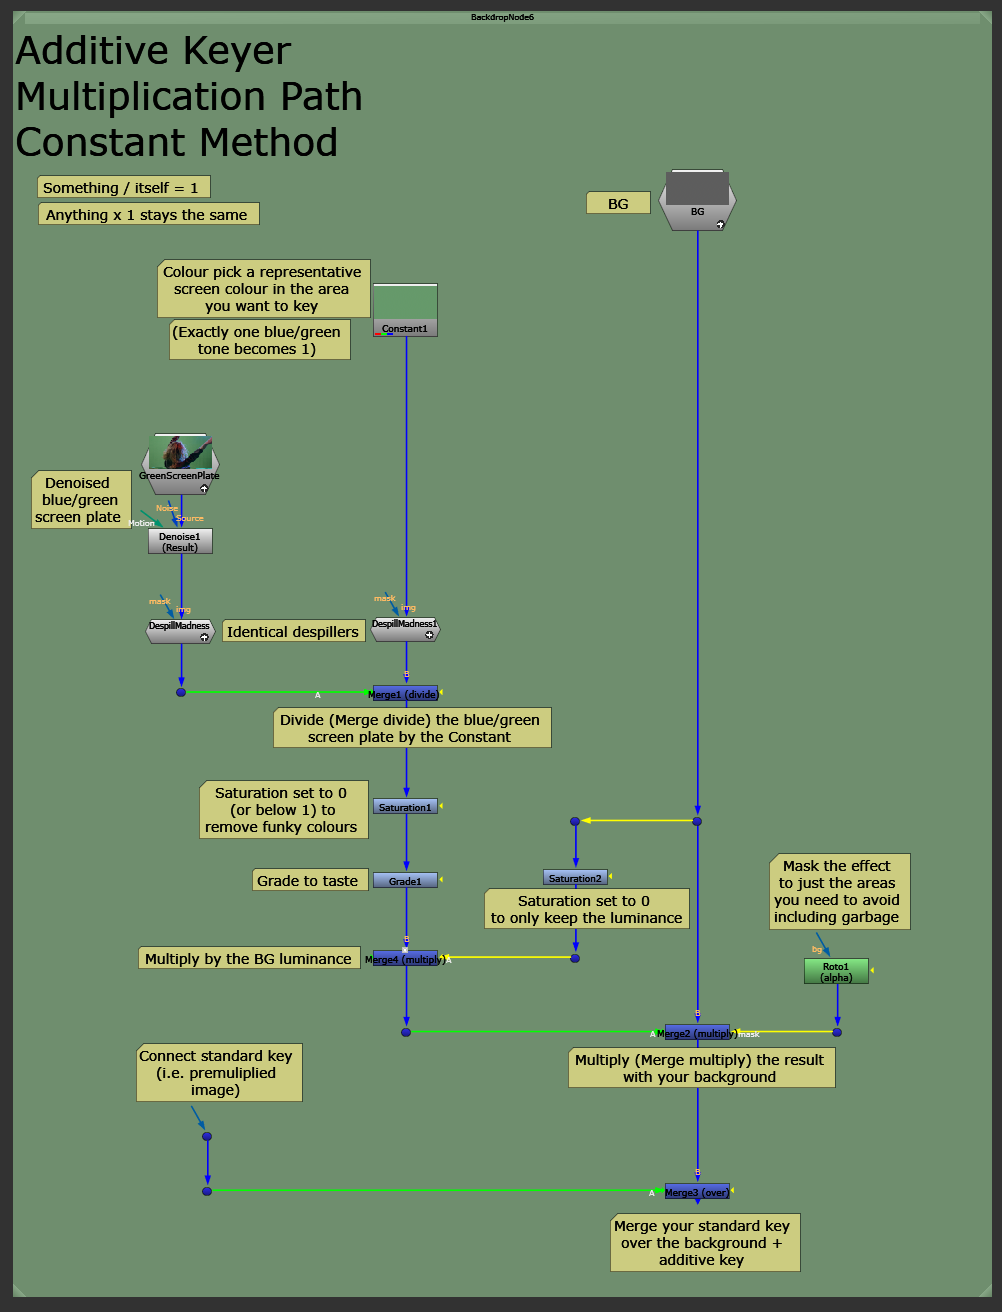
The setup for the Constant method on the Multiplication path.
By dividing the blue/green screen by the blue/green colour, you make the blue/green screen white (a pixel value of 1) in that area.
However, in areas where there isn’t a blue/green screen, like where the actor is, there will be different values left over from the division:
Where the denoised plate was brighter than the picked blue/green colour, there will be values above 1. And, where the denoised plate was darker than the picked blue/green colour, there will be values lower than 1.
By multiplying these values (A) with the background (B) using a Merge (multiply), you then superimpose the actor onto the background, without any (or with very little) of the blue/green screen.
Shortcut Using A Grade
Like I showed in my Multiplication Key Technique guide, instead of dividing the denoised blue/green screen plate by a Constant node, you can use a shortcut:
Add a Grade node to the denoised and despilled blue/green screen plate, and colour pick the area of the despilled blue/green screen that you would like to key as the whitepoint.
Setting a value as the whitepoint (remember white = 1) will divide the image by that value, turning that value into 1, and every other value to above or below 1, proportionally. Just like dividing by a Constant.
The rest of the setup is exactly the same as we have seen before:
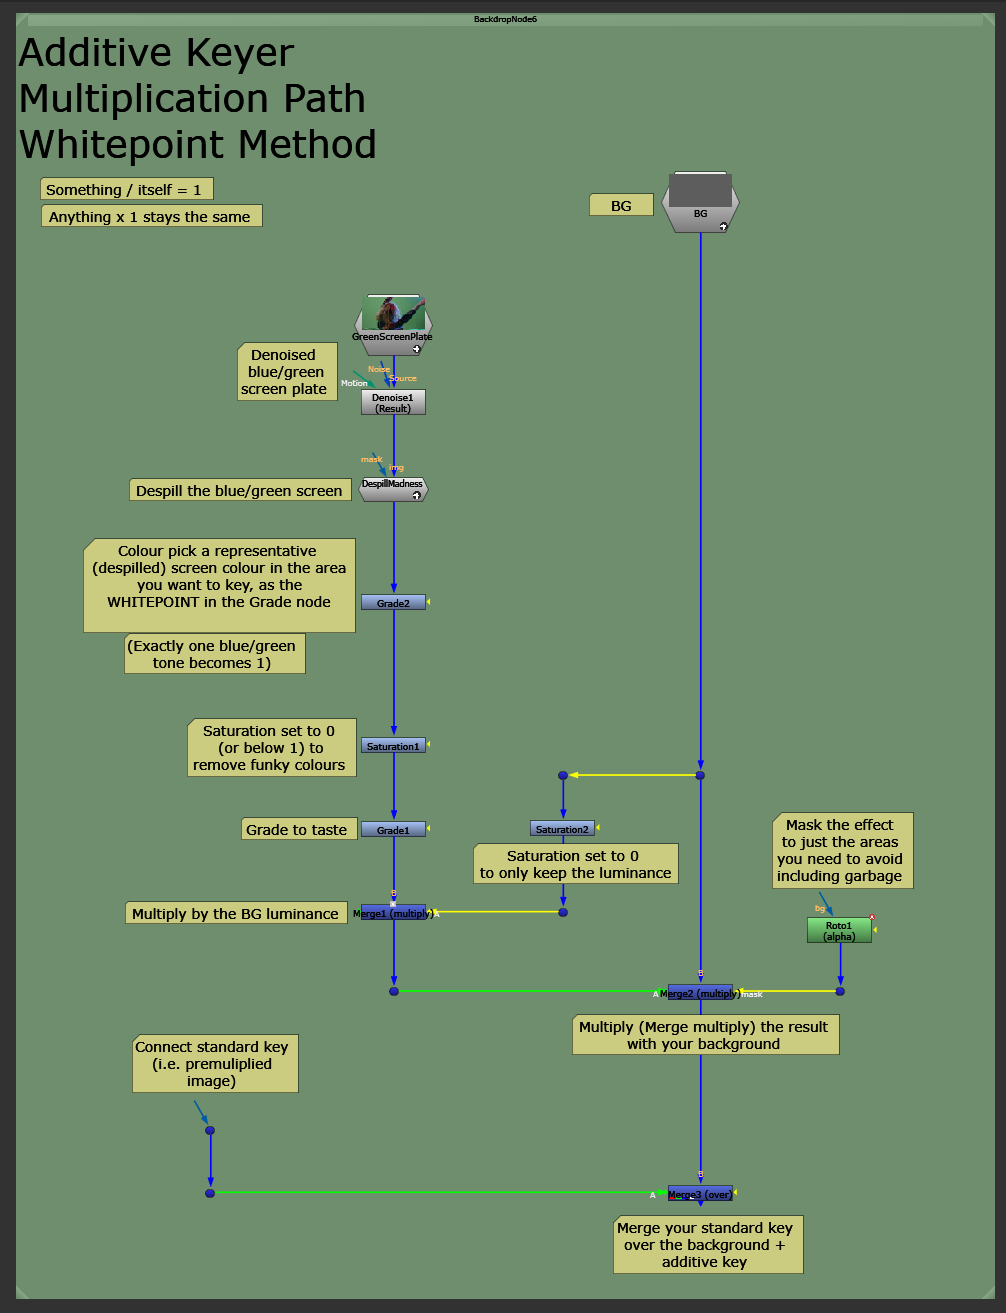
The simplified setup for the Constant method on the Multiplication path.
Multiplication – Clean Plate Method
The second method is almost exactly the same as the first one – just instead of a Constant node, you connect a clean plate.
Like before, fewer variations in the blue/green shade will be captured by the additive key, creating a cleaner key.
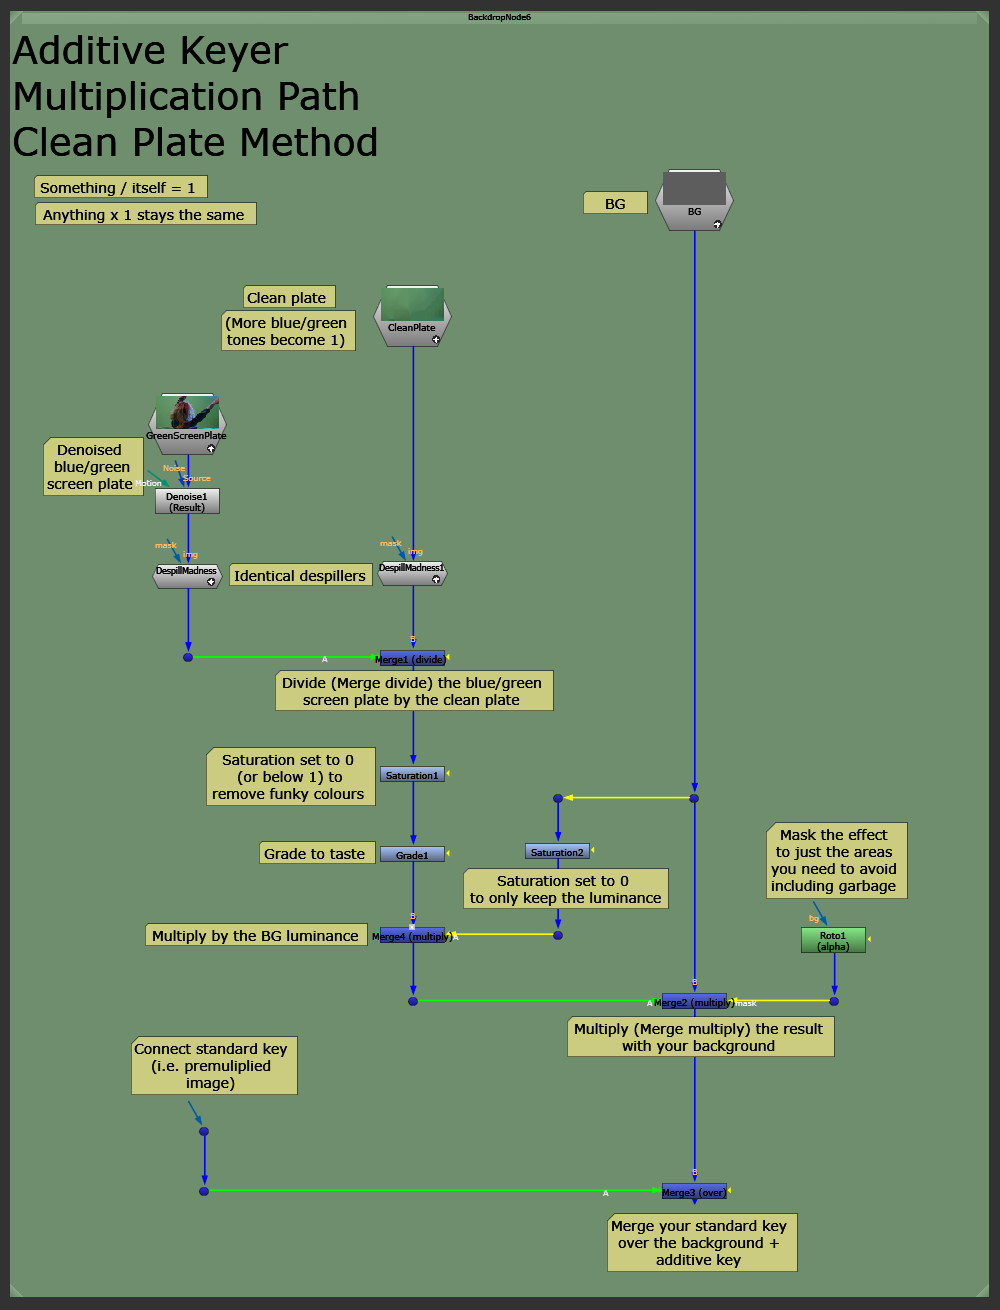
The setup for the clean plate method on the Multiplication path.
Since the two paths, and each method on the paths, create slightly different outcomes, you can mix and match them as you please.
Keymix in what works best for different sections of your blue/green screen. Or, you can use one setup for just the dark details, and one for just the light details, as shown in this video.
Additive Keyer Tool
To avoid building these setups over and over again when you do keying work, consider turning them into a tool.
There are also great additive keyers available, such as AdditiveKeyerPro from the Nuke Survival Toolkit.
I hope you found this tutorial useful. For more Nuke tips & tricks, see Nuke.